Help, please: Need help with deep relief cutting

aaronhlin

Member
Joined
Dec 12, 2019
Messages
10
Hello,

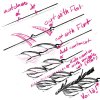
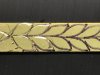
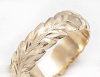
I am practicing on deep relief cutting. I am having difficulty trying to create a wider cut. I am currently using a square graver that has been grinded down to a flat with 45 degree face and 15 degree heel. The heel is almost 1mm (short). In addition, I am using Lindsay hand control airgraver. As for cutting, I try to dig one side of my graver to create a wider cut but it seem's impossible. I've always rotated the vice when turning my cuts. If anyone can give me guidance, I would really appreciate it! Lastly, I have attached a photo of my practice plate as well as another photo that I want to achieve.
 

Attachments

  • IMG_4852.jpg
    IMG_4852.jpg
    115.6 KB · Views: 145
  • E2D05C4D-7F55-4D47-BE6C-7B7D964E5E11-6358-0000072161EA7173.JPG
    E2D05C4D-7F55-4D47-BE6C-7B7D964E5E11-6358-0000072161EA7173.JPG
    41.9 KB · Views: 151

allan621

:::Pledge Member:::
::::Pledge Member::::
Joined
Jan 10, 2007
Messages
365
Flat graver and a square graver.

This is the process I use. The first thing is to lay it out evenly and scribe it in. Then lightly cut it with a square graver ( I use a 90 degree graver but nothing too wide ). This is to create a track for the flat tool to follow. And then lightly cut in the center of the leaf for the center bright cuts.

The flat tool should be highly polished. When all the basic cuts are in place cut the center of the leaves with the flat tool, but in two directions. You cut the right half up from the bottom of the leaf going to the top; making a series of wider cuts until that half oval space you've scribed is full. Then turn the work upside down and do the same thing but this time going from the top of the leaf to the bottom. The important point is to make sure you don't go out of the center track.

Then you use the flat tool to cut the outside of the leaves. There are two kinds of cuts on the outside. The cuts on the left leaf outside and the right leaf inside use the left side of the flat tool. The cuts on the left leaf inside and the right leaf outside use the ride side of the flat tool. ( I learned this from Sam Alfano 20 years ago ) . And this takes practice to get the cuts looking right.

Take the time to practice it.

Allan
 

mitch

~ Elite 1000 Member ~
Joined
Jul 23, 2007
Messages
2,636
I don't do a lot of this sort of work, but big, bold, bright-cutting is one of the rare occasions where I'll hook up the Magnum handpiece to my Gravermax G8. You might try using a heavier/heaviest piston in your Lindsay and instead of making multiple passes establishing lines, etc., practice cutting in one shot.
 

jerrywh

~ Elite 1000 Member ~
Joined
Jun 7, 2007
Messages
1,032
Location
Baker City , Oregon
A few months ago I was trying to teach a guy how to do some heavy cutting on one of his customer floor plates. No matter how hard he tried the lindsay graver just never had the power to do the job. just saying.
 

Dave London

~ Elite 1000 Member ~
Joined
Nov 12, 2006
Messages
1,765
Location
Colorado
It appears you are cutting brass, use the heavy piston , open all the ports and crank the air pressure up to 90 psi
 

allan621

:::Pledge Member:::
::::Pledge Member::::
Joined
Jan 10, 2007
Messages
365
No offense guys but I do ring carvings a couple of times a week. And even if its brass, hard brass, it doesn't call for bringing out the big guns. (Now if I was doing a floor plate, that calls for more power) But it looks like he's trying to match his sample photo which is a ring carving.

I have a Lindsay tool, and for jewelry engraving, its basically permanently set at 30 psi and the power adjustment ring is set so that adjustment ring just cover the holes. It cuts strong but very smooth so the bright cuts are basically flat which no tool marks. And it doesn't matter whether its a baby cup, a wedding band or a brass sample to show the customer, I don't change it. And the GRS equipment works just as well. You just have to find the power and pulse that works for you.

As far as practicing making just one cut, I'm not sure about that either. I was taught ring carving by a true master, Jack Devitt of Philadelphia. He was all about shaving the metal in multiple passes, getting the right level and look by degrees. He emphasized using the right tool in the right widths to achieve efficiency. He really believed in being efficient. The key was going as slow as possible, even when practicing. Especially during practicing. And by doing that you pick up speed naturally without even realizing it. You can only make one cut at a time and worrying about the next one will screw up the one you working on.

That's how I was taught and I've been doing this for 40 years. So far so good.

Allan
 

Dave London

~ Elite 1000 Member ~
Joined
Nov 12, 2006
Messages
1,765
Location
Colorado
I agree Allan , I use 30 psi 98% of the time and I mostly work on guns and knives. I was just trying to explain how to get more power if he felt he needed it MTC YMMV
 

aaronhlin

Member
Joined
Dec 12, 2019
Messages
10
Thank everyone for commenting. I will try to outline the design with a square graver and later deep cut with flat.
 
Joined
Mar 19, 2012
Messages
93
If a power-graver of any kind can't do jewelry work.. It's probably broken.. I can see really deep cuts in steel giving problems but, even with a Lindsay you can crank 60psi of pressure in it if needed...

And for this kind of job 30 are just fine, it is not done in one single cut, first you block in the volumes then you refine them.. So it is a v for the division of the leaves and maybe a flat for the shaping of it (just gave it a quick look but a decent v should do the trick)
You might want to get an onglette to split the leaves and trim them as you shape them.

And yes, many careful and shallow cuts are needed to achieve that look, not one single plow cut that can lump metal, push it around or generally come out like an amateur's job

Can probably be done that way, but I wouldn't advise it
 
Joined
Mar 19, 2012
Messages
93
Quick sketch of how I’d tackle it if I had to reproduce your pic, note that you can “build up” your deep cuts using multiple passes.

hope it helps

S.
 

Attachments

  • D00C8E5E-D523-4E2B-84CB-E4D02A5E469D.jpeg
    D00C8E5E-D523-4E2B-84CB-E4D02A5E469D.jpeg
    163.6 KB · Views: 81

Sponsors

Top