Hi to all

Smallpatch

Member
Joined
Dec 5, 2006
Messages
19
Location
Mesa, Az
Hi Gang,

Well, this is my first time here.... be gentle with me.

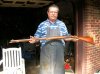
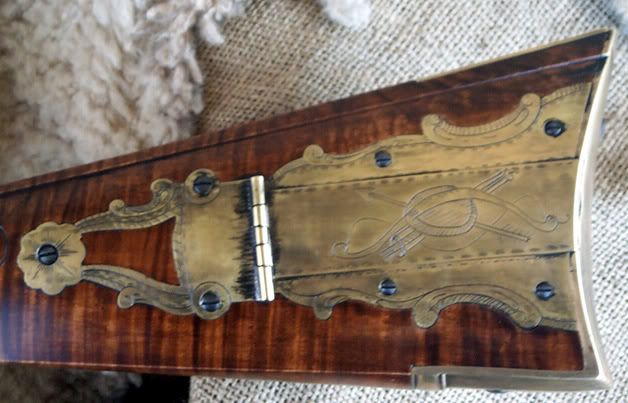
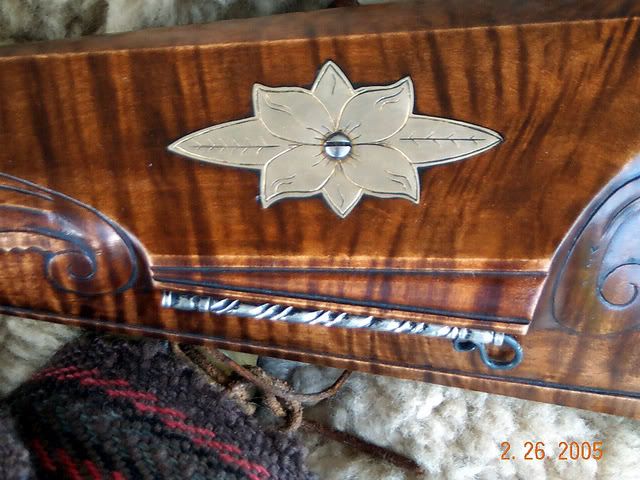
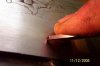
I am a "primitive engraver" and a rank novice at that. Primarily, I engrave patchboxes, and inlays on Pennsylvania/Kentucky rifles that I build.

Wanting to improve my abilities, I ventured here.

I have long been a member of several other boards and have found them very valuable and infomative to improving my craft skills.


Hope to do the same here.

Thanks so much.;)
 

Sam

Chief Administrator & Benevolent Dictator
Staff member
Joined
Nov 6, 2006
Messages
10,491
Location
Covington, Louisiana
Hello, and welcome to the Cafe. You'll find a friendly bunch that's willing to help and share information. Post some photos of your rifles...I'm sure everyone will enjoying seeing your work. / ~Sam
 

Ken Hurst

Elite Cafe Member
Joined
Nov 17, 2006
Messages
322
Location
Robersonville, N.C
Welcome aboard Mr. Smallpatch ---- you'll find all here are ready and happy to help ! You'll not find a better, friendlier bunch of people to work with re. your questions. Ken
 

KSnyder

Elite Cafe Member
Joined
Nov 13, 2006
Messages
613
Location
Toledo, Ohio
Smallpatch,
Welcome aboard, I also build flintlocks since 84'. that's how the engraving bug bit me. pic of a recent lefty I made. I cut the old way also, hmr & chsl.
This is a great forum, especially for us greenhorns.
Kent
 

Attachments

  • DSCN0249.jpg
    DSCN0249.jpg
    46.7 KB · Views: 78

William Grubb

Elite Cafe Member
Joined
Nov 10, 2006
Messages
119
Location
Haubstadt ,In
Hi Smallpatch,
I too have built a Flintlock, everyone here is willing to help,with any questions you may have, so don't be afraid to ask.There is a good bunch of knowlegeable guys ,and gals on this forum. Welcome aboard.
 
Joined
Nov 28, 2006
Messages
96
Location
New Port Richey Fl.
Old rifles

Hi Mr. Smallpatch: I would be very Interested in seeing your work, This is where my interest in engraving started, my fathers gun shop always had an original flintlock or percussion gun from those years leaning against the wall. Those old guns took my third dimensional technicolor imagination for a ride.
Thanks Jack Davenport.
 

Cody

Elite Cafe Member
Joined
Nov 10, 2006
Messages
136
Welcome aboard Dane, your in for a real treat. This place is the ALR of engraving.

Cody
 

Smallpatch

Member
Joined
Dec 5, 2006
Messages
19
Location
Mesa, Az
Hi Guys,

Thanks for the welcome. I'll try to post a couple of photos, maybe showing some of my primitive engraving.
Looking for all the help I can get.


Smallpatch

Member
Joined
Dec 5, 2006
Messages
19
Location
Mesa, Az
OK Gang,

Where do I go from here. I know my work is very, very basic. Done strictly with a#52 nd #51 round graver. I'd like to learn the real way. Just ordered a video by Lyton McKenzie.
Would actually like to learn tools and techniques to go to the next level.

Any comments would be appreciated. Realize that what I'm talking about is Early American Longrifle engraving. Borders are very important, and I'd like to learn about them. One is called nick and dot??? Done well, it's beautiful.

H-E-L-P !!
 
Joined
Nov 28, 2006
Messages
96
Location
New Port Richey Fl.
borders and such

Good photos! it took awhile for the third one to load but the wait was worth it. If I had to cut the border that you illustrated in the photo I Would do the layout and concentrate on doing all of the dots first then the nicks. Just my idea on how I would do it. How did you get all of the screw slots to line up on that gun? Thanks Jack Davenport.
 

Cody

Elite Cafe Member
Joined
Nov 10, 2006
Messages
136
Dane, I do the nick & dot with a flat graver with a 25 deg heel. I first do a light boarder line with a square but it should be very light, even a scribe line would be fine. Then put the corner of the flat on the line and drive it in at a fairly steep angle then drop the back (handle) of the graver and bring it back out. The corner of the graver stays on the line and makes the long baseline of the diamond, the drive in makes the one side of the diamond and the drive out makes the other. The steep 25deg heel allows you to come out easier with more control. The 'dots' are actually tiny diamonds done the same way but in the other direction.

Cody

BTW, I really like your engraving. It has a quality and character about it that is in keeping with that of the originals. I've never been able to find that warmth and charm.
 

Smallpatch

Member
Joined
Dec 5, 2006
Messages
19
Location
Mesa, Az
Cody,

What size flat graver?? I have a couple, I think I understand, I'll give it a try. Thanks for the compliments. I think my engraving is atrocious.(sp). Stricktly self taught self interpretation of photos of originals I've seen.
Jack, un-aligned screw slots are one of my pet peeves. I work very hard to counter sink them all to line up. I just think it looks "finished" this way.

Thanks for all your advice and comments.

Keep 'em coming.
 

Cody

Elite Cafe Member
Joined
Nov 10, 2006
Messages
136
SP, I use a flat that is 1/16" wide. Don't know what # it is.
 

Smallpatch

Member
Joined
Dec 5, 2006
Messages
19
Location
Mesa, Az
Cody,

I guess I'm just dense. Are we talking about a triangle or a diamond??
Any chance of photos??
Thanks in advance.
 

KSnyder

Elite Cafe Member
Joined
Nov 13, 2006
Messages
613
Location
Toledo, Ohio
Small flat tool, looks kinda like a cold chisel. I like a 50deg. face & 15 deg heel , I seem to get better control with the 50 face.
Kent
 

Cody

Elite Cafe Member
Joined
Nov 10, 2006
Messages
136
Sorry, I meant triangles:( . I'll do few on a plate and post pics.

Cody
 

Cody

Elite Cafe Member
Joined
Nov 10, 2006
Messages
136
Here's a couple pics. The first pic shows the graver cutting the first half of the triangle. The back of the graver is then dropped and the graver comes out cutting the second half of the triangle. Graver has a 60deg face and 25deg heel. The second pic shows some nick & dots completed. I find it important to focus attention on the corner/edge of the graver as it cuts the baseline of the triangle along the scribe line. The first 7 (cut from right to left) show some of the issues encountered when focusing on the leading edge cutting the peak of the triangle rather than the corner/edge cutting the baseline. The next 7 are cut focusing only on the baseline of the cut. Hope this helps

Cody
 

Attachments

  • nick.jpg
    nick.jpg
    24.5 KB · Views: 46
  • nick1.jpg
    nick1.jpg
    26.7 KB · Views: 46

Smallpatch

Member
Joined
Dec 5, 2006
Messages
19
Location
Mesa, Az
Cody,
First, thanks so much for the photos, now comes the questions.

My interpretation is this....
The leading edge of the graver is following the base line that you have made, and the opposite edge tipped above the metal. The graver is then driven in til the opposite edge just barely cuts into the metal, at that time, you begin to tip the handle down and drive the graver back out of the metal at the same angle from the base line. So the result is that the base line side of the graver cuts the entire base of the triangle, and the opposite side just cuts the very tip???? Sort of scooping out the triangle as it were.

I hope that made sense???

Secondly, are you pushing the graver, or is it hammer driven??
 

Cody

Elite Cafe Member
Joined
Nov 10, 2006
Messages
136
Dane, I'm not sure i follow your description so let me try a different approach. When I talk about "the leading edge" I'm referring to the front edge of the graver, the bottom of the face, the edge created by the face and heel. The "side edge" is the edge that angles up from the leading edge to the upper flat of the graver, up the side of the face. So, if you put the left corner of the graver on the scribe line and tip the graver to the left, the leading edge will lift off of the work and only the very corner will be touching the work. Then drive the graver in along the scribe line. The "side edge" will follow the scribe line and make the baseline of the triangle and as the graver goes deeper, the leading edge will progressively widen the cut creating the first side of the triangle. Then as you drop the back of the graver and come out, the leading edge will progressively narrow the cut createing the second side of the triangle. It's important IMO to focus on the baseline of the triangle to ensure that the cut follows the scribe line. If you go straight ahead, you will end up with fishbellied triangles because you have the graver tipped to the side so as you go deeper, the side edge will cut an abreviated version of the peak you are making on the other side. You have to cut away from the scribe line slightly going in and back towards it coming out. It might sound complicated but really isn't. Just watch your scribe line and make sure that the graver cuts right along it. If you get triangles that look like any or all of the first 7 in my second pic, it's because your not watching the scribe line. I wouldn't want to try to cut these with the push method as they are way to deep (for me at least). Maybe others can but I strongly recommend a hammer. If my description is not clear, please ask more questions.

Cody
 

Latest posts

Sponsors

Top