
You are using an out of date browser. It may not display this or other websites correctly.
You should upgrade or use an alternative browser.
You should upgrade or use an alternative browser.
New iGraver tutorial - shading variations
- Thread starter Sam
- Start date
Tim Wells
~ Elite 1000 Member ~
Thanks for the eye opening tutorial.
I enjoy looking for those subtle details in other engravers work. I did this for three days at the FEGA show and felt like my eyes bled from looking down so long and concentrating so hard. I went in one morning at 10 and started looking and when I looked up to see where I was it was dinner time!
Man, my neck hurts...
Thanks for the tutorial Sam, I have a questions here, do you scribe the shading line first to cut ? where do you start to cut from the top or bottom? Isn't that difficult to cut deeper when you go down to the bottom?
I practiced a little bit, but can't come up wiht the right shading.
Thanks, Tez
I practiced a little bit, but can't come up wiht the right shading.
Thanks, Tez
Tim Wells
~ Elite 1000 Member ~
Tez,
Shade lines are normally cut from the end of the leaf toward the root of it or where it begins, or thin to thick as Sam says. Some people use onglettes, 90, or 120 degree gravers and they yield different effects. I personally like the 120 or 90 and what you do is start where you think the shade lines need to begin and just let the graver lightly scratch the surface on its heel.
Then as you go toward the termination point you gradually lift the back of the graver and the line will get a taper to it so that it is skinny at the end of the leaf and thicker and deeper at the root. When the shading cuts are done this way rather than each line being the same width all the way down , it gives the shading much more character and life.
This was a big hurdle for me as well so I studied this site and any engraving I could get a picture of to see how they did it. I particularly focused on this at the FEGA show this weekend as I studied hundreds of guns. You can also see the tips and tricks shading section. When you taper the lines and they come together at the root you actually cut into the side of the previous line and if you do it right you will consistently converge these lines in the same spot longitudinally. This will give the leaf a lifelike appearance. Look at any of Sam's work in the gallery and you'll see what I mean. Shade lines aren't scribed by the way.
I'll give you a tip that Marty Rabeno gave me at the show on shading, I apologize for making such a long winded post but shading kicked my butt and still does sometimes and I don't want it to be such a struggle for anyone else.
Draw a leaf and draw a shade line in the middle from near the tip to the root of the leaf. Now draw one on either side of it half way between the center line and the edge. If you keep adding lines in the middle of two lines you already drew (or cut) your mind will automatically divide up the space and you will reach the line density you want for the effect you are trying to achieve. Don't be tempted to cut too many lines when less will do the job.
He also said get used to and master controlling where you put a few lines and build on that rather than becoming a line factory and cramming a bunch in there thinking more is better. Shading lines to me are like musical notes in a tune. Sometimes less notes are better than a blast of a bunch of em'.
You're not alone, Tim. I'm beginning my 9th year of teaching and shading seems to generate the most frustration from students, beginner to advanced. I don't exclude myself either...sometimes it kicks my butt.
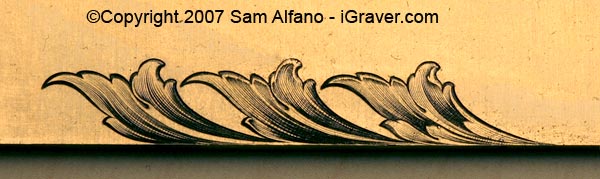
Tim's correct in that the lines are cut thin-to-thick, and they get deeper and wider as they travel toward the base of the leaf. Following the thin-to-thick rule, looking at a shade line should instantly tell you in what direction the line was cut. The only exception I can think of at the moment would be if there's an object in the way and you simply cannot cut in that direction, and you are forced to cut thick to thin.
I don't scribe shade lines, but on a very large or symmetrical leaf, I sometimes mark a center shade line, cut it, and then shade on either side, with the center shade like acting as a guide for the rest of the lines. I do this about 2% of the time. Normally I just start cutting.
That's good advice from Marty. In music it's not always what you play that makes you a good musician, but what you don't play. Same goes with shading. There should be varying degrees of lights, greys, and blacks, and not a solid mass of lines.
The examples in this tutorial were cut with a 120° graver, which is my graver of choice for 95% of my line work.
If you can, study the shading work of Winston Churchill.
Tim Wells
~ Elite 1000 Member ~
I hope this don't take me over my upload size limit but I reduced a picture I took this weekend. It's something I think Eric Gold did but I'm not sure.
I captured it because I love the softness of this type of scroll work and it will illustrate what we're talking about both inside the leaf and outside. It reminds me of some of the pictures of Winstons work that I've seen, wondering how he got that soft feathery effect. Also there is another style of shading that Robert Swartley does to ecanthus leaves. I love this gun and nearly wore it out looking at it.
I captured it because I love the softness of this type of scroll work and it will illustrate what we're talking about both inside the leaf and outside. It reminds me of some of the pictures of Winstons work that I've seen, wondering how he got that soft feathery effect. Also there is another style of shading that Robert Swartley does to ecanthus leaves. I love this gun and nearly wore it out looking at it.
Attachments
-
 IMG_0919R50.jpg87.2 KB · Views: 171
 -
 IMG_0953R50s.jpg86.6 KB · Views: 150
Last edited:
Who cannot marvel at Swartley's classic acanthus leaf engraving? Lovely stuff. I wish the photo showed a better closeup. The other gun (Eric Gold?) is nicely engraved and has a light, airy feel to the design.
Tira
~ Elite 1000 Member ~
Thanks, Sam. Another lightbulb just fired and another piece of the puzzle fell into place. These tutorials really get one thinking. Very subtle changes and yet they make all the difference.
Tim Wells
~ Elite 1000 Member ~
Ask and ye shall recieve? I didn't know what close up you wanted, the leaves or banknote scene so here's all three.
Attachments
-
 r40s.jpg107.2 KB · Views: 83
 -
 IMG_0956r40s.jpg93.7 KB · Views: 76
 -
 IMG_0958r40s.jpg109.4 KB · Views: 88
Mike Cirelli
~ Elite 1000 Member ~
Another wonderful tutorial. The hardest part is finding the drawer in my brain to keep all this stuff in. Maybe you should put up a tutorial or thread on mind management")
Thanks for sharing the knowledge.
Mike
Thanks for sharing the knowledge.
Mike
Patternweldor
Member
Shading Tutorial
Thank-you Sam... for a very helpful tutorial, shading always seems to be a challenge, and you answered, and solved some questions I have surely had during the process. I can't wait to put the new information to use.......
Thanks again..for taking the time...
Chris
Thank-you Sam... for a very helpful tutorial, shading always seems to be a challenge, and you answered, and solved some questions I have surely had during the process. I can't wait to put the new information to use.......
Thanks again..for taking the time...
Chris
Robert Morales
Elite Cafe Member
Another wonderful Tutorial! Makes it worth getting up this morning, it's 14 outside. One thing I have found out is I need to visualize my shading when drawing. I have cut leaves and when I go to shade them they are impossible to shade and keep the flow of the design. Tim, thanks for the pics from the show. Thanks
pilkguns
~ Elite 1000 Member ~
One thing I have found out is I need to visualize my shading when drawing. I have cut leaves and when I go to shade them they are impossible to shade and keep the flow of the design.
yes, this is problem I frequently see with students, they cannot properly shade finely because the leaves are awkwardly drawn. Its like trying to slide down a set of stairsteps. You just can't do it smoothly cause the surface is too square.
Bump, bump, bump
Swartlye's work is total eyecandy. i love the modeled gold inlays.
Another wonderful Tutorial! Makes it worth getting up this morning, it's 14 outside. One thing I have found out is I need to visualize my shading when drawing. I have cut leaves and when I go to shade them they are impossible to shade and keep the flow of the design. Tim, thanks for the pics from the show. Thanks
Robert: unfortunately not all leaves are shading-friendly. I think this is where instinct and experience come into play.
ken dixon
Elite Cafe Member
Thanks Sam, It was very helpful. Could you explain what graver you cut the little teardrop out with? Thanks Ken
Thanks Sam, It was very helpful. Could you explain what graver you cut the little teardrop out with? Thanks Ken
Glad it helped you, Ken. Everything was cut with a 120. For the teardrop, dive the graver into the metal and pop it out quickly.
Marcus Hunt
~ Elite 1000 Member ~
I think Tim makes a point that really deserves emphasizing and that is to not use too many shading lines when less will do. This is really important as so many times one sees engravings by inexperienced engravers that think cramming a leaf full of shading lines makes it look better. In my opinion the microscope is to blame for this as we can now magnify to such an extent putting line after line into even a small leaf is easy. However, all the naked eye sees is a black blob! Remember, negative space is as important to modelling as shading is and it ain't always what you put in as what you leave out that can make something spring to life.
I like Tim's music allegory; I once saw the reformed Lynyrd Skynyrd and although there were about 10 members of the band I could hear every individual instrument and it was fantastic. They'd really concentrated on getting the balance perfect. In comparison some semi-pro bands I've seen have been dreadful because all you can hear is a cacophony of noise. They think they are being clever by adding more and more effects and don't balance the rhythm and lead and all that happens is a mush of sound. This is like shading; if three lines will do the job for the unaided eye don't try and stick a dozen in the same space.
cheers,
Marcus
Sponsors


