Poor engraver's photo tent, deluxe model

rod

~ Elite 1000 Member ~
Joined
Nov 19, 2006
Messages
1,609
Location
Mendocino. ca., and Scotland
My thanks to who ever first posted this good idea!

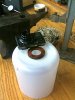
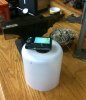
I have added a wood ring that nicely supports the camera without shake, and usually put the camera on "hands off" delay setting.

Rod
 

Attachments

  • IMG_0080.jpg
    IMG_0080.jpg
    64.1 KB · Views: 161
  • IMG_0079.jpg
    IMG_0079.jpg
    68.5 KB · Views: 157

Sandy

Elite Cafe Member
Joined
Nov 13, 2006
Messages
683
Location
Kansas
Rod,
I must have missed the original thread.:beat up: What did you use for the tent?:confused:
Sandy
 

rod

~ Elite 1000 Member ~
Joined
Nov 19, 2006
Messages
1,609
Location
Mendocino. ca., and Scotland
Hello, Sandy,


Compliments to the original poster of the idea, it is just that I could not remember who first posted, maybe some one will direct us? I find the original idea excellent, it uses the top of the plastic bottle to be the camera holder, and works well. Here, I used the bottom half of a one gallon plastic bottle, and since I am at the lathe constantly, I made the wood bush with the hole a good fit to my camera lens back, so it sits stably.

Cloudy, maybe you have not seen the original posting? Main thing is that we were shown that it is the "matt" opaque one gallon water bottle that will diffuse the light, and prevent hot spots in you photos of shiny things like engravings... especially bright cut engravings. So I simply use available light, be it natural window light, or your shop lights. That opaque water bottle material does the conversion to flat even light. No harm in looking through your view finder with a sheet of paper handy to tweak or further diffuse any hot spots.

best

Rod
 
Last edited:

monk

Moderator
Staff member
::::Pledge Member::::
Joined
Feb 11, 2007
Messages
10,868
Location
washington, pa
ah, my friend, you have cheated ! the original was a common milk jug. now you have raised the bar so high, us poor folks will never be able to afford such a beautiful bottle as that. where, btw, did you get the bottle ? looks much more stable than my lousy milk jug !
 

rod

~ Elite 1000 Member ~
Joined
Nov 19, 2006
Messages
1,609
Location
Mendocino. ca., and Scotland
Steve and Monk,

Thank you for getting the original step by step tutorial link out there, Steve!

Guess I got it wrong, Monk, I forgot the original was a milk bottle, I led you astray using the bottom of a water bottle.

Milk or water bottle, top or bottom, it is still a good price for a Scotsman ...

best

Rod
 

Sandy

Elite Cafe Member
Joined
Nov 13, 2006
Messages
683
Location
Kansas
Rod and Steve.
Thanks for the information. :beerchug: I am headed to the shop to make one. Thanks again.:tiphat:
Sandy
 

canadian

Elite Cafe Member
Joined
Nov 7, 2008
Messages
201
Location
Toronto, Canada
This is a good idea. There is however the professional version of this. I use it myself with great success.
Here is the link the write up about this devise. It is called Cloud Dome. Cindy Lichfield is the inventor: http://www.clouddome.com/html/whatis.html
It is worth reading about.
Your solution is poor man's answer to the same problem. Which proves once again that Need is the mother of Invention!
Boris
 

Ross

Member
Joined
Jan 28, 2007
Messages
23
Location
Hulett, Wyoming
How about a gallon ice cream bucket? Flat surface to support the camera. You can get
some half gallon sizes that are short but still big around. Stiffer sides for more support. Plus it gives you a reason to eat some ice cream.

Ross
 

Latest posts

Sponsors

Top