Second hand drawn Scroll Design on Don Cowles Knife

billrice@charter.net

Elite Cafe Member
Joined
Nov 13, 2006
Messages
463
Location
Morro Bay, California, United States
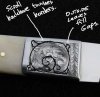
Ok I have finished another knife engraving project that I hand drew. I think I got the leaves going in the right direction and I tried to flatten out the background some. This is some of the hardest metal to engrave I am constantly breading the tips on my engraver. Also after I removed metal for the background I went back and tried to stipple it with a pointed tool. all it did is mushroom the tip
I am looking forward to more of your comments and I will keep engraving these until we are both happy. ( wow that could be along time ).

Engraved Cowles Knife 2.jpg
 

Marrinan

~ Elite 1000 Member ~
Joined
Nov 11, 2006
Messages
2,917
Location
outside Albany in SW GA
Bill, I Have done several of Don's production knives and had very little problem with the metal. If your stipple tool is mushrooming I think you deed to harden or use some other material for your punch. Fred
 

Marrinan

~ Elite 1000 Member ~
Joined
Nov 11, 2006
Messages
2,917
Location
outside Albany in SW GA
I would be glade to post my carry knife tomarrow, thanks
 
Last edited:

monk

Moderator
Staff member
::::Pledge Member::::
Joined
Feb 11, 2007
Messages
10,868
Location
washington, pa
from the foto, looks as though you really went rather deep. one can acheive the illusion of depth, without all that pesky background removal.
 

Sam

Chief Administrator & Benevolent Dictator
Staff member
Joined
Nov 6, 2006
Messages
10,491
Location
Covington, Louisiana
Bill: I'm glad to see your hard work and determination, and also for requesting critique.

When I look at this engraving I can't see a distinctive scroll shape, and the reason is because you have so many lines that you've obliterated the body of the scroll. This would have been far more effective with less lines in perfect placement. Quite often fledgling designers see the work of the more experienced guys like Phil Coggan, etc, and think they must put 50 lines in every leaf. While it's true that more lines give you more control over tonal gradation, more lines also demand exact placement and consistency of spacing becomes critical.

Look at the early work of Lynton McKenzie. Before he used a microscope he used fewer lines but placed them perfectly, and even today those early works don't look 'under shaded'. What we're looking for in hand engraving is contrast - the contrast of the body of the scrolls and leaves against a background with finely cut shading which adds dimension and contour. This piece lacks that contrast because of too much shading an/or lines which are cut too deeply. Your homework is to cut a few scrolls and leaves with less (but properly placed) shading lines. Once you get in the zone with that and develop more graver control, you'll be able to add more as needed.
 

KCSteve

~ Elite 1000 Member ~
Joined
Jun 19, 2007
Messages
2,882
Location
Kansas City, MO
Look at the early work of Lynton McKenzie. Before he used a microscope he used fewer lines but placed them perfectly, and even today those early works don't look 'under shaded'. What we're looking for in hand engraving is contrast - the contrast of the body of the scrolls and leaves against a background with finely cut shading which adds dimension and contour. This piece lacks that contrast because of too much shading an/or lines which are cut too deeply. Your homework is to cut a few scrolls and leaves with less (but properly placed) shading lines. Once you get in the zone with that and develop more graver control, you'll be able to add more as needed.

Great advice Sam!

Especially when looking at engraving at a normal viewing distance (as opposed to the super-close, in-the-scope view we usually have here) one skillfully cut shading line can look a lot better than five done only fairly well. Those like yourself who've really got the hang of it can do marvelous things with subtle shades via a plethora of lines, but that seems to be a hard-earned skill.
 

billrice@charter.net

Elite Cafe Member
Joined
Nov 13, 2006
Messages
463
Location
Morro Bay, California, United States
Ok everyone this is great. I need critiqueing it does not hurt my feelings ( yet and when it does I will just try harder ) Sam you are right. The problem with metal is once you take it away you cannot put it back. Also Fred You speak of Don Cowles knives and how the metal cuts fine. I know Don Cowles knives and the one in your picture has his signature ruby in the knife. That is one of his knives he personally made. I don't know we will have to ask him if he used different steel in these bolsters. I bought about 20 of his manufactured knives that he did not hand make and he did not like the way they came out So I am wondering if the steel in these bolsters is a little harder. No excuses though I should be able to apply what you are all telling me and improve in my engraving. As I said I bought 20 of these knives to practice on So I Hope you do not get tired of seeing the same knife for a while. I figure if I can figure out how to at least engrave on this knife and make it look appropriate for my engraving skills I will be able to apply what you are telling me to future work and It is much easier on the pocket book to do poor engravings on these knives that engraving on some of my knife maker buddies high end knives. Which is my goal one day.
I hope you do not get tired of seeing my posts but I am on a roll and determination to improve my engraving skills. I have been at a beginners stage to long.
I hope you all keep posting your works of art. They are a great source of inspiration to me. And please keep giving me this great feed back. I wish I could come to the FEGA show However I have been invited to the NAMM show in Los Angeles Ca. by a good friend of mine. Don Young he owns National Guitar If you ever get a chance to see his steel bodied guitars you are in for a treat. I actually get to pick one up and admire it in my hands once and a while. The people he has working for them are true craftsman. In fact if you like I could probably go through his factory and do a picture tour for you. Some of his high end guitars are fully engraved. The guy who does the engraving is really good.

Oh well keep up the great work and I will keep chipping and scratching away.

Thanks again
 
Last edited:

Marrinan

~ Elite 1000 Member ~
Joined
Nov 11, 2006
Messages
2,917
Location
outside Albany in SW GA
Bill, That is one of Don's production knives. When they arrived for final fit and finishing touches (the ruby and other tweak) he was sorely disappointed in the quality of some pieces and sent them back. Those that met his standard are available from him. The others were not supposed to be sold with his mark on them but they did it anyway. He was upset to say the least. I purchased several directly from him and have sold probably ten or so. Fred
 

billrice@charter.net

Elite Cafe Member
Joined
Nov 13, 2006
Messages
463
Location
Morro Bay, California, United States
Fred
I bought these at a price that I could afford to practice my engraving on and as you can see I need allot of practice. I look forward to buying some of his production knives that meet his standard. I would like to see more of the knives you have engraved Please post the next one you engrave.
 

Andrew Biggs

Moderator
Joined
Nov 10, 2006
Messages
5,034
Location
Christchurch, New Zealand
Hi Bill

The best advise I can give you is to do all this on some metal practice plates and put the knives to one side at this stage. This will give you a bit of breathing room and be a lot cheaper as well as giving you a chance to control the surface you are working on.

If you get some mild steel practice plates you will have a bit more engraver friendly metal to work on. So that will eliminate one problem for you. This will help build the skills needed like background removal, stippling and border cutting etc etc. It is only a matter of transferring those skills to a harder metal later on.

You can still outline the knife bolster on the plate and work within that shape which is a good idea. It also means that you can sand off the design as many times as you like and keep drawing it without damaging a knife in the process.

Another thing I would suggest is that you size up the bolster shape a bit and draw in that area on pencil and paper...................you can rub out and draw the thing a 1000 times if you want and it's good practice. Then hand scribe the design onto the plate etc using the drawing as a reference point.

The design...............you need to use your borders effectively and bring the scroll out to touch those borders. Then fill the outside gaps with leaves. I've attached something for you to think about. But draw them on paper first so that you get used to the whole idea.

Cheers
Andrew
 

Attachments

  • Bill-1.jpg
    Bill-1.jpg
    53.2 KB · Views: 27

billrice@charter.net

Elite Cafe Member
Joined
Nov 13, 2006
Messages
463
Location
Morro Bay, California, United States
Andrew

Great advice. I have allot of mild steel practice plates and I will cut one to show my work. However there is a method to my madness. I got these knives cheap and are intended for practice. Engraving on a practice plate and engraving on the real thing is different to me. I needed to come out of the box and start engraving on real items and also hand draw directly on the item I want to engrave. Real items to engrave are not flat and metal is not always nice. I am sorry that you have to look at such bad engravings but I really wanted this kind of critique that I am getting. I will post some of my engravings from my practice plates but I will also continue to engrave these knives and hope that you will continue to give me all your good advice. Just like what you have done here.

thanks again
 

Latest posts

Sponsors

Top