1874 sharps

joe seeley

Member
Joined
Aug 21, 2007
Messages
87
Location
Big Timber MT
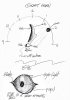
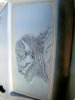
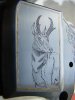
Here are photos of an 1874 C. Sharps that I did this weekend. I was trying technics that were given at the engraving seminars in Reno please feel free to point out where I can improve them.

Joe
 

Attachments

  • DSC01350.jpg
    DSC01350.jpg
    70.2 KB · Views: 293
  • DSC01348.jpg
    DSC01348.jpg
    54.8 KB · Views: 299

Ron Smith

~ Elite 1000 Member ~
Joined
Apr 6, 2007
Messages
1,455
Very well done Joe! All I can see is just a little more experience on how to add intensity to your subjects maybe. Will there be any scrolls around the subjects or no? With no background work they stand out sufficiently. Very good and accurate art work..............Ron S
 

RT Bit and Spur

Elite Cafe Member
Joined
May 17, 2007
Messages
279
Joe
I am impressed. I would add a few lines of background of a desert or grassland and they would really pop.
Rod
 

Andrew Biggs

Moderator
Joined
Nov 10, 2006
Messages
5,034
Location
Christchurch, New Zealand
Hi Joe

Very nice work. The seminars were really good wern't they!!!

I do have a couple of suggestions....................

But first a disclaimer. This is my way of thinking. Also the trouble with enlarged photos is that they can sometimes "wash out" some of the black areas so the contrast is not always that good in a photo. So based on soley what I can see here are my thoughts.

Try to pick a light source when you engrave an animal. By that I mean what position the sun is in the sky. An example of what I'm talking about is your goat horns. At the moment they seem to be an overall grey of the same value (or that could just be the photo).

If the sun was in the sky at the 2 oclock position.......the right hand side of the horn would be light because the sun is hitting that side. As you progress to the left hand side of the horn it would get darker until the very left hand side would be black (or blackish). This could also be applied to the buffalo horn.

Following on from that the snout ridge line would be white and as you move to the left and down the shadows (grey) start coming into play. The folds in the fur would become black because of the absence of light. (very dark shadow)

This gives depth to one dimensional objects like a drawing, painting or engraving. In other words creates the illusion of being a round object.

The other thing I would mention is the eyes......................

They are the gateway to the soul of any living creature and should be paid very careful attention to. A sparkle in the eye gives it life. By a sparkle I mean an eyeball is like glass........it reflects. Try rounding the eyeball at the edges a wee bit. This gives it depth) and then burnish back a tiny dot (or sparkle).

Without the sparkle the living creature is dead. It's a very subliminal thing but it can make quite a difference to the life of any living creature.

The eyeball is also a semi sphere shape and quite round. On some animals it's very pronounced. Light and shadow still have a part to play even on the eyeball as small as it is.

The Walt Disney animators gave the eyes a great deal of attention to bring their cartoon characters alive.

There is also one other thing with the goat.....sometimes you have to tinker with the picture a bit (even though it maybe taken from a photo). At the moment the right ear looks like it's a tuft of hair in the middle of the head. By moving that ear to the right a bit and the right hand horn to the left would give it a bit more balanced look

I'll try and post a picture of what I mean. Hope this helps

Cheers
Andrew
 
Last edited:

Leonardo

Elite Cafe Member
Joined
Jan 9, 2008
Messages
640
Location
Cordoba - Argentina
Thank you Joe for sharing your work, I liked it very much. And thank you Andrew for taking the time to write and explain so clear concepts.
 

joe seeley

Member
Joined
Aug 21, 2007
Messages
87
Location
Big Timber MT
Thank you Andrew for the pointers I will work on incorperating them into the supjects that I do. This has been a great learning process for me and I have been enjoying it very much. I have no formal art training so I sincerely thank you all for the pointers and help. Ron there is to be no scroll coverage around the subjects,
this is supposed to be en economy job with simple line borders and just a touch of McKenzie style scroll in the corners, as such there wont be any background around the animals. I thought that the absence of backgound would help the supjects stand out a little better. I hope that I improve in quality with the pointers that I recieve from the great engravers that I have met here, and at the shows that I attend.
Sorry that I did not introduce myself to most of you when I was in Reno, I was very Busy and slightly overwelmed, by all of the quality work.
again Thank you!!!

Joe
 

Weldon47

~ Elite 1000 Member ~
Joined
Dec 9, 2006
Messages
1,412
Location
Welfare, Texas
Joe,

Thanks for sharing photos of your work. Looks like you are on the right track!
You have received some excellent pointers here, keep it up!

Weldon
 

James Wark

Member
Joined
Nov 10, 2006
Messages
87
Location
Athens, PA
Hi Joe,
Good to see you on the Forum.
I think they are looking good and will only improve with the help of these tips. I am sure I will try the tips also, this helps us all.
Thanks for posting
jim
 

Andrew Biggs

Moderator
Joined
Nov 10, 2006
Messages
5,034
Location
Christchurch, New Zealand
No Worries Joe...........only to glad to be of some help.

What I would recommend is buying a good book on pencil drawing. There are about a zillion of them out there and there are some really good cheap ones that go into the basics of light and shadow in more depth.

There is also a good seminar tape in the FEGA collection by Bill Gamradt about animal posing and how you have to tinker with photos to make them look a bit better for engraving purposes.

Cheers
Andrew
 

Darren

Elite Cafe Member
Joined
Nov 9, 2006
Messages
143
Location
Billings, Montana USA
Hi Joe,
Your engraving looks very nice. when you said you did a little McKenzie style scroll in the corners.
Can we see how you did that? And how was the metal to engrave?. I understand that some of the parts are investment cast.
Thanks
 

Latest posts

Sponsors

Top