Question: About bevelling to the inside

Arnaud Van Tilburgh

~ Elite 1000 Member ~
Joined
Oct 3, 2008
Messages
4,221
Location
Belgium
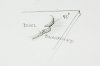
As far as I understand, cutting mainlines looks better when they are bevelled to the inside of the leaf or tendril.
But is the background will be removed, an angle of 90° looks better.
Does that mean that when background will be removed, the main lines are cut different or is the background removal deeper than the bevelled cut?

I illustrate this, because that perhaps make my question more clear.

arnaud
 

Attachments

  • _DSC6347.jpg
    _DSC6347.jpg
    49.9 KB · Views: 249

KCSteve

~ Elite 1000 Member ~
Joined
Jun 19, 2007
Messages
2,882
Location
Kansas City, MO
I think - but could easily be wrong - that the point of a beveled cut is to make that edge be at a different (generally flatter) angle so that it reflects more light.

If that's the case then you might still want the bevel next to a relieved area because the difference in reflection is going to make that beveled cut look different than a straight drop to the relieved area - more of a gradual transistion up from the bottom which should give a more 3D effect.
 

Joe Mason

Elite Cafe Member
Joined
Nov 11, 2006
Messages
430
Location
Brandon, Mississippi
I remove the background up to the top of the bevel or real close anyway. Then I go around all the edges with a very small flat cleaning up the edges. You end up with a 90 degree and no bevel. Hope this helps.

Joe
 

Arnaud Van Tilburgh

~ Elite 1000 Member ~
Joined
Oct 3, 2008
Messages
4,221
Location
Belgium
Joe, I think I understand.
This illustration shows what I understand, the greens are bevelled the reds have a 90° angle.
So one should have attention that the lines remain smooth

arnaud


Mario Sarto

Elite Cafe Member
Joined
Jul 30, 2008
Messages
611
Location
Bad Salzuflen
Hello Arnaud,
picture below shows i try to do it. I think it is the same like your first picture.
I think if you cut away the bevel it would look weird on the transitions.
Just the mind of a beginner...

Mario
 

Attachments

  • remove.gif
    remove.gif
    4 KB · Views: 126

Kevin P.

~ Elite 1000 Member ~
Joined
Feb 28, 2008
Messages
1,256
Location
Nambe, NM
Arnaud, how did you do that muti-color drawing?
I think your first question has two parts that don't need to be together. As for the 'bevel' cut I was told that the bevel makes the element that is being beveled 'pop'. You might check out Sam's "relief engraving" tutorial.
The attachment is my attempt at copying Sam's design.
Kevin P.
 
Last edited:

Arnaud Van Tilburgh

~ Elite 1000 Member ~
Joined
Oct 3, 2008
Messages
4,221
Location
Belgium
Mario,
I think the way Joe explained it, is the most logical way.
When removing the background, bevelled to the inside, he almost removes everything of the bevelling. There where the leaf crosses an other leaf, the bevelling remains, so the face of the leaf that will be shaded has no interruption, as it is the face that will remain white, the bevelling looks black, just like the removed background.
The only thing that must be kept in mind, in my opinion as a novice of course, is that you don’t cut on the line, but to the line. So when bevelling to the inside, cut a bit next to the line to the outside. Otherwise the leaf or tendril will be not wide enough.

My idea at the start was that bevelling to the inside was only done on the parts that has no background removal. And that you bevel to the outside these parts that will have background removal. That way you already have a 90° angle.
But this can’t work when a leaf is crossing another one.

So I stay with the way Joe does it, to me as a novice it makes the most sense.

Kevin, I have read Sam's tutorial on bevelling. But the more I read the more questions I have

I use pencils, brush on paper and calc. I use also Adobe Photoshop CS3 and Adobe Illustrator CS3.
Illustrator uses vectors that can be copy pasted in Photoshop. So it is easily to use the bucket tool to fill some areas with colours or draw with them.
When I use a pencil to draw scrolls, I scan them and use some layers in Illustrator to go over the scanned lines. Than I can make every layer visible or not. But if I print lines of 0,25 points with my old HP laserjet printer on baking parchment and do the transfer using 80% Zippo fluid and 20%, I have all I need to start.

For making a pencil drawing ready to print on baking parchment, I use the “threshold tool” that is in Photoshop. Printing this with the laserjet at 600dpi is almost equal to the vector prints.

And what pleases me best, pencil or Illustrator with Wacom tablet? I’m still not sure. :D

arnaud
 

Joe Mason

Elite Cafe Member
Joined
Nov 11, 2006
Messages
430
Location
Brandon, Mississippi
Remember, There are no rules for background removal. This is just the way I do it. I have seen engraver leave the bevel and other have a bevel all the way down to the bottom of the removed background. I remove all the bevel. Here is a blown up photo of a Damascus guard I engraved before etching and painting. BTW this is a John White Fighter that won Best Art Knife at the Little Rock Show.

Joe
 

Arnaud Van Tilburgh

~ Elite 1000 Member ~
Joined
Oct 3, 2008
Messages
4,221
Location
Belgium
Thank you Joe, it has a lot of information this close up, and like you said "similar like my illustration".
But also nice telling there are no rules for background removal. :D

It saves a few practice plates to find out on my own. :)

arno
 

Kevin P.

~ Elite 1000 Member ~
Joined
Feb 28, 2008
Messages
1,256
Location
Nambe, NM
Arnaud thanks for the explanation of your drawing technique. I have Photoshop and am able to use 5% of it.
I think using Sam's plate to illustrate is easier since we both can look at it. Everything that is dark has been relieved or removed. The rest is the foreground, the important stuff. Think of the foreground as floral elements; the largest as a fiddle head fern. To emphasis those, make them 'pop' you do a bezel cut rolling to the inside. But before that everything is outlined with a '120' before you do the bezel cut. It takes multiple cuts to get to a reasonable depth. That cut establishes the depth of the relief. [ I hope I'm not mangling Sam's tutorial.] I used an NSK to do most of the removal and a small flat and a modified onglette to finish up. Now for the bezel. Go around and make a bezel cut turning the graver to the inside -/ element. So if this is a cross section of the plate -/ (these two keyboard marks, the dash and the forward slash, illustrate what it would look like (with the dash and slash meeting and forming an obtuse angle. The 90 degree thing doesn't make sense in this context. It's the bezel cut that makes the element (fern head) appear to rise above the backround.
I hop that helps.
Kevin P.
 

Arnaud Van Tilburgh

~ Elite 1000 Member ~
Joined
Oct 3, 2008
Messages
4,221
Location
Belgium
Kevin, thanks for the reply, I have in my mind how to do it. Busy on another practice plate.
Can't wait till Tuesday, as Monday is my day of.
Just want to be sure I make some progress on the next practise plate.


And sure we can't do it all the same way, it would be boring. :D

arno
 

Andrew Biggs

Moderator
Joined
Nov 10, 2006
Messages
5,034
Location
Christchurch, New Zealand
And don't forget that you can always cut main lines, releive background, stipple (or whatever)...........and then recut with slight bevel to clean the walls of the main cut. And sometimes you don't want the engraving to sparkle at all.

So it all comes back to what it is that you are trying to acheive and what you have in your minds eye when you start the job.

Cheers
Andrew
 

bcarter

Member
Joined
Mar 23, 2008
Messages
30
Location
Caldwell, TX
I thought I would jump in and say that I had a great "oh that's how they do it" moment after reading this thread. Thank you Arnaud for posting it and everyone else responding. I practiced this weekend and it was like a light bulb went one in my head, now I just need to keep practicing and reading and practicing. thanks to all of you who will post their work on this site and for the seasoned pros to help with the novices. It is appreciated! Alice
 
Top