Doubt heel

Marcelo

Elite Cafe Member
Joined
Aug 28, 2014
Messages
109
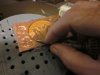
Could someone clarify the following doubt. If I make a very short heel what happens with the graver? If it is too long? I do not know what is happening with my graver, because I can not make a line at the same depth, ie, my graver tends to sink as soon as prolong the cut. I believe it is my mistake, but just in case I would rule out problems sharpening.
Thanks
 

monk

Moderator
Staff member
::::Pledge Member::::
Joined
Feb 11, 2007
Messages
11,007
Location
washington, pa
short heel for tight turns. longer heel works better for straight lines, or no heel at all. what kind of equipment are you using ? what kind of material ? what sort of geometry ? how long have you been engraving? by answering some of these questions, we may be more able to help you. if you make a short heel, nothing really "happens" to your graver.
 

Marcelo

Elite Cafe Member
Joined
Aug 28, 2014
Messages
109
I am learning about three months, hand push, copper plates. I am all the time encouraging me to improve, I know it's necessary time and practice. Here in Brazil we have no recorders tale with you. I have another doubt cruel. I'll try to explain. found it easier to write with her forefinger in graver, comocei your toe from east to west, but the other way I have more control of the graver.what should I do about the way of handling the graver?
 

monk

Moderator
Staff member
::::Pledge Member::::
Joined
Feb 11, 2007
Messages
11,007
Location
washington, pa
i don't fully understand the way you describe how you hold the graver. i'm not trying to complicate things for you, but could you have somebody take a picture of how you are holding your graver.many engravers place the index finger on top of the graver, and the thumb on the side. shown is a copper plate. partially acid etched, partly hand engraved. this graver has no heel,and it is held very low to the plate. or at least that's how i hold a graver with no heel. if i were to increase the tool angle to the plate, it would dig in way too deep. i hope my poor photo helps a bit.
i urge you to look at the forum information, and make lots of notes in a notebook. there is so much to learn here, take your time. in time , you will succeed.
 

Attachments

  • graver hpld.JPG
    graver hpld.JPG
    86.1 KB · Views: 216
Last edited:

Andrew Biggs

Moderator
Joined
Nov 10, 2006
Messages
5,035
Location
Christchurch, New Zealand
Hi Marcelo

If your cut is going down in the metal..........lower your hand slightly until you get a consistent depth. By lowering your hand you are raising the front of the graver.

If your cut keeps slipping out of the metal.........raise your hand until you get a consistent depth. By raising your hand you are lowering the front of your graver.

To get consistent cuts that are even all the way........you have to find the balance between the above.

How you start the cut is also important........press the graver tip into the metal at about 30 degrees...........then immediately lower your hand to about 15 degrees (maybe a bit lower or higher) before you start cutting. If you start your cut at a very high angle, then the graver wants to keep digging down.

Try what I have said on a soft piece of copper and see if that helps you out. :)

Cheers
Andrew
 

Roger Bleile

~ Elite 1000 Member ~
Joined
Oct 4, 2007
Messages
2,997
Location
Northern Kentucky
Marcelo,

Go to the following link then scroll down to BURIN. You will see pictures of three different engravers pushing a graver. All of those people hold the graver with the the graver between the thumb and forefinger. Some engravers do put their forefinger on top of the graver but that way is less common.
http://www.engravingglossary.com/Hand Engraving Glossary B.htm

Muitas felicidades,

Roger
 

Kevin Scott

Elite Cafe Member
Joined
May 17, 2009
Messages
241
Location
Philadelphia, Pa, USA
Marcelo,

Much of what you read about graver geometry and heels applies to air power, not push power.

For push power, you grind the bottom of the graver only to give your fingers clearance at the handle. About 10 to 15 degrees usually. No additional bevel cuts, which some call heels. These bevel cuts create advantages, but also make it much harder to push the graver thru the metal.

The more force needed to push the graver thru the metal, the more likely you will slip and lose control.

Also, 120 degree face width is too wide for push engraving. Too much metal contact, too much resistance. Use a face 90 to 100 degrees.

I find a face to work angle, the included angle, to work well at 45 to 50 degrees. A higher angle, which most air power engravers use, is too hard to push thru the metal, except on hairlines, or very soft metal.

The above geometry has disadvantages, but for push power, the advantages outweigh the disadvantages.

The above is not just my opinion, but also seems the opinion of most push engravers.

Review these threads if you have not already. And keep trying. I don't think you are too far from getting better results, since it seems you don't give up easily. Which is easy to do when trying to learn push power on your own.


http://www.engraverscafe.com/showthread.php?15879-Hand-push-demonstration-video-by-Sam


http://www.engraverscafe.com/showthread.php?15790-Hand-push-with-the-EasyGraver-105%B0-graver
 
Last edited:

DKanger

~ Elite 1000 Member ~
Joined
Sep 30, 2007
Messages
1,063
Location
West TN
Looking at the pictures in your other post, it might also be that your graver is too long which could lead to a lack of control. You don't always use them as they come full length. Sometimes you need to cut them down to fit your hand.

Brian probably would have told you that if he wasn't too busy reliving his misspent youth. :biggrin:
 

Marcelo

Elite Cafe Member
Joined
Aug 28, 2014
Messages
109
really do not give up on something that I propose. I wish to work with power graver. I'm learning with burin (graver push) because I believe I can develop more sensitivity and because it is cheaper for beginners. I was facinado with GRS. everything that has been bought as a function of a video of Sam Alfano (push hand). with everything that was said to be a bit confusing. I know I should search the forum, but sometimes do not even know how to look, because I'm starting. bought an engraving block, dual angle both GRS. hand to push as I sharpen my ability to Burim to create power graver? thank you once again for your time and kindness to all. I always admired the engraving, but now I'm learning I admire even more because a lot of dedication and resilience to do well is required.
 

Kevin Scott

Elite Cafe Member
Joined
May 17, 2009
Messages
241
Location
Philadelphia, Pa, USA
Marcelo,
Seems you have the needed tools to hand push. It was a good idea of yours to get the dual angle fixture. Left to buy is only inexpensive supplies for layout drawing and transfers.

And maybe a book. The Schippers book is good, but it is really more about hammer and chisel than push engraving. He only uses push gravers for shading. Also the book is expensive, and since it is fairly new, hard to find used. Mine Cost $148.00 USA shipping.

I think the Meeks book would be better for you. Plus it is alot cheaper, and can find used on Ebay etc. Mine, used, very good condition, cost $30.00 with USA shipping on Ebay. And all in all, I like the Meeks book better.
 
Last edited:

Marcelo

Elite Cafe Member
Joined
Aug 28, 2014
Messages
109
Engraving Historic Firearms, by John Schippers. This is the book that tells you. I am sure of it and buy today. From everything I read I saw that parallel heel seems to be the best option to push hand. You think it's a good way? I tried the burin without heel, but it hangs or sinks. Thanks a lot.
 
FEGA
Top