Help wanted on multi- coloured gold inlay .

katia

Member
Joined
Jun 30, 2007
Messages
79
Location
UK
Well ,hello there!

I have just been asked to do a little " extra ' on a gold inlay job .
That little extra is actually something that has puzzled me for quite a while.
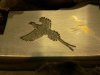
My customer wants a griffin in raised 24 carat gold . No problem , I can do that .
But now , he has told me that he would also like the eyes to be in a different colour ( green ) . And the tongue in red .
So, I have not answered back yet as I have absolutely no idea as to how it should be done technically .
At what stage do I put in the green and red gold and how do I make sure the wires ( I work with gold wires ) are in the right place?
I really don't know how to proceed .
Can anyone help me?
And do you know if it will slow down the process of inlaying the whole thing significantly ?

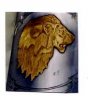
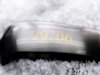
PS :I have attached some gold inlays samples that I have done in the past . The pictures were taken before I read all the advices about photography i found on this website , so they are a bit blurred .

Many thanks,

Katia
 

Attachments

  • tile0b.JPG
    tile0b.JPG
    31.2 KB · Views: 268
  • katia9.jpg
    katia9.jpg
    38.1 KB · Views: 220

pilkguns

~ Elite 1000 Member ~
Joined
Nov 14, 2006
Messages
1,874
Location
in the land of Scrolls,
you did'nt say what base metal you were putting these inlays in, but I assume from the pictures you will be doing this in steel. both the red and green gold are significantly harder than the 24k so you will have to inlay them into the steel first, (which is of course harder than the red and green) , form them to shape, and then make your teeth up in the steel and also the pink and green gold areas that are below the surface. Then inlay the yellow gold around them color inlays. I personally prefer sheet over wire, and would for this operation for sure, but think running the wire up to and stopping at your green and gold inlays would work ok

You could inlay the whole thing in yellow gold first andthen cut your inlay deep back down to steel through the yellow gold but I think this willl ber much more difficult working at depth with a harder gold into a softer base, since it will want to spread as you hammer it in the softer sides.
 
Last edited:

ron p. nott

Elite Cafe Member
Joined
Nov 9, 2006
Messages
329
hi Katia and welcome to the forum .. there are 2 people that I know who are a master at this type of gold inlaying and they are Ron Smith and Ray Cover , may be they will see your message and be able to help you .. Ron p
 

Ray Cover

~ Elite 1000 Member ~
Joined
Nov 14, 2006
Messages
1,012
Location
Missouri
Katia,

From what I read you have a few things that are going to make this a trick to do.

1. it is to be a raised inlay and modeled or sculpted.
2 different colors for the eyes and tongue than the base yellow.

There are a couple ways you can go about this but I think this would be the way I would tend to lean. There is usually more than one way to skin a cat but one thing is for sure it is easiest if you kill the cat first.:D

1. The green and red golds are going to be considerably harder than the the 24k Yellow. For this particular method I would step down to a harder yellow. At least a 22 maybe even and 18K yellow.

2. Carefully cut out and fit the different color parts. The fit must be close on the parts with minimal if any gaps.

3. Cut out a fine silver base for the assembly. This fine silver is what is actually going to swedge into the footings for the inlay. Make is a bit oversized for now. It can be trimmed to actual fit later.

4. Assemble the gold pieces on top of the silver footing so that the silver sticks out from around the edges a bit. being a bit oversize helps keep from having gaps when you solder all this together. Use a bit of jewelers binding wire if you have to to hold things in place.

5. Silver or gold solder the assembly together into one unit and pickle it to clean the solder crud off. I tend to like paste solders for this type of work because my soldering skills are not the best and I find the paste easier to use. Once it is soldered trim the silver footing back to actual size.

6. Now you have a block of inlay material that has your various colors arranged on the top layer and a soft silver footing on the bottom layer. Form the block to the radius of the piece it is to be inlaid to and hammer it in place. This can be kind of tricky since you want to hammer it hard enough to set he silver footing but not hard enough to mangle the colored gold assembly on top. That is why I recommended using a harder yellow alloy in step one.

7. Once the assembly is in place sculpt it as you normally would.

Like I said there are a couple ways of doing this but I think this is the way i would do it. I have use this technique with success before and Ron Skaggs uses a very similar method for the raised multicolor scuplting he does on a lot of knives.

Ray
 
Last edited:

katia

Member
Joined
Jun 30, 2007
Messages
79
Location
UK
Thanks everybody for help!

Scott, yes it is steel. And thanks for the advice !
Ron : well, it seems that one of the 2 suspects you were talking about came to my rescue
Ray : what can I say? This is such an in-depth explanation, it is a thing of beauty!
I think that it must be the way to go as sheets must be more appropriate for that kind of inlay.
The problem is I have never worked with sheets, always with wires, and for this job, which needs to be done very soon, I think it is a bit premature for me to use sheets.
I'd rather learn the whole process on a sample piece of metal, which I am really looking forwards to !
So , I'll try Scott's suggestion this time .
Once again, thank you ever so much for taking time to answer my question .
Katia
 

John B.

Lifetime Pledge Member
::::Pledge Member::::
Joined
Nov 9, 2006
Messages
3,966
Location
Los Angeles area, California.
Hello Katia, and welcome.
Here is the way I do multi-color raised inlays using wire over a steel background.
I cut the total outline of the inlay as a single line.
I then cut a line inside this that would be the outside line of each different color element.
Then I lay a piece of clear transparency material over this and tape one edge down.
Scribe all the lines into the plastic, rub a printing ink into the lines, clean the surface and hinge it back out of the way.
Undercut the line for the red ( hardest) material area and raise burs all over just this area.
Inlay the red gold or copper, the hardest material in that area first.
Hinge the plastic window down to see if it has spread and how it should be trimmed back to size.
Trim the outside of the red stuff back to size.
Then do the same with the next hardest material such as white gold, pure silver or green gold.
The last one I do is the yellow gold, 22K or 24K.
The little plastic window allows you to trim and keep each color in its proper place if it spreads.
Finally detail, shade and antique in the normal way.

You can see some inlays I did this way on the FEGA forum www.fega.com
On the opening page on the left side click Photos< Certified Professionals< John Barraclough.
The dog is multi color and the gold quail have white throats.
There are lots of other examples on that site by other people.
Some great ones to look at with better photos tham mine are Sam Welch and Ron Smith and others.

Hope this is some help from and old ex-Brit and best of luck with your project.
Regards, John B.
 
Last edited:

pierre

Elite Cafe Member
Joined
Jun 20, 2007
Messages
134
Location
liège Belgium
Hi Katia,
I put two picture to show you how i process with multi gold inlay this exemple is not raised but it's the same,
when your background is ready, for the green eye, you just have to punch with a small ( perloir) if you have a 0,5mm wire you put it inside and after, before to put yellow gold around, cut the the green one to obtain the best profile that you want. If you don't have the good size on your wire, make a drop with it and punch it.
about the red gold, it's really very hard to inlay, if you can't, you can use a red copper wire (from an electric one).
I go to the iwa this year, if you want, i can give to you a peace of 10 cm of red gold wire ( free of course) it's the more soft that we can find in Anvers.
If you can't come, i can send it to you by mail.
have a nice day
Pierre
 

Attachments

  • P1030023.jpg
    P1030023.jpg
    54 KB · Views: 140
  • P1030021.jpg
    P1030021.jpg
    42.9 KB · Views: 128

katia

Member
Joined
Jun 30, 2007
Messages
79
Location
UK
John, Pierre, and all the other previous people... What can I say?
You have been so generous in sharing your knowledge, I really wish I could do something in return.
The veil of mystery that was shrouding multi-coloured gold has finally been lifted.
Hurray!
Now, I just need to practice and see what comes out of it.
John, thanks very much for your detailed explanation and your link to the website.
Pierre, those pictures of a multi-coloured gold inlay in progress are extremely useful and thanks for your offer.

A very happy lady,

Katia
 
Top