Suggestions Please

Crazy Horse

Elite Cafe Member
Joined
Nov 9, 2006
Messages
580
Location
Philly
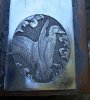
This item is still unfinished, and may never reach completion. The material is German Silver (Brass with 18% Nickel content). This particular piece of material was/is very "gummy."
The Ellipse is 1 1/4 X 1 1/2 inches. Depth of relief is .013. I already know the scroll work sucks. I just can't envision it properly in my head. I know it needs more refinement, that's why I'm asking for suggestions, suggestions, suggestions (other than "Don't quit your day job.").
 

Attachments

  • eb513007.jpg
    eb513007.jpg
    64.9 KB · Views: 238

Peter E

~ Elite 1000 Member ~
Joined
Nov 9, 2006
Messages
1,795
Location
Canton CT
I think a border (even just a single line) around the oval would make it look more "finished".

Peter
 

Crazy Horse

Elite Cafe Member
Joined
Nov 9, 2006
Messages
580
Location
Philly
Suggestions

Pete , eventually it should end up as a money clip looking more like this, if all goes well.
 

Attachments

  • eb9cb552.jpg
    eb9cb552.jpg
    40.9 KB · Views: 161

Peter E

~ Elite 1000 Member ~
Joined
Nov 9, 2006
Messages
1,795
Location
Canton CT
Crazy_Horse,
I like that money clip. Very nice indeed. The duck on the unfinished plate looks good so far.

Peter
 

Dmitry Martinov

Elite Cafe Member
Joined
Dec 20, 2006
Messages
168
Location
Latvia, Riga
I think it's good. If the main theme on this money clip - is duck, everything is right. IMHO :)

P.S. I was learning to engrave on German silver, the material is very good, the quality will grow with each other attempt. I still use this material in making.... :confused: I can't remember the word in English :confused: the metal piece on belt which connects two ends together...:eek: say no to vodka
 

McAhron

Elite Cafe Member
Joined
Nov 15, 2006
Messages
227
Cut the scroll out and use some type of reed or tall grass as a background instead.I dont know if thats possible or not as Im a brand newby.
 

Crazy Horse

Elite Cafe Member
Joined
Nov 9, 2006
Messages
580
Location
Philly
Ink

Dmitry:

I don't use ink I use liquid (Cold) gun blue. The same agent you use to blue (black) gun barrels. I also use a Birchwood Casey product called "Aluminum Black." It works very (bardzo) well.

It doesn't come out real dark black, but rather a dark grey because it's an oxidation process. This is the lid of a brass box I made and engraved. The gun blue made it a dull brown/black effect. I like it better than dark black.
 

Attachments

  • ee95ecce.jpg
    ee95ecce.jpg
    44.8 KB · Views: 126

Dmitry Martinov

Elite Cafe Member
Joined
Dec 20, 2006
Messages
168
Location
Latvia, Riga
I like this piece Crazy Horse. Listen, I never use this staff for gun barrels, well may be you can explain how you use it on German silver?
 

Crazy Horse

Elite Cafe Member
Joined
Nov 9, 2006
Messages
580
Location
Philly
German Silver

Dmitry, I just place a few drops on the item and spread it around. I let it stay on for a few minutes (2 or 3) and then I wipe off the excess with a cloth. I then use a piece of stiff felt and apply some "Flitz' or similar polish and rub until I get the effect I want.
 

Crazy Horse

Elite Cafe Member
Joined
Nov 9, 2006
Messages
580
Location
Philly
Gun Blue

Does it matter what type of gun blue you use?

C 2/5

I've been using Birchwood Casey's "Perma Blue" and Birchwood Casey's "Aluminum Black." Both work very well. I have also used a Browning solution that worked well also.

I like it better than any kind of paint or ink because these items are oxidizers and actually affect the metal as opposed to paint or ink which only coat the metal.

So what happened to those suggestions I asked about??? Are all of those engravers asleep???
What should I do to bring this bird "to life?"
 

jimzim75

Elite Cafe Member
Joined
Nov 10, 2006
Messages
808
Location
Canada
Hi Crazy Horse,
I sure as I'm writing this, someone's going to write the definitive help
letter. I think if this were my engraving on the go I would. Sand it back
very very lightly. See what I got. Start refinishing raged edges. Consult
the bird anatomy books for proportions. The bill where joins to the head
looks to a bit large. I would have the assume this is a mallard landing. The head has a more of a domestic goose look. It might be that mallard beaks are rounded at the tip and yours is not.

If your taking this from a photo you shot for the image, blow it up so you can get the right detail. The feather pattern of the back doesn't read well.
Where the left wing joins the body looks more like the back bone.
This give the bird a overly deep look. You start well in the tail section with
the back bone but loose it where the wing attach to the body.

You could blow up the detail on the engraving and your solution might
just leap out at you. Looking though a scope and looking at a blown up
picture can be two vastly different images. I know I forgive my own
mistakes looking thought scope. Pictures don't lie.

Hope this helps.

ps. Here is a bronze of a Mallard head that might help in the attachment.
 

Attachments

  • mallard1a.jpg
    mallard1a.jpg
    54.3 KB · Views: 17
Last edited:

Sandy

Elite Cafe Member
Joined
Nov 13, 2006
Messages
683
Location
Kansas
Is there anything that you do, other then being very careful, to keep it off of the area you want bright?
 

Crazy Horse

Elite Cafe Member
Joined
Nov 9, 2006
Messages
580
Location
Philly
Bluing

Sandy, I often use a wooden "Q" tip stem. I cut it in an angle dip it in the blueing solution and apply. You could use a tooth pick also.

Thanks for your advice Jim. I don't have a microscope. I use an optivisor #10 lens. I can enlarge this piece on Photo shop and see what it does there.
 

jimzim75

Elite Cafe Member
Joined
Nov 10, 2006
Messages
808
Location
Canada
I have a pair of the #10 Lens but hate to use them. I find they're really hard on my eyes. I also am nearly right on top of the
engraving. For a guy with a big shnoz, that is a problem.
 
Last edited:

coincutter

Elite Cafe Member
Joined
Jan 30, 2007
Messages
233
Location
Pleasantville Iowa 50225
Doing great
what i pick up on tis the stipple
go for a smaller tool
work it in a circluar fashion
you have a secondary image all the way around your major elements
iron those out so the stipple tone is even all through the background

fy i stippling can take a lot longer than doing the engraving
have fun
 

Sponsors

Top