Critique Request Newbie pattern practice

Latergaters

Elite Cafe Member
Joined
Aug 24, 2014
Messages
109
Location
Colorado
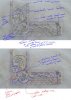
I can't draw, not even a little. When I draw with my kids you can't tell which is which. With that said I've been practicing. My husbands friend dropped off the shotgun he keeps in a cooler in the back of his truck and said have fun. I said no and he said do it so I am. This is what I've come up with but some of it looks wrong to me. Any suggestions on leaf design would be greatly appreciated.

20141115_090743[1].jpg
 

phil

Elite Cafe Member
Joined
Oct 21, 2007
Messages
224
Location
England
Do not even attempt it. You will be entering into a world of disappointment that could put you off for a very long time. I am like you. My drawing abilities are non existant. However over many years of study I have learned the ability to draw smooth scrolls with well proportioned elements and also learned how the addition of an extra line here and there can add complexity such as folding leaves and intertwining. Keep this drawing and continue to study. You will see the progression over the months to come and when you no longer need to ask if the design is acceptable, then you will be ready to start cutting. Good luck!!!!!!
 

Andrew Biggs

Moderator
Joined
Nov 10, 2006
Messages
5,035
Location
Christchurch, New Zealand
Hi Neisha

Yes, you can draw. Your attachment proves that.........all you need is practice and patience. :)

If you tell yourself you can't draw...............then you can't. It's as simple as that. With that mind set you may as well give it up now and take up golf for a hobby. Harsh I know, but true. You are what you think you are!!!!

Phils advise above is correct. Do not engrave the gun. Basically you will totally ruin it. Stand up to your friend and stick to your original answer. NO!!!! or tell him you have a 3 year waiting list before you can touch it. All you are doing is setting yourself up for a fall and will attract all the wrong people that don't know good engraving from clay.

My best advise to you is get Ron Smiths book Advanced scroll drawing and learn how to draw a scroll. Just one scroll. Draw it big on an A4 piece of paper (Letter size) Then fill it with leaves. Then once you can draw one decent scroll filled with attractive leaves, then you simply join another scroll onto that. And on it goes. At the same time take those drawings and cut them on practice plates. That way you learn to draw and cut at the same time. They go hand in hand and what you learn from one you take to the other.

Using Ron Smiths book, draw till you are sick of it. Then draw some more. Learn how to fill a space properly............Draw in the bathroom, on the bus, watching TV, in your sleep and just keep at it till you have the basics............then, when your work is half way decent, attempt gun parts. But not before......there are plenty of practice gun parts available.

Cheers
Andrew
 
Last edited:

Jan Hendrik

Elite Cafe Member
Joined
Jan 24, 2014
Messages
292
Location
Pretoria, South Africa
You have potential! Practise your drawing every day. You will be amazed at how much you can improve in just a few weeks!
Don't engrave that gun now. You will regret it forever if you do. Keep drawing and cutting practise plates for now. You will know when you are ready to take on a project like that.
 

Dani Girl

:::Pledge Member:::
::::Pledge Member::::
Joined
May 6, 2012
Messages
1,251
Location
NSW, Australia.
I have to agree with everyone, don't get started on the gun yet. Practice is all there is, believe in yourself that you can draw if you commit yourself to it and give yourself the resources and time we all needed.

If I gave your above design one critique keep your border the same width all the way around... You can change it gradually sweeping it out bigger around a rounded corner... But 99.9% of the time... Keep it uniform.

That said I can't actually think of a good cure for going around your writing... Can anyone sqiggle up an idea ?
 

monk

Moderator
Staff member
::::Pledge Member::::
Joined
Feb 11, 2007
Messages
11,007
Location
washington, pa
getting in a hurry is the norm these days, we all do it. that is, except the art of engraving. i'll not bore you with the wisdom already posted. slow down, take a few deep breaths and begin wandering thru this forum. take a looseleaf notebook-- and take notes. and i will say YOU MUST learn to draw. without the ability to make a pencil produce concepts on paper, concepts that are pleasing to the eye, with good flow and balance, you may as well go watch judge judy. learnin this is not an overnight thingy. many took years to become proficient. give yourself a chance to catchup with your dreams. dreams come true with a lot of effort, not less.
 

Latergaters

Elite Cafe Member
Joined
Aug 24, 2014
Messages
109
Location
Colorado
Hmmm not sure how to take this. Lots of the typical comments about newbies but not a lot about the actual design. Dave, I'll take you up on your offer. I'm going broke buying books and the library isn't as robust on the subject as I would like. Yes I keep practicing. What I meant about drawing is that I have lots of ideas running through my head as I wake up but I have a very hard time translating that to paper. Hence the drawing practice I posted for input about my leaf design.
 

Gemsetterchris

Elite Cafe Member
Joined
Mar 24, 2009
Messages
822
Location
Finland
Hmmm not sure how to take this.I have lots of ideas running through my head as I wake up but I have a very hard time translating that to paper.

To be blunt, your drawing needs to be a lot better..if you can't draw it good then you can't cut it good either since engraving is harder to do.
Sounds like you have plenty of books, buying more won't help anything, only drawing & learning to see Will help.
Once you can draw, you have half a chance of doing a passable job.

But, you are not alone :) , I can vision great work but can't draw much..so I don't cut much yet...
 

Latergaters

Elite Cafe Member
Joined
Aug 24, 2014
Messages
109
Location
Colorado
I'm getting whiplash from the comments. Not sure if I have potential or if I should just give up. I've had the $50 shotgun for a long while now and I still haven't even broken it down yet. I'm just working on practicing my drawing and designs at this point. I appreciate that most people rush engraving but I also know you have to start at some point or you'll never get anywhere.

Thank you Dani Girl, I appreciate the actual response to my question.

Now, anyone with experience that wants to help me improve my design please give me specifics. I know there are challenges with engraving certain styles and designs. I believe this should be a fairly straight forward. Are my leaves on the right too much? Do they even look like leaves? Is the stem too thick (I know it is uneven and needs to be refined but I wanted input before I redrew it)? I wanted something fairly heafty looking. Do the leaves in the scrolls look right?

Please quit telling me I need practice....I know, the word practice was in the title of the post. Please quit telling me not to engrave guns and that I'll regret it....I know, but I'm going to do it anyway eventually. This guy is a good friend and is excited that he will get my first gun engraving, he knows it's not going to be a master piece....so do I.
 

SamW

:::Pledge Member:::
::::Pledge Member::::
Joined
Jan 31, 2007
Messages
2,454
Location
Castle Valley, UT in the Red Rock country
It is an interesting vine approach and you already realize the refinements needed on the stem width. Also needs refinement to make the scrolls as round as you can. Borrow that book for good info on shading. Obviously you like the basic pattern as it came from you mind so refine it until it looks best to you. Ask comments from the world wide web and you will get comments that cover the wide world!

I have no problem using a "$50" gun for a practice plate...that is how I learned 40 plus years ago.

I assume with your business you have the FFL requirements taken care of and the only other concern not yet mentioned is the hardness of the frame. I have no idea how hard the metal will be but you need to figure that out before cutting.

PS...those "practice plates" from so long ago remain locked in a safe out of sight where they belong.
 
Last edited:

don hicks

Elite Cafe Member
Joined
Mar 16, 2011
Messages
554
Location
Pictou,Nova Scotia,Canada
Hi Latergaters;
Here are some of my observations. Your backbone should be more uniform in width, all your leaves appear to come off the top of the backbone , you can make some of them appear to come from the side or under the backbone by manipulating the backbone lines ( adds to depth). I thing the border would look better if it was the same ( stick with the lattice or running leaf design instead of the mix) I would continue the border line all the way around ( on the right) and bring the scroll up to or overlay it . Instead of the vine running over the lettering, I would put a scroll on the right and join it to the left scroll with a line scroll on the top and bottom, something simple.
Let me add that I am as new to engraving as you are, less that 100 hours of drawing and cutting combined,I'd venture. If these things are popping out to me they must be beating real engravers over the head with a pan shovel, that is why everyone is telling you to practice. I think Sam's video and the works of Lee Griffiths and Ron Smith should be in your library regardless of what is already there. They will get you there, with practice.
I for one will be waiting for your revised design. Thanks for posting and asking questions, we all learn for the responses. Please don't take my comments as anyting but encouraging observation.
Cheers
Don
 

Brant

Elite Cafe Member
Joined
Feb 6, 2014
Messages
198
Location
Weeki Wachee
Latergater,

I feel your pain. I am just starting as well and drawing is my weakest skill.

You may want to look at this book, "The New Drawing on the Right Side of the Brain" by Betty Edwards: https://d1e0u2actw4eb3.cloudfront.net/edu/src/New Drawing on the Right Side of the Brain.pdf

It has helped me progress in a very short time to the point that my 7 year-old style of drawing has now progressed to the point that my drawings are now recognizable.

Enjoy the learning-journey. We are very fortunate to have this forum to help and encourage us.

Brant
 

Latergaters

Elite Cafe Member
Joined
Aug 24, 2014
Messages
109
Location
Colorado
Thanks for all the input. I appreciate it and I'm working on refining it. I am lucky in that I am very good with design in general. I have a decent sense of balance and color. Now I'm just trying to expand my skill set. I've been looking at local classes but I don't have much time for that sort of thing right now.

Brant, thanks for the book link. I've had one similar in my Amazon cart but I've been putting off hitting the buy button. This helps a lot!

I'm interested in drawing not only for engraving. One of my 5 year old twins I'm homeschooling is very interested in art and drawing and I want to be able to help her. I want to be able to use art to introduce geometry, math and geography to help keep her engaged.
 

Andrew Biggs

Moderator
Joined
Nov 10, 2006
Messages
5,035
Location
Christchurch, New Zealand
Practice………the bane of every newbie, beginner and apprentice. It’s the most frustrating time because as you say…………you have an idea in your head and you can’t get it to paper. That is normal. If it was easy then everyone would be doing it. :)

To keep going or give up? That’s up to you. Not everyone can do this. Those that give up will never do it. The money you have spent is small in comparison to the time you have to spend learning how to do this. That is the true cost of engraving. The financial side is the cheap bit. There is a lot of second hand equipment for sale by people that have found this out the hard way. If you want to keep going with it then relax and enjoy the process of learning. It’s supposed to be fun. Many will try to help you on your way if you’re prepared to listen.

You do need Ron Smiths book and unfortunately it’s not the sort of book you find in libraries. It will show you how leaves are formed as well as scrolls. Then how to put it all together. So beg, borrow or steal it. Just get it whatever way you can.

The advise about not cutting the gun is good advise. You have a long way to go. This is not about becoming a master. It’s about getting your work to a stage where you can do a competent job and build on that. At the moment you aren’t at that stage. But you will get there with patience and perseverance.

As I said…draw and cut, draw and cut. One compliments the other. Cut practice plates till you can form and cut a decent scroll……………That is well over 50% of the battle.

I know you don’t want to hear any of that but it’s true. I know that sounds harsh but it is not meant to be. You can take or leave the advise given as that is your prerogative. However, keep in mind that we have all started at exactly the same point that you are starting out at. So we have learnt a few things on the way.

So……..to your drawing.

I have attached two copies. The top is critiquing your design and the bottom is my approach. Now it’s important that you keep in mind that there are many ways to do this and what I am showing you is just my way. You have the right idea you just can’t execute it. Don’t worry, that is normal. So below are some basics.

Engraving is two things. Technique and design. The technique is simple enough and with practice you can learn to control your tool. Control is everything with technique. It’s the design that is the most important thing of all.


1. Attention to detail……….Engraving is all about the detail so from the start, get it right.

2. Outline of area to be engraved…………get it right. See number 1. Holes included. Holes are round not elliptical or all over the place

3. Borders……..are important. They frame your work. Keep them even and in proportion to the canvas. To big and they dominate. To small and they disappear. They can either be a cut border like you have done or an invisible border that is not cut.

4. Scrolls……….are the building foundation to your work. It’s the frame of a house. If the scrolls are out of whack then everything else will be. So concentrate on the scroll layout first. Get that right and everything else follows on from that.

5. Scrolls again……..should always touch borders. There are many exceptions to that but at this stage make sure they do touch the border.

6. Staring scroll……..this is the most important scroll. Start from a hole or the border. If you start wrong then everything else becomes increasingly difficult. Think organic, in other words, how does a plant grow.

7. Thumbnail sketches……..do lots of them till you have a rough idea how everything fits. They are small quick and dirty sketches to play with ideas. Once you have an idea that seems to work then go to a proper drawing.

8. Break areas down……..don’t over extend or cram a scroll into an area. Keep breaking big areas down to smaller areas. An example of that is the long vine on the bottom right of your drawing.

9. Draw big……draw on a large piece of paper to begin with. It gives you breathing room. Your drawings will naturally get smaller over time.

10. Study good engraving……..buy a book like American Engravers of the 21st Century or British Gun engraving and study the photos. And I mean study not just look at them. Pick a leaf and try to recreate it with pencil and paper and just keep doing that. Learn the difference between good engraving and bad. There are a lot of both out there.

11. KISS..keep your designs simple to begin with. As you develop and refine your skill your designs will naturally become a bit more complex.

That is some real basic stuff…..the rest is up to you. Keep drawing, keep cutting, relax and enjoy the process no matter how frustrating and learn to tell the difference between good and bad engraving. Start and finish small projects like key tags and cheap knives. You will learn a lot from them like work holding, working within a set space, work flow, etc etc.

Cheers
Andrew
 

Attachments

  • Neisha-1.jpg
    Neisha-1.jpg
    91.3 KB · Views: 124

Roger Bleile

~ Elite 1000 Member ~
Joined
Oct 4, 2007
Messages
2,997
Location
Northern Kentucky
Neisha,

It is said that advice is worth what you pay for it. In this case that saying is very untrue. Andrew just gave you (and all beginners) a thousand dollars worth of advice for free. There are a few people on this forum who have taken similar advice to heart and we have seen their work go from rank beginner to professional. That said, we have also seen many more who were not willing to pay the price in time and effort who have had their tools for sale after a while.

Cheers,
Roger
 

JJ Roberts

:::Pledge Member:::
::::Pledge Member::::
Joined
Nov 10, 2006
Messages
3,549
Location
Manassas, VA
Latergaters, Don't feel bad after 40 plus years I sill sit for hours agonizing over coming up with a pleasing design,I have no problem with drawing or engraving birds and animals but placing scrolls in the odd shapes on firearms makes me nuts.But I still love it.Take Andrews advice and get Ron Smith's book on scrolls. J.J.
 

Marrinan

~ Elite 1000 Member ~
Joined
Nov 11, 2006
Messages
2,917
Location
outside Albany in SW GA
When I was starting to design things I took someone's advice(Ron Smith I think but don't really remember) and bought a $50 light box at hobby lobby. I draw my outline, might be full size or might be twice the size. There are several ways to get an exact outlines. Use the search function here. I ink the outline. I have a piece of blue line grid paper with eight inch squares in one inch heaver lined boxes. Any office supply drafting department will have a pad of them. They are usually Vellum so they are near transparent. This is taped down to the surface of the light box. Next I tape my inked accurate outline on the grid paper using at least one of the grid lines as a starting point, If there is a ninety degree corner use the blue lines in two directions for easier layout. If it happens to be a circle or oval use the center lines in two directions. This just makes dividing things up easier.

Get yourself a pair of proportional dividers. Do a search for the reason why on this site. We will get to it's use soon.

Get tracing paper or vellum 8.5 x 11. I Usually cut my sheets into a size that will cover my outline. Cut several sheets. Paper cutter handy for this. Half sheets or quarter sheets.

Now you begin. Start with the border. This is one of the most critical areas. If it is off the slightest bit it will stick out like a sore thumb. It is one of the most important things to draw and particularly cut. I have been doing this off and on since 79. You, at this early stage, can note that many engravers who get high accolades from our members for their shading and bulino work have some real problems with borders. They are often inaccurately cut with chips, thick and thin lines and wavy lines and no back cutting. This comes from rushing though the basics to get to the fun stuff. Look at all the pictures posted for these kinds of errors and in a very short time you will note that what many are impressed with have serious basics issues. The great Lynton Mackenzie said that he really sweated the borders and felt sure they were giving him ulcers. He noted that once the borders were done and cut to his satisfaction he could relax and have fun cutting his scroll work. He also talked about if you can't do dogs then don't do dogs. Sub the dog scene out to someone who was good at dogs. He said this without hesitation and I am sure he meant every word. Cutting accurate borders and the edges of scroll which are next to back ground require special care to keep the cutting clean and accurate.

Use straight edges to draw accurately laid out borderlines. this is done on your first sheet of tracing paper. Use your regular dividers to make sure all sides are the same width. We are not cutting at this stage so we won't be talking about backcuts and other issues yet.

Once you are satisfied with your borderlines. They may be double lines or thick thin lines depending on your design. Do your fill work, designs like running wheat, running leaf, whatever on new tracing paper taped over the top of the border sheet. Do this over and over on a new pieces of tracing paper over the top of your lines. You should be done with them and you will never draw them again during the design development process. They should be taped down on all four corners. Use drafting tape easy to remove and adjust.

At this stage you should have four sheets of transparencies done. These should be done with these. They will stay on the light table from here until your design is ready to cut.

At this stage it is imagination time. Scrolls are usually laid out in odd numbers 3 5 7 9. This seems to give the best design results. This is were the proportional dividers come in. Read up. Any questions PM me and I will call you at a time of your convenience.

As you start to create you will like some parts you like and some you don't. Simply trace what you like on a new sheet taped over your drawing then remove the old and replace with your new. Now go on from here. You may have lots of sheets by the time you get to the end.

One more thing, I cut a piece of plywood big enough to hold my light table then put a one inch cleat on the narrow direction on the bottom. This I can clamp in my ball vise allow be to rotate as I need. Fred
 

D Fulwood

Member
Joined
Jun 14, 2014
Messages
29
Location
Macon, GA., USA
I just started engraving on my first gun. I practiced drawing scrolls for about ten years, then started scratching them onto ivory, horn and bone (scrimshaw) for about ten years. Practiced on mild steel for about two months.I think I might be ready to engrave a gun but I'm not certain. No kidding.
 
Top