simple hair barrettes

mtlctr

Elite Cafe Member
Joined
Jan 6, 2015
Messages
381
Location
NW Ohio
hi everyone,
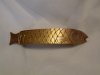
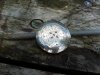
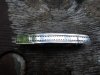
here I have a couple barrettes very simple cutting the shield in n.silver the thin straight in sterling & the fish in red brass.I did this work some time past, I'm hoping maybe some new folks get ideas about starting out with small pieces that won't bust the wallet and practice before cutting on a knife scale or gun. comments welcome as always.:hammer:
 

Attachments

  • 008.jpg
    008.jpg
    79.7 KB · Views: 211
  • 001.jpg
    001.jpg
    132 KB · Views: 210
  • 022.jpg
    022.jpg
    116.8 KB · Views: 210

Andrew Biggs

Moderator
Joined
Nov 10, 2006
Messages
5,035
Location
Christchurch, New Zealand
Yes, always a good idea to start on small doable projects that are easy to complete. That way you learn tool control and the start to finish of a completed project :)

One thing you can do, and I know this is heresy to some, is lightly sand your work when finished. Make sure that the wet n dry paper is backed with something solid. This will get rid of the burs that are raised on the edges of the cuts. Don't go crazy with it but rather a very light sand with 1200 grit paper and finish with the 3m green paper for a polish.

Also, take your time a bit more and finish the cuts in the areas where one cut joins another. Often a few extra minutes critically analysing your work and doing some extra cuts can pay dividends. While practicing, time is not an issue but getting it right is. Always think to yourself "how can it be made to look better?".......if it takes extra work, then do it. For instance. Taking the time to shade the scales and underneath the fin of the fish would make it pop out a bit more and add shading and dimension to the design.

And try rolling your graver a bit. Start with the graver straight up and down (vertical) and as you are coming toward the end of the cut start rolling your graver over so the cut flares out. After a while it will become automatic. The middle photo.......On this type of work it is important as each cut really stands out and it will add a bit of dimension to the overall look.

How do you work? Pneumatic, push, hammer/chisel???

Cheers
Andrew
 

mtlctr

Elite Cafe Member
Joined
Jan 6, 2015
Messages
381
Location
NW Ohio
Yes, always a good idea to start on small doable projects that are easy to complete. That way you learn tool control and the start to finish of a completed project :)

One thing you can do, and I know this is heresy to some, is lightly sand your work when finished. Make sure that the wet n dry paper is backed with something solid. This will get rid of the burs that are raised on the edges of the cuts. Don't go crazy with it but rather a very light sand with 1200 grit paper and finish with the 3m green paper for a polish.

Also, take your time a bit more and finish the cuts in the areas where one cut joins another. Often a few extra minutes critically analysing your work and doing some extra cuts can pay dividends. While practicing, time is not an issue but getting it right is. Always think to yourself "how can it be made to look better?".......if it takes extra work, then do it. For instance. Taking the time to shade the scales and underneath the fin of the fish would make it pop out a bit more and add shading and dimension to the design.

And try rolling your graver a bit. Start with the graver straight up and down (vertical) and as you are coming toward the end of the cut start rolling your graver over so the cut flares out. After a while it will become automatic. The middle photo.......On this type of work it is important as each cut really stands out and it will add a bit of dimension to the overall look.

How do you work? Pneumatic, push, hammer/chisel???

Cheers
Andrew

Hi Andrew, thanks for your advise, for me its gold. my method is h & c with some push most of my work is with muzzleloaders and "art jewelry". I'm "primitive" (self taught) I do so value your advise.
watch yer back trail,
Kent:hammer:
 

mtlctr

Elite Cafe Member
Joined
Jan 6, 2015
Messages
381
Location
NW Ohio
Do you have the book Engraving Historic Firearms by Shippers?

If not you can buy it from the FEGA web site here

It's an excellent book if you are into traditional muzzleloaders

Cheers
Andrew

yes i do have it. I've been building longrifles since 84. back then there where no sources of engraving information. I was at a ML show one time & asked a guy that had a nice engraved rifle if he could show me how to sharpen a graver he said, read a book like i did. seemed very secretive in those times.
 

SamW

:::Pledge Member:::
::::Pledge Member::::
Joined
Jan 31, 2007
Messages
2,454
Location
Castle Valley, UT in the Red Rock country
"... seemed very secretive in those times. "

One of the reasons FEGA came into being...the exchange of techniques and methods among engravers and to educate the public about quality gun engraving.
 

monk

Moderator
Staff member
::::Pledge Member::::
Joined
Feb 11, 2007
Messages
10,998
Location
washington, pa
very nice, and useful as well. i first earned money turning my 2 x 3" practice plates into belt buckles. i never thought to do such items as you show here. if you like, many of us would really enjoy seeing some of the work you have done on your guns. thanks for showing.
 

Latest posts

Sponsors

FEGA
Top