
tsterling
Elite Cafe Member
View attachment 38419
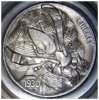
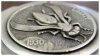
The gold inlaid wasp I added to a recent knife I engraved for William Henry Studios turned out so splendidly I had to do a Hobo Nickel with the same theme.
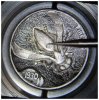
View attachment 38430
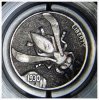
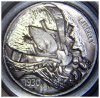
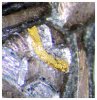
Above, I’ve taken a 1930 Buffalo nickel and transferred a scaled yellow jacket design to it.
View attachment 38414
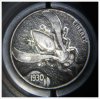
I begin the engraving process by cutting all the major outlines with a V-graver. This design is now indelible, and I can’t wipe it out with a misplaced finger…
View attachment 38421
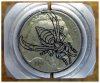
Now begins the background removal process. Here I’ve used the same V-graver to cut parallel lines in all the spaces where I need to waste away the background. These V-cuts are a convenient way to measure the depth of background removal and make a smooth background of consistent depth.
View attachment 38428
I could use a flat graver to remove the excess background, but I find a tiny carbide bur is faster and just more convenient, at least in the initial stages of wasting away the unwanted background.
View attachment 38413
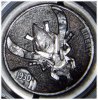
Above, I’ve removed the excess, and also used the same carbide bur to make a “scribble†textured background. Of course, now the yellow jacket is looking pretty flat, so I’ve got to do something about that…
View attachment 38420
Speaking of flat gravers, I begin to sculpt the yellow jacket abdomen, thorax and head by using a flat graver to cut away the top corners. I start with a 45 degree cut, then move up with the flat graver held at a shallower angle. I find twice around is a good start for most of my sculpted engravings.
View attachment 38426 View attachment 38412
Above are two images taken at an oblique angle to try and illustrate the depth I’m working towards. You can see the two facets left at the top corners of the body shapes.
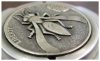
View attachment 38418
The flat graver leaves little facets when used at an angle. I could carve away those little facets with more work with the flat, but I’m going to exploit one the greatest aspects of engraving in metal - its’ ability to be moved. Above, I’ve used a tiny steel punch to hammer the body shapes smooth. You can see the attractive pebbled texture the tiny punch leaves behind. I’ve also used the punch the sculpt the wings. Additionally, I’ve carved the legs to provide a little vertical development. Perhaps you can see where they are lowest where they go under the body, climb up to the first joint, then descend back down to the “feet.â€
View attachment 38429
The legs are still a little crude, too wide near the body, and some of the feet detail is missing. I used a tiny 90 degree V-graver and a tiny flat to trim around the lower edges of the body parts and legs - you can see the shiny spots in the background texture.
View attachment 38416
Getting down into tiny spaces is a problem, and I’ve solved that by manufacturing an even smaller carbide bur. You can see it in the image. I make these by grinding four tiny flats in a worn out ball bur - in this case, the tiniest round bur I’ve been able to purchase (about a half millimeter in diameter). I haven’t measured one of my tiny manufactured burs, but it’s a lot smaller, and comes to an even tinier point.
View attachment 38427 View attachment 38415
Above, you can see two oblique images at this stage. Starting to look pretty good now.
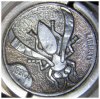
View attachment 38425
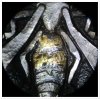
The yellow jacket is sufficiently sculpted and trimmed so it’s time to add the gold inlays. Using gravers and carbide burs, I’ve excavated the cavities where the tiny 24 karat yellow gold wires will go. I’ve undercut the edges of the front cavity (see the blue arrow) with a tiny flat graver, and also cut three rows of tiny uplifted teeth, at three different angles. This provides a forest of tiny teeth in the bottom of the inlay cavity, as well as a continuous undercut around the bottom edge, for the gold to flow into and become permanently trapped.
View attachment 38431
Above, I’ve used a tiny brass punch to partially hammer a single soft gold wire along the rear edge of the inlay cavity. I’ll add in more parallel wires, lightly tapping them into place until the cavity is completely filled.
View attachment 38424
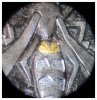
Here, you can see three parallel rows of wire in place. I’ll use the tiny brass punch to vigorously punch the gold wires into place. If I’ve done my job well, the extremely soft gold will flow into all of the teeth and undercuts, as well as cold-weld together into a single solid mass.
View attachment 38423
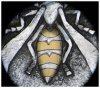
Here you cans see two completed inlays, which have been roughly scraped to remove excess gold. Next, I’ll use a very smooth carbide burnisher to remove the few remaining rough spots. After everything is smooth, I’ll use a tiny abrasive stone to really smooth the gold surface.
View attachment 38417
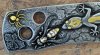
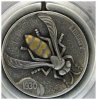
Here are the completed 24 karat gold inlays in the abdomen. Notice that I’ve used a tiny V-graver to cut very fine lines in the cupro-nickel metal around the gold. This really provides a visual demarcation and makes the inlays really “pop.â€
View attachment 38422
Above, I’ve also used a small round graver to cut the wing details in.
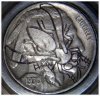
View attachment 38433
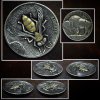
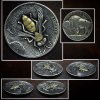
Here's the Yellow Jacket Hobo Nickel finished! Six 24 karat gold inlays and a lot of carving. Thanks for looking!
The gold inlaid wasp I added to a recent knife I engraved for William Henry Studios turned out so splendidly I had to do a Hobo Nickel with the same theme.
View attachment 38430
Above, I’ve taken a 1930 Buffalo nickel and transferred a scaled yellow jacket design to it.
View attachment 38414
I begin the engraving process by cutting all the major outlines with a V-graver. This design is now indelible, and I can’t wipe it out with a misplaced finger…
View attachment 38421
Now begins the background removal process. Here I’ve used the same V-graver to cut parallel lines in all the spaces where I need to waste away the background. These V-cuts are a convenient way to measure the depth of background removal and make a smooth background of consistent depth.
View attachment 38428
I could use a flat graver to remove the excess background, but I find a tiny carbide bur is faster and just more convenient, at least in the initial stages of wasting away the unwanted background.
View attachment 38413
Above, I’ve removed the excess, and also used the same carbide bur to make a “scribble†textured background. Of course, now the yellow jacket is looking pretty flat, so I’ve got to do something about that…
View attachment 38420
Speaking of flat gravers, I begin to sculpt the yellow jacket abdomen, thorax and head by using a flat graver to cut away the top corners. I start with a 45 degree cut, then move up with the flat graver held at a shallower angle. I find twice around is a good start for most of my sculpted engravings.
View attachment 38426 View attachment 38412
Above are two images taken at an oblique angle to try and illustrate the depth I’m working towards. You can see the two facets left at the top corners of the body shapes.
View attachment 38418
The flat graver leaves little facets when used at an angle. I could carve away those little facets with more work with the flat, but I’m going to exploit one the greatest aspects of engraving in metal - its’ ability to be moved. Above, I’ve used a tiny steel punch to hammer the body shapes smooth. You can see the attractive pebbled texture the tiny punch leaves behind. I’ve also used the punch the sculpt the wings. Additionally, I’ve carved the legs to provide a little vertical development. Perhaps you can see where they are lowest where they go under the body, climb up to the first joint, then descend back down to the “feet.â€
View attachment 38429
The legs are still a little crude, too wide near the body, and some of the feet detail is missing. I used a tiny 90 degree V-graver and a tiny flat to trim around the lower edges of the body parts and legs - you can see the shiny spots in the background texture.
View attachment 38416
Getting down into tiny spaces is a problem, and I’ve solved that by manufacturing an even smaller carbide bur. You can see it in the image. I make these by grinding four tiny flats in a worn out ball bur - in this case, the tiniest round bur I’ve been able to purchase (about a half millimeter in diameter). I haven’t measured one of my tiny manufactured burs, but it’s a lot smaller, and comes to an even tinier point.
View attachment 38427 View attachment 38415
Above, you can see two oblique images at this stage. Starting to look pretty good now.
View attachment 38425
The yellow jacket is sufficiently sculpted and trimmed so it’s time to add the gold inlays. Using gravers and carbide burs, I’ve excavated the cavities where the tiny 24 karat yellow gold wires will go. I’ve undercut the edges of the front cavity (see the blue arrow) with a tiny flat graver, and also cut three rows of tiny uplifted teeth, at three different angles. This provides a forest of tiny teeth in the bottom of the inlay cavity, as well as a continuous undercut around the bottom edge, for the gold to flow into and become permanently trapped.
View attachment 38431
Above, I’ve used a tiny brass punch to partially hammer a single soft gold wire along the rear edge of the inlay cavity. I’ll add in more parallel wires, lightly tapping them into place until the cavity is completely filled.
View attachment 38424
Here, you can see three parallel rows of wire in place. I’ll use the tiny brass punch to vigorously punch the gold wires into place. If I’ve done my job well, the extremely soft gold will flow into all of the teeth and undercuts, as well as cold-weld together into a single solid mass.
View attachment 38423
Here you cans see two completed inlays, which have been roughly scraped to remove excess gold. Next, I’ll use a very smooth carbide burnisher to remove the few remaining rough spots. After everything is smooth, I’ll use a tiny abrasive stone to really smooth the gold surface.
View attachment 38417
Here are the completed 24 karat gold inlays in the abdomen. Notice that I’ve used a tiny V-graver to cut very fine lines in the cupro-nickel metal around the gold. This really provides a visual demarcation and makes the inlays really “pop.â€
View attachment 38422
Above, I’ve also used a small round graver to cut the wing details in.
View attachment 38433
Here's the Yellow Jacket Hobo Nickel finished! Six 24 karat gold inlays and a lot of carving. Thanks for looking!
Attachments
-
 Yellow_Jacket_Hobo_Nickel_Tutorial_8.jpg68.3 KB · Views: 208
 -
 Yellow_Jacket_Hobo_Nickel_Tutorial_5.jpg166.2 KB · Views: 204
 -
 Yellow_Jacket_Hobo_Nickel_Tutorial_2.jpg130.6 KB · Views: 201
 -
 Yellow_Jacket_Hobo_Nickel_Tutorial_13.jpg69.1 KB · Views: 200
 -
 Yellow_Jacket_Hobo_Nickel_Tutorial_11.jpg208.8 KB · Views: 201
 -
 Yellow_Jacket_Hobo_Nickel_Tutorial_18.jpg129.5 KB · Views: 201
 -
 Yellow_Jacket_Hobo_Nickel_Tutorial_9.jpg139 KB · Views: 206
 -
 Yellow_Jacket_Hobo_Nickel_Tutorial_0.jpg99.7 KB · Views: 204
 -
 Yellow_Jacket_Hobo_Nickel_Tutorial_6.jpg170.6 KB · Views: 203
 -
 Yellow_Jacket_Hobo_Nickel_Tutorial_3.jpg162.9 KB · Views: 201
 -
 Yellow_Jacket_Hobo_Nickel_Tutorial_19.jpg123 KB · Views: 197
 -
 Yellow_Jacket_Hobo_Nickel_Tutorial_17.jpg78.5 KB · Views: 194
 -
 Yellow_Jacket_Hobo_Nickel_Tutorial_16.jpg80.2 KB · Views: 191
 -
 Yellow_Jacket_Hobo_Nickel_Tutorial_14.jpg79.1 KB · Views: 190
 -
 Yellow_Jacket_Hobo_Nickel_Tutorial_7.jpg70 KB · Views: 190
 -
 Yellow_Jacket_Hobo_Nickel_Tutorial_12.jpg72 KB · Views: 190
 -
 Yellow_Jacket_Hobo_Nickel_Tutorial_4.jpg168.4 KB · Views: 191
 -
 Yellow_Jacket_Hobo_Nickel_Tutorial_10.jpg98.6 KB · Views: 188
 -
 Yellow_Jacket_Hobo_Nickel_Tutorial_1.jpg121.9 KB · Views: 189
 -
 Yellow_Jacket_Hobo_Nickel_Tutorial_15.jpg86 KB · Views: 194
 -
 Yellow_Jacket_Hobo_Nickel_Tutorial_20.jpg147.4 KB · Views: 211
 -
 Yellow_Jacket_Hobo_Nickel_Tutorial_20.jpg132.8 KB · Views: 221


