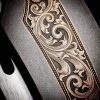
Raised dot border
- Thread starter Flatsguide
- Start date
i'm not sure any "special" preparation is called for. i'd just take the metal "down" to the desired final finish you want, ie the final grit/polish level you want on the finished piece. it's not good to engrave, then go over that to achieve a final surface finish. doing such will likely damage any fine detailing you've done.
Flatsguide
Elite Cafe Member
Monk, thank you for replying. I’m not understanding you as I guess I did not make it clear in my question. Let me try again please. I’m not interested in the scroll engraving shown in the photo, I just want an idea of how to get those dots as shown in the photo. Let’s say that the metal surface is finished ready for engraving, it looks like the start of this border would be to engrave two lines that are parallel space just a bit wider than the ball diameter. I did that then I engraved perpendicular line inside these lines so what I had then was a lot of square sections i the took a chisel shaped graver and nicked the corner off the square sections and wound up with an octagon shape I tried the dot punch over the octagon shape but it did not look good at all. I’m pretty inexperienced about engraving but I hope this explanation make it a bit clearer.
Thanks Richard
Thanks Richard
Richard, not trying to be too critical here. A nice design. But a little lacking in the border areas,
The main engraving, shading and backgrounding looks to be well done.
But the dots have a variety of sizes. And the inner border line has uneven widths.
A good pair of dividers could be used to line out the borders and space out for the ball/dots.
The dots could be first spaced, otagoned ,rounded and cut with a graver.
Followed by forming and sizing with the shaped, polished punch.
Then trimmed, finished and backgrounded with a graver, followed by a stipple punch.
Richard, you are on the right track by forming octagon shapes.
They need to be the same size and evenly spaced so that the shaped punch can form and size them. The excess metal outside the ball should be trimmed with a small graver.
Last edited:
Flatsguide
Elite Cafe Member
John, thank you! I understand what you are saying. On needs to more preparation, like doing a little “whittling” before the polished punch is used.
Thanks again John...Stay well.
Cheers Richard
Thanks again John...Stay well.
Cheers Richard
Ronald Scott
Member
- Joined
- May 5, 2011
- Messages
- 38
Hi Richard, I am guessing you are planning to use the raised dot border on the barrel breech? Somewhere, I have a tutorial on the process that I prepared for my NMLRA seminar. Why don't you give me a call and I can better understand your goal. 541-941-0395
AllenClapp
Elite Cafe Member
I am sure that we all would like to see the tutorial. Can't have too much info!Hi Richard, I am guessing you are planning to use the raised dot border on the barrel breech? Somewhere, I have a tutorial on the process that I prepared for my NMLRA seminar. Why don't you give me a call and I can better understand your goal. 541-941-0395


