
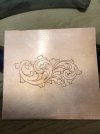
Hello gentlemen, I finally finished cobbling together a make shift amateur work bench. The crown jewel being a GRS Gravermax G8, the rest of the setup consists of a cheap microscope rigged to a workable, A knock off block and the final piece arrived yesterday a pottery banding wheel set atop a solid semi adjustable stand with a wire spool side for a top. I hope at least some of you are grinning right about now, ether from fond memories of your own first setup or just the thought that I could not be more excited, proud and thrilled to have a hodgepodge bench to start hopefully getting serious. Anyways I know this is a tired old babies first scroll design everyone is tired of seeing but until now all I have done is my coins mostly hand pushing and I’m so very happy to share this zero detail outline I buggered up one of the leaves but other than that if anyone sees anything particular I should focus on or avoid doing on my next one before I develop a bad habits please feel free to rip this apart ")
Thank you for looking, I would not be this far without the knowledge and support of everyone in this wonderful and welcoming community. Dustin Byrn
Thank you for looking, I would not be this far without the knowledge and support of everyone in this wonderful and welcoming community. Dustin Byrn
Attachments
-
 BE851EC9-E1BE-4389-AB08-80E9E59F5322.jpeg105 KB · Views: 140


