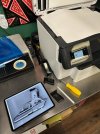
Real size template - Tutorial.

EngraverHand

Elite Cafe Member
Joined
Oct 20, 2008
Messages
194
Location
Sitges, Barcelona
I´m sure most of you know, at least for the more experienced engravers, but still for some new ones I think it´s a good and easy tips for how to make real size template for what you're about to engrave.. and make design ideas either to transfer or before you draw it directly to the item. :)

So for anyone interested:


unplugged

Member
Joined
Oct 31, 2019
Messages
12
Location
Germany
Brilliantly simple - thanks for this tip. I have so far photographed the workpieces and created the contour with image processing.
 

ByrnBucks

:::Pledge Member:::
::::Pledge Member::::
Joined
Dec 25, 2020
Messages
209
Location
Chattanooga, TN
I´m sure most of you know, at least for the more experienced engravers, but still for some new ones I think it´s a good and easy tips for how to make real size template for what you're about to engrave.. and make design ideas either to transfer or before you draw it directly to the item. :)

So for anyone interested:

Good evening EngraverHand, Very much enjoyed the epic score accompanying your informative video. Thanks for sharing
 

EngraverHand

Elite Cafe Member
Joined
Oct 20, 2008
Messages
194
Location
Sitges, Barcelona
Brilliantly simple - thanks for this tip. I have so far photographed the workpieces and created the contour with image processing.
Thanks, glad you liked it! :) For smaller items I often use a photo too, but be ware of the lens distortion especially on phone cameras, and make sure to try to take the photo directly from the top. It can usually gets off quite a bit.. but if it´s small, it´s easy to scratch in the corrections :)
 

EngraverHand

Elite Cafe Member
Joined
Oct 20, 2008
Messages
194
Location
Sitges, Barcelona
Good evening EngraverHand, Very much enjoyed the epic score accompanying your informative video. Thanks for sharing
Oh thank you so much! :) I have great fun composing my own music for my videos.. in that case I never have any problems with owners rights for the music.. and so much of the free music library is quite boring, in my opinion :) Anyway, glad you liked it and noticed the music too :)

Marius
 

unplugged

Member
Joined
Oct 31, 2019
Messages
12
Location
Germany
Thanks, glad you liked it! :) For smaller items I often use a photo too, but be ware of the lens distortion especially on phone cameras, and make sure to try to take the photo directly from the top. It can usually gets off quite a bit.. but if it´s small, it´s easy to scratch in the corrections :)
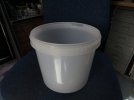
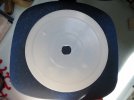
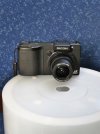
Yes-better are distortion-free photos. For this I have a simple trick - a translucent bucket.
 

Attachments

  • Fotoeimer.JPG
    Fotoeimer.JPG
    60 KB · Views: 23
  • Fotoeimer-Boden.JPG
    Fotoeimer-Boden.JPG
    64.3 KB · Views: 23
  • Fotoeimer-.JPG
    Fotoeimer-.JPG
    127.8 KB · Views: 23

EngraverHand

Elite Cafe Member
Joined
Oct 20, 2008
Messages
194
Location
Sitges, Barcelona
Yes-better are distortion-free photos. For this I have a simple trick - a translucent bucket.
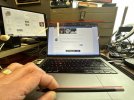
I think we are talking about different things :) I don't think a bucket are going to fix the lens distortion problem.. if you see the photo I just uploaded, the pencil and the top of the computer are supposed to be straight.. and the drawers behind the computer.. :) But the camera makes lens distortion, almost like a fish eye. This was taken with an extra wide lens just to show what can happen.. :) But a bucket is good to avoid reflections form lights and things :) Untitled_Artwork 49.jpg
 

unplugged

Member
Joined
Oct 31, 2019
Messages
12
Location
Germany
yes and no - under the bucket you place only small objects - and photograph with "normal" - macro lens. And the lens is placed exactly perpendicular to the hole. The bottom of the bucket then works like a tripod. As said - works only with small, not curved surfaces. That's why I'm so happy about your tip.
 

CMSchneider

Member
Joined
Dec 4, 2022
Messages
9
I was gearing up to design a layout for my personal knife. This will make that a lot easier. Thanks for sharing!
 

tdelewis

Elite Cafe Member
Joined
Oct 10, 2010
Messages
777
Location
Volant, PA 60 miles north of Pittsburgh
Very nice scroll design. Pencil rub is the way I've been doing it for years. I scan the rub into Adobe Illustrator and make a vector drawing of the outline. I enlarge it to about 250%. I print out several copies to work on. The reduction Percentage is the reciprocal of the percent increased. Example: 250% is 2 1/2 or 5/2 and has a reciprocal of 2/5 so the enlarged drawing is reduced to 40% =2/5. Another example: Enlarged to 175% or 1 3/4 has a reciprocal of 4/7, thus the reduction percent is 57.14%.
 

EngraverHand

Elite Cafe Member
Joined
Oct 20, 2008
Messages
194
Location
Sitges, Barcelona
Very nice scroll design. Pencil rub is the way I've been doing it for years. I scan the rub into Adobe Illustrator and make a vector drawing of the outline. I enlarge it to about 250%. I print out several copies to work on. The reduction Percentage is the reciprocal of the percent increased. Example: 250% is 2 1/2 or 5/2 and has a reciprocal of 2/5 so the enlarged drawing is reduced to 40% =2/5. Another example: Enlarged to 175% or 1 3/4 has a reciprocal of 4/7, thus the reduction percent is 57.14%.
Cool, thanks a lot! :) I often use procreate on the iPad, as I can zoom in and out while drawing to see how it looks in real size.. bout your method sounds good too! :) The scroll drawing was just a quickie for the video.. I started the knife yesterday, and it has a different design now, but thanks anyway! :)
 
Joined
Feb 20, 2022
Messages
74
I use a laser printer to make transfers- I have been unsuccessful getting more interesting flat shapes right on procreate after taking cell pics of both actual objects and smoke pulls.

The next thing I’m going to try is using my HP inkjet copier/printer as a scanner which I haven’t done before but hopefully is easy enough to do wirelessly into apple products.

I don’t mind a little size tweaking to get a printout correct, or needing a bunch of tries to transfer in just the right spot, but when the whole shape is subtly off it gets maddening
 

EngraverHand

Elite Cafe Member
Joined
Oct 20, 2008
Messages
194
Location
Sitges, Barcelona
I use a laser printer to make transfers- I have been unsuccessful getting more interesting flat shapes right on procreate after taking cell pics of both actual objects and smoke pulls.

The next thing I’m going to try is using my HP inkjet copier/printer as a scanner which I haven’t done before but hopefully is easy enough to do wirelessly into apple products.

I don’t mind a little size tweaking to get a printout correct, or needing a bunch of tries to transfer in just the right spot, but when the whole shape is subtly off it gets maddening
If you can use a scanner, it´s always a lot more accurate and easier to print in an accurate size . Especially for larger objects.. if your scanner in wireless, it should not be too much problems. At least not here.. :) but you know, computers are computers.. not always perfect either.. :)
 
Joined
Feb 20, 2022
Messages
74
If you can use a scanner, it´s always a lot more accurate and easier to print in an accurate size . Especially for larger objects.. if your scanner in wireless, it should not be too much problems. At least not here.. :) but you know, computers are computers.. not always perfect either.. :)
Here goes nothin!
 

Attachments

  • 55DA1A5E-5626-449F-AF84-70C257F4E970.jpeg
    55DA1A5E-5626-449F-AF84-70C257F4E970.jpeg
    149.4 KB · Views: 32

EngraverHand

Elite Cafe Member
Joined
Oct 20, 2008
Messages
194
Location
Sitges, Barcelona
Here goes nothin

Hi, if you tried to scan your gun in the scanner I think you misunderstood or I was not clear enough.. I have no idea of how that would work. :)

When I say use a scanner is to first use the tape like in the video, draw a line around the edges, take the tap off and place it on a paper scan that. :)
 
Joined
Feb 20, 2022
Messages
74
Hi, if you tried to scan your gun in the scanner I think you misunderstood or I was not clear enough.. I have no idea of how that would work. :)

When I say use a scanner is to first use the tape like in the video, draw a line around the edges, take the tap off and place it on a paper scan that. :)
Yes I agree scanning a tracing or smoke pull is a great idea. As a proof of concept scanning my customer’s pistol worked great- drawings made from it in procreate were perfect to size and proportion with the caveat that only surfaces placed directly on the glass are in focus.

I was able to print my transfer, compare the exact length of it vs my slide with machinists calipers, and adjust the size perfectly first try.
 
Last edited:

EngraverHand

Elite Cafe Member
Joined
Oct 20, 2008
Messages
194
Location
Sitges, Barcelona
Wondering if it would be helpful to put the tape on graph paper instead of plain paper. The graph lines would help make sure there isn't distortion, and ensure you are at the exact right scale.
I guess it could help too :) But the idea is if you put the tape on a printing paper (In Europe it´s A4). and then scan the full printing paper, you should be pretty safe.. I think the most chance of problems is when printing as some home printers have some slightly differences and not always print in absolute 100% and then it would be the same if you placed tape on graph paper or not.. but maybe easier if you have to adjust later. Anyway I think it would be so little that it would not matter too much, but worth a try :)
 

Gargoyle

Official Cafe Stone Carver
Joined
Feb 18, 2007
Messages
745
Location
Chicagoland
I guess it could help too :) But the idea is if you put the tape on a printing paper (In Europe it´s A4). and then scan the full printing paper, you should be pretty safe..
My thought is the graph paper background will also help if there is any lens distortion, you can make sure teh graph lines are still equally spaced and parallel when printing it.
 

Latest posts

Sponsors

FEGA
Top