1st coin

threefingerdave

Elite Cafe Member
Joined
Feb 23, 2007
Messages
284
Location
North Idaho
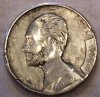
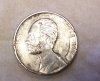
Here is my 1st attempt at a coin
it had some bad nicks on it when i started like the one across his nose and the one over on the edge by the date But it was good practice.
Check out the tiny ear lol it is way out of proportion but at least i noticed it

please tell me what you thing and any tips and criticisms are really welcome because i would like to learn how to do these
thanks in advance and sorry about the blurry pictures


Dave:confused:
 

Attachments

  • 100_3017.jpg
    100_3017.jpg
    52 KB · Views: 196
  • 100_3020.jpg
    100_3020.jpg
    74.7 KB · Views: 102

sdcoxx

Elite Cafe Member
Joined
Nov 10, 2006
Messages
295
Location
Glitter Gultch, Nv
Dave,
Good 1st attempt, with each attempt we learn and improve, as will you.
For future reference, a burnisher, super stone or polishing pins will repair most of you nicks and nacks.
The date's border could be continued around the coin and decorated.
Stimpling the background and toning the coin will add contrast.
Searching previous hobo nickel threads will yield a host of additional techniques.
It is ONLY a nickel, Have Fun...
Thanks for sharing,
Stephen
 

threefingerdave

Elite Cafe Member
Joined
Feb 23, 2007
Messages
284
Location
North Idaho
Thanks Stephen,
Could you tell me what polishing pins are? are they rubber impregnated points for a dremel tool?
I will search the threads.
I appreciate your input
Dave
 

gtsport

Elite Cafe Member
Joined
Feb 16, 2007
Messages
305
Location
Racine, wisconsin
Good job, Dave.

I use Gesswein finishing stones to clean up the background on my coins. They come in various grits and hardnesses. Stippling is a good option when you go deep and have a high rim like on your piece, that's how I did my first nickel, oh so many years ago. As for toning, Steve Adams recently showed me a method of torching the coin until it is a nice, deep color (purple to black) and then burnishing and polishing the high points for contrast. It even worked on my first try! Like Steve said, its just a nickel. Even if you don't like the results, you can always spend it.

Joe Paonessa
 

Billzach

Elite Cafe Member
Joined
Nov 8, 2006
Messages
510
Location
mayfield, ky
Dave
It,s a 100% better than my first coin carving..As Stephen has mentioned, a burnisher is a big plus in finishing a coin out and it,s one of my main tools i use on every carving..We have a super group of coin carvers here and on the coincarving forum who are always ready to help a new coin carver, so feel free to ask us if you have a question..
 

threefingerdave

Elite Cafe Member
Joined
Feb 23, 2007
Messages
284
Location
North Idaho
Thank you guys
i will definitely get some finishing stone
Joe, would you mind explaining the torching method? or is it on the site here.
I really appreciate you all and this web site
Merry CHRISTmas to all
Dave
 

gtsport

Elite Cafe Member
Joined
Feb 16, 2007
Messages
305
Location
Racine, wisconsin
Torch Toning

Hi Dave,

Here is the basic method as I learned it. You can adjust it to suit your needs or equipment. After you are happy with your carved coin, put it in your blast cabinet and give it a quick shot with glass beads at about 20 psi. This will give it an overall matte finish. If you don't have a glass beader, skip that step, the final result will be that your coin is a little shiner. Now you heat the coin. Steve sets his coin between the open jaws of a vice and heats it from above and below with a propane torch, watching until it reaches the desired color. I have held my coins with tweezers or in a slotted metal spoon and have used a propane torch, a butane torch, or the burner on the kitchen stove, they all work. When the color is right, let the coin cool. Now the fun part. Using a piece of white or gray scotch brite - the really fine stuff - lightly buff the high points and other areas of the coin that you want to be brighter. This will remove the oxidized surface (the dark stuff) bringing back a brighter, shiner metal. However, it will also leave very fine, but obvious scratches. At this point you take a nylon brush like those used in a Dremel (or my favorite, a cut down acid brush), put a drop of oil in the bristles and dip the brush in powdered carbide from your cutter/grinder. What? No cutter/grinder? No problem, I've used polishing compound instead, usually in 400-600 grit. Now, taking the brush in your hand, gently polish the coin, especially in the areas that were scotch brited, until the scratches are gone. You can also polish away more of the oxidation if you want. However, the best part is that if you don't like the results, heat it up and do it again. That's pretty much it. Steve probably has some extra tricks he uses, but this method will give you good results.

Good Luck!

Joe Paonessa
 

Keith

Elite Cafe Member
Joined
Jan 17, 2007
Messages
481
Location
Lincroft, NJ
I have done the same heat technique, but rubbed the coin with some Comet or Ajax on my fingers.
Cleaned off the high spots.
Keith
 

threefingerdave

Elite Cafe Member
Joined
Feb 23, 2007
Messages
284
Location
North Idaho
Thanks
I will try the heat toning method.
i am thinking of getting the "air eraser" it is like an airbrush that shoots abrasive instead. will that work like the bead blaster?
i am a little limited on room and the air eraser will definitely be smaller
thanks for all of the advise and comments
Dave
 

Keith

Elite Cafe Member
Joined
Jan 17, 2007
Messages
481
Location
Lincroft, NJ
I dont use any bead blasting. I dull the coin with pc board etch from Radio shack and use gun blue to age the coins.

Keith
 

Keith

Elite Cafe Member
Joined
Jan 17, 2007
Messages
481
Location
Lincroft, NJ
www.keithpedersen.com
Click on any of the pictures. I carved all the coins and they are bright and shiny where the cuts are. Rub the coin with the acid using a q-tip.dump in water. Dry the coin. Put on the gun blue and buff off the blue until desired using a rag with a little of the etchant on it. Dump it into water again. Dry off and post pictures for us to see.

The whole acid gun blue thing is done very quickly no chemicals are left on the coin very long.
If you leave the coin with the etchant on it too long you will start to see a ghosting of the original feathers and profile of the Indian.
Good Luck,
Keith
 

monk

Moderator
Staff member
::::Pledge Member::::
Joined
Feb 11, 2007
Messages
10,874
Location
washington, pa
first coin

hey, 3 finger- glad to see you're busy doin somethin useful. practice makes todays' work look way better tomorrow ! i've never done a portrait, but i think they would be more difficult to do. keep at it !
 

Latest posts

Sponsors

Top