A serious effort.

JTR

Member
Joined
Jan 10, 2007
Messages
68
Location
La Mesa, Ca.
Well I think I’ve been hanging out here looking long enough.
So here’s one I did a little while ago.
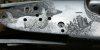
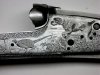
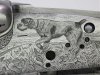
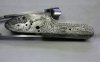
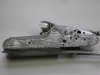
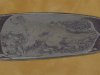
After about a jillion practice plates, this is my first serious practice plate. It’s just a copy out of Meeks ‘The art of Engraving’ book, from page 143. I chose to do it instead of scrolls just to see if I could do a reasonable likeness of the main scene. And reasonable is about all it is, but it was fun, as well as really enlightening as to just what it takes to do something like this.
Pointers and constructive criticism to make it better are certainly welcome!
John
 

Attachments

  • Picture 015 (Medium).jpg
    Picture 015 (Medium).jpg
    72.1 KB · Views: 309

Andrew Biggs

Moderator
Joined
Nov 10, 2006
Messages
5,034
Location
Christchurch, New Zealand
Hi JTR

Not a bad effort all round considering it's your first.

Here's my spin on it.............The devil is in the detail. :) Please bear in mind that this is only my opinion and others may see things differently.

1. It lacks shadow, depth and texture. This can be acheived by going around the dog and cutting tiny lines very close together that fade out. This will give shadow. First you have to choose a direction of light sourse. In other words where the sun is in the sky.

2. The grass needs to be cut as blades of grass. It has two sides so you have to cut 2 sides. The grass also needs shadow by cuting a little heavier around the base of the grass. You also need a lot more of it.

3. The dog itself. The hair needs to be cut using tiny cuts that follow the animals contours. This highlights muscle form in the dog which gives it shape.

4. There seems to be tiny burrs that are raised along the edge of the cuts and this is trapping unwanted finger grease/ink. One trick is to use a very fine grit wet n dry paper and lightly sand. 2000 grit with a couple of light wipes will work. You then go back and may have to darken areas.

5. Think of it as building up a series of layers in the design. Each one being worked on to build the picture.

I would highly recommend the FEGA tape/DVD by Chris de Camilas on bulino engraving. Available at www.fega.com This will explain the process a lot better than I can. There is also a duck casting that's worth getting as well so you can see the actual cuts. Also a book called the technical pen available at GRS is an excellent book for showing line drawings and how they are built up.

If you can make it to the FEGA show in Reno, Marty Rabeno is giving a seminar on just this sort of thing.

Don't worry.........it takes time and effort to learn these things. Just keep going and bit by bit you'll start to understand the process.

Cheers
Andrew
 

pilkguns

~ Elite 1000 Member ~
Joined
Nov 14, 2006
Messages
1,874
Location
in the land of Scrolls,
Not to disagree with Andrew, but engraving is a multi-faceted art. There are all sorts of budgets, and therefore all sorts of levels of engraving. There are factory engraving patterns that are seriously sought by collectors where the dogs and birds are configured of the simplest of lines, not much more than ballooned stick figures. And then there are the patterns where it takes hours to put detail into the tail or foot of a dog.

Andrew is focusing on the highest level and his comments are valid for that style of engraving. But given that this was a copy from Meek's book page 143, it should be compared to that level, which I would say is medium quality engraving. And John's copy of that is very well done or a "A Very Serious Effort" to paraphase. Kudos to you John.

As you say learned a lot and the best advice I could give you is do another one with similar detail, you will learn more on the next one. I will say that Andy's #4 comment about needing sanding is valid for this or any piece, if you have burs raised up by the engraving, they need sanded down to a smooth surface, so that you really see what you have, and whether you should make additional cuts. Although, 2000 grit for this style is a bit too fine. I would think for these cuts you will have to start at 600, or maybe even 400 to make any headway.

Waiting to see number two in the "Serious Effort" series.
best
Scott
 
Last edited:

pilkguns

~ Elite 1000 Member ~
Joined
Nov 14, 2006
Messages
1,874
Location
in the land of Scrolls,
And as an afterthought commentary, I have to say that this style of engraving as seen on page 143 has become more interesting to me over the years than the every fine detail yet very fragile style of engraving. I like engraving that you can tell what it is with the naked eye from any angle yet still put a loupe to it and see lots of detail. Ron Smith is one of the current masters of this style (as seen on page 143). Ron's work certainly has more detail, but it is "cut" detail as opposed to mostly dot detail, and cut deeper than the average Italian/Bulino style.

And not just me, there seems to be a quiet rebellion of high end engraving purchasers seeking an investment that does not have to held "correctly" and will take a smidgeon of use or minor handling without seeing "the paint fall off the canvas". I have done both and will continue to do both occassionaly as necessary I am sure but for me at least at this point in my career, I am favoring the "engraverly" style of engraving, just as I prefer painterly looking paintings as opposed to one that looks just like a photograph painted on a canvas.

Not to demean this style of work, as I hold those practicioners in high esteem, and their art wows me when I see it, but for me at this point and time, I prefer that classic engraved look.
 

Christian DeCamillis

Elite Cafe Member
Joined
Nov 9, 2006
Messages
639
Location
Traverse City, Michigan
Here are a few photos of what Andrew was explaining, He has figured it out quite well and it shows in his bulino work. Chris
 

Attachments

  • Picture 842.jpg
    Picture 842.jpg
    62.1 KB · Views: 141
  • Picture 841-2.jpg
    Picture 841-2.jpg
    76.5 KB · Views: 135
  • Picture 1048-2.jpg
    Picture 1048-2.jpg
    108.2 KB · Views: 129
  • Picture 1057-1.jpg
    Picture 1057-1.jpg
    131.7 KB · Views: 149
  • Picture 995-1.jpg
    Picture 995-1.jpg
    103.8 KB · Views: 139

JTR

Member
Joined
Jan 10, 2007
Messages
68
Location
La Mesa, Ca.
Thanks for the comments so far!
Fortunately I wasn’t trying to do a bilino style engraving as I’m just a rank amateur, but like scott pointed out, just a semblance of the engraving shown in Meeks book. In fact, I’m so amateur that I’m taking the GRS basic engraving course this April which I’m sure will help considerably.
The beautiful work Andrew does is, and will probably remain lightyears ahead of my skill level.
Still, lot’s of good tips from him and Scott. I hadn’t thought of light sanding to get rid of the prickly parts. And the pooch could use some more fur like the close-up of the dog that Chris posted, and more lines to show some shadow and depth,,,,and,,,and,,,and.
So as time permits I’ll try another one, or maybe just try to improve on this one.
Thanks for the comments as they’re certainly appreciated!
John
 
Last edited:

John B.

Lifetime Pledge Member
::::Pledge Member::::
Joined
Nov 9, 2006
Messages
3,956
Location
Los Angeles area, California.
Hi John. Good post.
I think you made a very good effort for a first try.
You have received some good comments and direction.
You will go a long way with this help, further study and classroom instruction.
Keep going!

Chris, fantastic work and wonderful photographs.
Thank you for showing them but you killed my Sunday morning just studying them.
There's a whole seminar in these picture enlargements.
Hope to see you in Reno, best, John B.
 

jlseymour

Elite Cafe Member
Joined
Dec 22, 2006
Messages
695
Location
Mt. Dora FL
John keep drawing and cutting you will keep getting better and better...
Good start and it gets better...
Wish I had more time to draw and engrave I'm enterupted all day at the jewelry shop...
Jerry

Hey Chris, Your work is fantastic, I hope to take another class with you, there's so much to learn...
You were right about I would like to give up jeweley work for engraving...
Thanks Jerry
 

Latest posts

Sponsors

Top