Critique Request Advice, Tips, comments

MICHAEL

Elite Cafe Member
Joined
Dec 14, 2009
Messages
340
Location
Harriman, Tn.
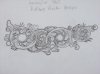
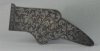
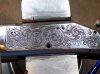
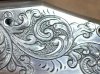
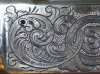
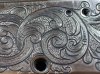
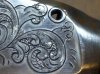
I was practicing drawing the Nimschke 1865 Rolling Block pistol design and thought it would look good on the reciever of a 1887 Winchester shotgun. I guess it would have looked good if I could cut as well as I draw. I thought it was supposed to be the other way around. I had a hard time getting my #3 punch dot close without overlapping dots. Any tips on getting them to touch?
First of all, this was an unshootable reciever, so no real guns were harmed in the engraving of this piece.:)
I prepped the metal with a belt grinder. I'm still not there as I lost some edges and almost removed the serial number. But I'm still working on it. I did remove some very deep gouges. Someone had added some extra holes also.
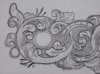
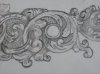
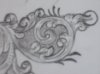
I purposely left off a border. I tried to recut some lines and really made the first few worse but then started to make some better. I used a liner for the first time and mixed single point shading with the liner. I ended up going over the single point with a liner as it looked unbalanced.
I had to change the design as I drew / engraved it to make it fit the area. Any suggestions on making this a better design for future use would be much appreciated. I already started designing the other side of the reciever and thought about leaving the rest of the gun without engraving. I'm still thinking about this though, so ideas for other areas of the gun would be welcome to hear. I haven't seen an engraved 1887 Winchester so if someone can point me toward pic's of one I would appreaciate that also. Thanks:thumbs up:
 

Attachments

  • 100_0238.jpg
    100_0238.jpg
    87.6 KB · Views: 187
  • 100_0239.jpg
    100_0239.jpg
    93.6 KB · Views: 181
  • 100_0240.jpg
    100_0240.jpg
    107 KB · Views: 178
  • 100_0241.jpg
    100_0241.jpg
    116.3 KB · Views: 159
  • 100_0242.jpg
    100_0242.jpg
    87.4 KB · Views: 149
Last edited:

Arnaud Van Tilburgh

~ Elite 1000 Member ~
Joined
Oct 3, 2008
Messages
4,221
Location
Belgium
Michael, I understand you did the best you can and it looks quite good.
I can tell a lot about it where it could be better, but one of the main things in my opinion, never use a liner for shading, as it just makes the leaves grey.

arnaud
 

Andrew Biggs

Moderator
Joined
Nov 10, 2006
Messages
5,034
Location
Christchurch, New Zealand
Hi Michael

From what I can see you are suffering from two things.

The first is a lack of technical ability. At the moment you can see what you want to achieve........but can't quite get it there. But that's OK as it will come with time, practice and experimentation as does most things.

The second is probably the more critical issue at this stage. And that is lack of planning.

I had to change the design as I drew / engraved it to make it fit the area.

I think what you have said is the most telling thing of all. I can see where you have "lost the plot" on it quite a bit :)

It is critical at this stage of your journey to slow things down a little and before you start the cutting, make sure you plan the design and what you are going to do. Don't draw, cut and alter as you go because that will put you on a downward spiral as one mistake will compound onto the next.

Plan your design thoroughly, transfer properly (or scribe onto the metal)........make all adjustments that need to be made with a scriber............then start cutting, but only after everything else is correct.

One of the biggest mistakes I commonly see with people learning to engrave is in their keenness to start cutting the metal, they forget to put time into the planning stage.

As you become more experienced, then you can maybe start doing a few things on the fly.

Cheers
Andrew
 

pilkguns

~ Elite 1000 Member ~
Joined
Nov 14, 2006
Messages
1,874
Location
in the land of Scrolls,
I think this looks real good Michael, both design and execution ,D@!^N good compared to what you were doing at the Engrave-In.

And i have to disagree with Andrew on the drawing and cutting. I think it should be an equal mix. Cutting designs oftne teaches you what what dcoes'nt work, becuase it does not flow well, and helps you to learn to draw better designs. I higly encourage my students to draw a complete design on an object cut that, learn from it, then start the process over again with the new insight applied for the next one.

As to making the dot punches work., i.e., not making them overlap, it is just a practiced "feel thing" that you have do develop the muscle memory and the fine motor skils to do. I remember the first time it came together for me, all of sudden I was just doing them right, being able to shift the tool over the exact amount to touch but not overlap the edge of the previous one before the hammer strike, all in a tap, tap, tap, tap ,tap, much faster than I cant type this staccato. FWIW, I would only do this with a hammer and chisel, well hammer and punch, I don't know how you could do it with a Lindsay, GRS or Ngraver. you could, but it would be awkward I think, and was never able to get the right imprint with these tools, it wants to make multiple strikes to and then the punch bounces and your circle is suddenly three light jittery ones, rather than a nice deep single one.
 
Last edited:

Andrew Biggs

Moderator
Joined
Nov 10, 2006
Messages
5,034
Location
Christchurch, New Zealand
Hi Scott

I agree with you 100% about a good mixture of drawing and cutting because one affects the other.

But that is not what I was talking about in my post. :)

Cheers
Andrew
 

monk

Moderator
Staff member
::::Pledge Member::::
Joined
Feb 11, 2007
Messages
10,880
Location
washington, pa
the one glaring mistake i see first off: nimschke used a "beading punch". you did not. you need to purchase a beading punch set. a short, hardened rod- tapered at the end, with a concave depression set into it. the sets usually have 8-10 varying sizes to suit the job at hand. or you can anneal a small drill rod, make the end concave, and then draw temper to harden it. if you look carefully at nimschkes' work, his beads are raised. yours are depressed, the opposite of their intended way. using the beading punch allows for a much easier patterning effect. it must be done with the manual hammer.
 

MICHAEL

Elite Cafe Member
Joined
Dec 14, 2009
Messages
340
Location
Harriman, Tn.
Arnaud, Thanks for responding and I'll remember that. I was trying to emulate Nimschke is why I was using the liner.

Andrew and Scott- I appreciate the responses and the honesty. It's the only way I'll get better. It was hard for me to post the pics because I knew my drawing and engraving sucked but also knew it was the only way to get better.:eek: I agree completely with Andrew. I did not plan this out. I included the pics of the drawing I was practicing from the Nimschke book. My drawing is even different from Nimschke's because I was trying to apply some of Ron's rules to the drawing. I had been practicing my metal prep on some shotgun barrels and this reciever also. I liked the design alot and I try to engrave everyday, even if for only 30 mins. So, I started drawing the design on the reciever and started cutting. I only have so many gun parts and should have and will make the most of them in the future. Andrew you showed me that and I thank you.:tiphat:
I spent around 6 hrs drawing the design and only 2 hrs cutting it, so I realize now that I do need to slow down. I usually draw whenever I can when not home and try to engrave whenever I'm at home. It's alot harder to draw on the gun than a piece of paper, so I'll put some time into that too.
Scot I use a hammer and punch. I can judge the #2 punch dots better than I can the #3. It seems to me that the #3 is harder to judge the distance apart. I remember seeing Weldon's punch dot and would really like to do that. If all I have to do is keep working at it I'll do that. Just thought there might be a trick or two I didn't know about.
Thanks to all for your help.:thumbs up:
 

Attachments

  • 100_0243.jpg
    100_0243.jpg
    42.9 KB · Views: 98
  • 100_0244.jpg
    100_0244.jpg
    50.1 KB · Views: 97
  • 100_0245.jpg
    100_0245.jpg
    49.9 KB · Views: 94
  • 100_0246.jpg
    100_0246.jpg
    28.3 KB · Views: 83

MICHAEL

Elite Cafe Member
Joined
Dec 14, 2009
Messages
340
Location
Harriman, Tn.
Monk, I took a picture of my punches. If these are not correct please let me know where to get them. Mine have a concave depression in them. Maybe I'm using them wrong, such as striking too hard? Thanks for posting.:thumbs up:
 

Attachments

  • 100_0247.jpg
    100_0247.jpg
    54.2 KB · Views: 91
Last edited:

Andrew Biggs

Moderator
Joined
Nov 10, 2006
Messages
5,034
Location
Christchurch, New Zealand
Hi Michael

6 hours drawing and 2 hours cutting............oh dear!!! :)

Yip, you really need to slow down because you are rushing the work to such an extent that it is obvious.

A useful tip is to treat every project from start to finish as a really serious one. It dosn't matter if it is a key ring or gun part, big or small. Make it the very best work you are capable of on the day.......don't even think about the time investment.

Speed will come with experience. Strive for perfection and accuracey first and give your canvas the respect it deserves.

A project like this should take you a very, very, very long time. By that I mean weeks or more!!!!!!

But hey.........just one more lesson to file away in the cabinet of experience :)

And yes, those punches are correct.

Cheers
Andrew

PS. I just had a look at your drawings............where is the gun outline?????
 

MICHAEL

Elite Cafe Member
Joined
Dec 14, 2009
Messages
340
Location
Harriman, Tn.
PS. I just had a look at your drawings............where is the gun outline????? (quote from Andrew, couldn't figure out how to add the quote other than copy / paste)


Andrew, I was trying to explain to you that I was basically using the reciever as a practice plate. After prepping the reciever and spending so much time doing metal prep, I just decided to draw and cut. My reasoning was I thought I needed to engrave everyday to get better. Due to work and family obligations, I sometimes have no time to at best a few hrs to engrave. I'm also having to learn metal prep and firearms dissassembly / assembly/ drawing. I've placed everything else on hold and focusing on engraving.
When I put my mind on a goal and I'm focused on it, it takes a jolt to wake me up and let me see the light. You woke me up. I agree, I need to slow down and do my best on every piece. I know I should have erased my design on the reciever and redrawn it more. I'll do that next time.
I feel I did my best on the cutting. When I said 2 hrs to cut, that was everything except the shading and punchdot. I felt I really needed a boost to my morale due to the heel fiasco I had earlier in the week. I did this in a way to prove to myself that I was improving. I can see areas that I improved on and areas I need to work a whole lot more, and now I see areas I didn't have a clue about and I thank you for pointing them out to me.
 
Last edited:

Andrew Biggs

Moderator
Joined
Nov 10, 2006
Messages
5,034
Location
Christchurch, New Zealand
Hi Michael

The reason I asked that question is because without the outline of the object being engraved....in this case your gun receiver....then you don't know if the drawing will fit or be proportionatley in sync with the gun. It will also give you no guidelines or boundaries to work within.

You're learning a lot all at once. Don't worry, your at the really frustrating phase and it'll all come togeather for you. It just takes time.

Oh yeah...........a good tip on metal prep for guns.......pay someone else to do it and at least that way you will save your sanity :)

Cheers
Andrew
 

Martin Strolz

Elite Cafe Member
Joined
Dec 12, 2006
Messages
339
Location
Steyr, Austria
Michael,
Each year I use a certain print of Nimschke's work as a motif for a practice plate in school. These samples were done by 16 year old girls in their second year of education. They are good but are not the best results that I got. We do the whole plate (copper) with an onglette push graver, use a polished tool for the outlines and later grind it a little bit sharper for the shading. My students love to do these Nimschke motifs!
I recommend to engrave a bordering line at first, followed by the longest lines in the motif, -the backbones. After that you start to fill in the inner work. It probably would help you if you make progress if you smoke prints of your finished engravings and compare those to the original sources. The should look quite similar...
Liners are difficult to handle right, so why not shade in single lines?
Martin
 

Attachments

  • Nimschke plate 1.jpg
    Nimschke plate 1.jpg
    50.3 KB · Views: 63
  • Nimschke plate 2.jpg
    Nimschke plate 2.jpg
    41 KB · Views: 62

KenB

Member
Joined
Jan 25, 2007
Messages
58
Location
Ruckersville, VA
"I haven't seen an engraved 1887 Winchester so if someone can point me toward pic's of one I would appreaciate that also. Thanks"

Hi Michael,
Look for an example of engraving on a 1897, which is what you have here. I've watched your work from the beginning and am impressed by your willingness to listen and learn, along with a good work ethic. Stick with it and you will continue to improve.
KenB
 
Top