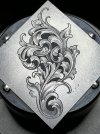
Help, please: Design advise on knife.

ByrnBucks

:::Pledge Member:::
::::Pledge Member::::
Joined
Dec 25, 2020
Messages
212
Location
Chattanooga, TN
Good evening to all,
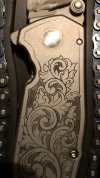
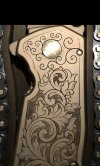
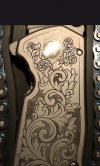
Currently working to my first real piece with my own design. Sadly Iv neglected Every piece of advice given to beginners here in the cafe…. Picking up a pencil has yet to be a high priority and now I’m paying the price.

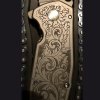
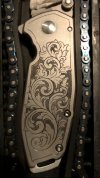
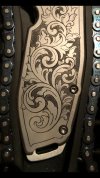
So first question, Id like to finish up with background removal before getting into shaping which I have about one third sketched out on Procreate. Before hastily slapping some filler leaves on the top “empty“ section and regretting it later.

I was wondering what some of you fine gentlemen would recommend as a good approach to fill this area. Thanks for any Ideas and your time taking a peek.

BB 74BA204D-A9EF-4012-812D-9D51AB607D93.jpeg DBB70954-5E14-43AC-B29E-F1AF9DCA9103.jpeg 333BBD6E-CFBC-425E-AD9B-B4D083C3F074.jpeg
 

John B.

Lifetime Pledge Member
::::Pledge Member::::
Joined
Nov 9, 2006
Messages
4,004
Location
Los Angeles area, California.
Hello Byrn, make a drawing or ink impression from what you now have on your knife'
Then draw in some smaller scroll or elements originating from the pins or the line borders at each end of your knife.
Try to design it so that the background removal areas stays balanced on the whole design.
Keep the B/G removal areas approximately the same size.
Look and study it on paper before you rush into cutting it.
Sometimes "next day eyes" see things and judge things better.
 

ByrnBucks

:::Pledge Member:::
::::Pledge Member::::
Joined
Dec 25, 2020
Messages
212
Location
Chattanooga, TN
Hello Byrn, make a drawing or ink impression from what you now have on your knife'
Then draw in some smaller scroll or elements originating from the pins or the line borders at each end of your knife.
Try to design it so that the background removal areas stays balanced on the whole design.
Keep the B/G removal areas approximately the same size.
Look and study it on paper before you rush into cutting it.
Sometimes "next day eyes" see things and judge things better.
Thank you sir, much appreciated. I very much like the “next day eyes” for better perspective.
 

monk

Moderator
Staff member
::::Pledge Member::::
Joined
Feb 11, 2007
Messages
10,971
Location
washington, pa
i found in my early days an art projector would help. blow it up giant size on a wall. this can sometimes help to see what yer eye otherwise ignores. in the case of your example, i'd start at the bottom with a slightly smaller scroll. progress forward in like fashion. you could then surround the pin with another spine and finish it out.
 

ByrnBucks

:::Pledge Member:::
::::Pledge Member::::
Joined
Dec 25, 2020
Messages
212
Location
Chattanooga, TN
So just a doodle on procreate and stopped at the backbones. I‘m having trouble determining If this works in any way. I realize that the scale in comparison is way smaller.

Would any of you proceed in this direction or is this a complete wash? Thanks for any input and no need for sugar coating :)

BB
56F16874-FB99-4A9A-8E72-FB4A1BA1B547.jpeg
 

John B.

Lifetime Pledge Member
::::Pledge Member::::
Joined
Nov 9, 2006
Messages
4,004
Location
Los Angeles area, California.
Too small, in my opinion Byrn.
Looks "added on", instead of part of the original design.
Not everywhere does it have to be full scrolls.
But keep the elements, leaves and background spaces approximately the same size as the existing engraving.
Some things could be just leaves and buds emanating from the line border or the existing scrolls.
 
Last edited:

ByrnBucks

:::Pledge Member:::
::::Pledge Member::::
Joined
Dec 25, 2020
Messages
212
Location
Chattanooga, TN
Too small, in my opinion Byrn.
Looks "added on", instead of part of the original design.
Not everywhere does it have to be full scrolls.
But keep the elements, leaves and background spaces approximately the same size as the existing engraving.
Some things could be just leaves and buds emanating from the line border or the existing scrolls.
Evening John, been at it since posting this… couldn’t really fill the “little fellows” so gave it another go, Iv been hesitant to come off the border for fear of the tacked on feel. The bottom left scroll is a bit “cluttered“. Just read your post and I think I can reduce the amount of elements and work a little on upsizing some others for consistent spacing. Thank you for your insight. BEA8D6A4-CECF-40A6-9769-CA416F54A2E3.jpeg
 

John B.

Lifetime Pledge Member
::::Pledge Member::::
Joined
Nov 9, 2006
Messages
4,004
Location
Los Angeles area, California.
Hello Byrn.
Still looks very "added on" to me. I realize you have been working hard and it's your decision to make.
If you don't mind, try working off the large hinge pin on the blade end.
And keep the elements and background areas in the same size range as your bold original and nice scroll work.
On the other end everything can work as "outside" work coming off your starting scroll if you don't want to have elements starting from your line borders.
Just try these ideas as a drawing and see what you think. You have a nice engraving design started.
Look forward to seeing what you come up with.
 

monk

Moderator
Staff member
::::Pledge Member::::
Joined
Feb 11, 2007
Messages
10,971
Location
washington, pa
to me it clashes with or detracts from the main design. what you wat is for a pleasant flow from start to finish. your changes disrupt any sort of flow.
 

ByrnBucks

:::Pledge Member:::
::::Pledge Member::::
Joined
Dec 25, 2020
Messages
212
Location
Chattanooga, TN
Thank you gentlemen I appreciate you time and wisdom. It will surly erase better on paper than after cutting haha.
 

ByrnBucks

:::Pledge Member:::
::::Pledge Member::::
Joined
Dec 25, 2020
Messages
212
Location
Chattanooga, TN
Good Day to All, Im fairly pleased with this one and think it should flow quite nicely.
Once again if anything is disrupting to the eye or feels out of place let me know. Thanks to all for your time and advise. Im certain to get stuck again before this is through but this should keep me busy without worrying about catastrophic miscalculations haha :) BB D28065E7-4D6F-45FF-A95C-6263EA32A519.jpeg
 

John B.

Lifetime Pledge Member
::::Pledge Member::::
Joined
Nov 9, 2006
Messages
4,004
Location
Los Angeles area, California.
Hi Byrn,
That is much better, but I think you will like it even more if you show a stem mostly surrounding the hinge pin and the elements originating from that, rather than directly from the hinge.
Give it a try and see what you think.
 

ByrnBucks

:::Pledge Member:::
::::Pledge Member::::
Joined
Dec 25, 2020
Messages
212
Location
Chattanooga, TN
Hi Byrn,
That is much better, but I think you will like it even more if you show a stem mostly surrounding the hinge pin and the elements originating from that, rather than directly from the hinge.
Give it a try and see what you think.
Thanks John, I was wondering about cutting all the way up to the pin as its raised a bit. Didn’t consider a stem “newbie” would help aesthetically and functionality. Photo I was using to sketch is slightly catawampus so transferring isn’t an option. Ill add a stem drawing on the knife itself, Thanks for the help Ill post the outcome once it gets there “probably next week”.
Hope everyone has a wonderful day. BB
 

John B.

Lifetime Pledge Member
::::Pledge Member::::
Joined
Nov 9, 2006
Messages
4,004
Location
Los Angeles area, California.
Thanks BB, hope you make it work.
You have a good design going on the knife and both ends of the knife need to continue with the same general design elements IMO.
 
Last edited:

ByrnBucks

:::Pledge Member:::
::::Pledge Member::::
Joined
Dec 25, 2020
Messages
212
Location
Chattanooga, TN
Evening gentlemen, Been a busy week and just got to put a little time drawing this up one more time before committing. Couldn’t quite unlock the proper way to begin the stem around the hinge pin and finish connecting it to itself So it feels a little off. Any insight into this would be appreciated thanks for looking and have a wonderful day. BB F5848C92-4948-43C7-9743-F2734F979B0B.jpeg
 

John B.

Lifetime Pledge Member
::::Pledge Member::::
Joined
Nov 9, 2006
Messages
4,004
Location
Los Angeles area, California.
Evening gentlemen, Been a busy week and just got to put a little time drawing this up one more time before committing. Couldn’t quite unlock the proper way to begin the stem around the hinge pin and finish connecting it to itself So it feels a little off. Any insight into this would be appreciated thanks for looking and have a wonderful day. BB View attachment 49993
That will work, Byrn.
Another way would be to slightly enlarge the last scroll on your original design ( the one with the textured background) and start a scroll backbone from the outside of it, and which extends and wraps around the hinge pin.
This will make that end of the scroll design part of the whole original design.
Either way will work, see which you prefer,
 

ByrnBucks

:::Pledge Member:::
::::Pledge Member::::
Joined
Dec 25, 2020
Messages
212
Location
Chattanooga, TN
That will work, Byrn.
Another way would be to slightly enlarge the last scroll on your original design ( the one with the textured background) and start a scroll backbone from the outside of it, and which extends and wraps around the hinge pin.
This will make that end of the scroll design part of the whole original design.
Either way will work, see which you prefer,
Thanks John, Gonna give this one a go then. Much appreciate, next time I wont jump into cutting without finishing the design… lesson learned.
 

ByrnBucks

:::Pledge Member:::
::::Pledge Member::::
Joined
Dec 25, 2020
Messages
212
Location
Chattanooga, TN
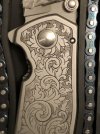
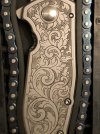
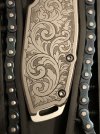
Good Day Fellers, Been pretty hot and draining theses past weeks but finely made a bit of progress. I’v been struggling a little getting my stippling to match as most was done in 1 to 2 hour chunks, after about 12 hours of only stippling the segments are all a little different despite trying going back over everywhere “Dont know if Im beating myself up“ but it seems like I shouldn’t have spent twice as long doing background.
Anyways here’s the progress thanks for looking. BB 022CC635-1558-45FB-A297-7731195A8E45.jpeg A54A3B92-38BC-487B-BE0D-55B0DF222539.jpeg 60B60979-5F94-42DE-B32C-A88CB57CB1FB.jpeg 58AB3B0D-1F59-424F-8A6F-C2F66EDEC811.jpeg
 

ByrnBucks

:::Pledge Member:::
::::Pledge Member::::
Joined
Dec 25, 2020
Messages
212
Location
Chattanooga, TN
Good evening everyone,
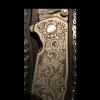
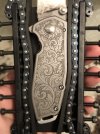
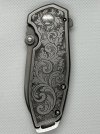
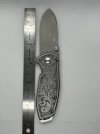
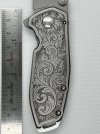
Finally throwing in the towel on this little feller, I didn’t make much more progress on this despite putting it in the vise and staring intently hoping to finish shading without making a mess of it. Unfortunately a lack of preplanning and design practice has ultimately made me come to the conclusion that even unfinished I’m not at all displeased with the piece even though I had planned on this being my pièce de résistance thus far in my journey.

I’ve undertaken serval pieces in the interim that have all turned out very well but this knife has haunted me as about 30 hours invested its a bit painful to abandon. I often give the advice at my work to up and comers if your not making mistakes then your missing opportunities to learn valuable lessons for future projects, as the ability to fix or save a paint job is equally important as producing perfection every time.

Anyways thanks for looking and I hope everyone has a wonderful weekend.
PS thanks to everyone in this most wonderful community for being so positive and encouraging to everyone undergoing the incredible journey. BB 4FFB0430-C2C6-484B-8055-282AEB53C8A3.jpeg 4AEBC626-CCE6-48D9-BA0B-73E9A918CBB8.jpeg 07CB7BC5-F9A9-41BF-820F-782F023EA1AE.jpeg 1C2B0F60-9CB1-4F21-A06B-70E83FDA1FB0.jpeg
 

Latest posts

Sponsors

FEGA
Top