Critique Request Drawing for critique

RDP

Elite Cafe Member
Joined
May 19, 2012
Messages
574
Location
Brisbane, Australia
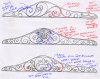
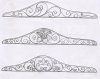
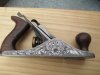
Here are three basic layouts for a wood plane I have, I have been following Mr Biggs instructions on previous posts and I hope I have learned something, I have done some cutting, but am not happy with a lot of it, because looking back at it, what I thought was OK now I realize is not, here is one I did before,(complete with submarine propeller, as somebody called it):rolleyes:,thanks Ray, so I decided to go back to the beginning with pencil and paper, starting with the basics, I am liking what I see but before I get to cocky, I thought I post this, for someone to get me down to earth again, the flower in the pencil drawing it will be improved at the final stage, is just there to get an idea for the lay out, I have been practicing every day time permitting at work, I am doing this as a hobby at the moment, any comments welcomed, don't hold back guys, thanks for looking,
Richard.
 

Attachments

  • Kunz Plane.jpg
    Kunz Plane.jpg
    98.1 KB · Views: 1,040
  • IMG_0976.jpg
    IMG_0976.jpg
    86.9 KB · Views: 1,030

JJ Roberts

:::Pledge Member:::
::::Pledge Member::::
Joined
Nov 10, 2006
Messages
3,549
Location
Manassas, VA
Richard, Your drawings and engraving looks really nice, Andrews advice has got you off to a good start. Keep us posted.:thumbsup: J.J.
 

rayf24

Elite Cafe Member
Joined
Dec 29, 2010
Messages
574
Location
united kingdom
Hi richard
Sorry about the sub propeller thing but know that I look again could be an electric fan as well :biggrin:
Back to the three layouts number 2 & 3 dont look bad but something not right with no 1 just my 2 cents worth it looks out of balance
with one scroll entwind and the other not ????.
Ray
 
Last edited:

Beathard

~ Elite 1000 Member ~
Joined
Jun 22, 2011
Messages
1,476
Location
Paige, TX
I like these a lot better. Especially the two more complicated ones. First let me say I'm looking at these on an iPhone, so the images are not large. Even though this us a 200%+ improvement there are always places to improve. It looks like there are elbows in the termination curve on almost every scroll on the fancy one without the flower. There are also a couple scrolls that it looks like you stretched them to make them fit. When you did that they didn't keep a good flow. When I get to a computer I will mark them. I'm really pleased with your improvement. Took me almost a year to get my backbones looking that good.
 

Marcus Hunt

~ Elite 1000 Member ~
Joined
Nov 9, 2006
Messages
1,799
Location
The Oxfordshire Cotswolds, England
nothing wrong with your design but the shapes of the scrolls need urgent attention! Your right hand starter scroll in the middle of the bottom picture is great so why aren't the rest? There are lumps, bump, and humps all the way through the design. The gradual taper of the inside of a scroll needs to be a smoooooth progression. If there is a sudden widening or narrowing and then widening something's wrong; a big hump back and a sudden tightening to the head of the scroll is also wrong. This is known as 'hooking' (as it makes the scroll look like a fish hook) and should be avoided.

Now the good news is you have drawn some good scrolls so you are capable of drawing them. So redraw the design with nice smooth scrolls and you should be okay. And I quite like the plane you've already cut. The style suits the plane well.
 

rod

~ Elite 1000 Member ~
Joined
Nov 19, 2006
Messages
1,609
Location
Mendocino. ca., and Scotland
All of what Marcus said, Richard

General rule.... do not put pretty nice art ideas on poor geometry, especially when ornamenting a very nice curved boundary of the wood plane. Back bone skeleton needs to be impeccable, and cannot be rescued by nice art ideas. As I wrote before, with such a big canvas as a wood plane, I would not start cutting until your drawing passes all the geometry tests.

On the plus side, Richard, taking onboard Marcus' valuable critique, combined with continuing your art ideas should combine to give rapid progress.

Best wishes, and thank you for posting!

Rod
 

Andrew Biggs

Moderator
Joined
Nov 10, 2006
Messages
5,035
Location
Christchurch, New Zealand
Hi Richard

That is a vast improvement on what you have been doing. You are doing some thing right like making scrolls touch borders etc etc.

But...and there is always a but!! :)

Marcus is correct.........your scroll back bones are a bit out of shape. I can't over emphasise how important it is to get this right. If they are wrong everything else turns pear shaped.

I have given you something to think about.

Top drawing......The scroll shapes are not that good and more oval than anything else. The ribbon bits at either end are not really anything. When engraved they will look out of context with the rest of the design. The scroll I have marked dosn't flow with the design and it hits you immediately when you look at it. Scrolls have to be in harmony with all other scrolls and not jar the senses.

Middle drawing.......The flower is far to big and dominates everything. I have suggested an alternative. This becomes a frame that you can place some flowers into

Bottom drawing.........Much better and headed in the right direction. Pay attention to scroll shape. The gap in the middle of the two centre scrolls would be very hard to fill with leaves. By making the smaller scroll close that gap as I've suggested it will make it much easier to fill. This is the best drawing of all three and with a bit of fine tuning would look great.

Cheers
Andrew
 

Attachments

  • RDP-1.jpg
    RDP-1.jpg
    189.3 KB · Views: 959

billrice@charter.net

Elite Cafe Member
Joined
Nov 13, 2006
Messages
463
Location
Morro Bay, California, United States
Andrew

I love it when you give instructions on design and flow. I always come away with " Hmm so that is how it is done" and I go back to my little hole and apply your instructions to one of the projects I am working on. I am working on a design for a knife and it has not looked right yet. now I will go back and add another little puzzle piece to my design and see where it takes me. Thank you for sharing your in sites.
 

Andrew Biggs

Moderator
Joined
Nov 10, 2006
Messages
5,035
Location
Christchurch, New Zealand
Hi Bill

No worries.

Just keep in mind that this is my interpretation of things. There are lots of ways to do it and solutions will vary from person to person.

A good rule of thumb is........if it looks wrong, then it is.

Finding out exactly what is wrong is the hard part and fixing it can sometimes be harder. Sometimes you just have to throw your hands up, admit defeat and start the design again till everything comes together. All of this gets a bit easier with practice, perseverance and patience. :)
Cheers
Andrew
 

RDP

Elite Cafe Member
Joined
May 19, 2012
Messages
574
Location
Brisbane, Australia
Well, better than espected!!

JJ, thank you for your comment, still a long way to go, I very much admire your work, specially your bulino recently posted,

Ray, I will deal with you later, ;) thanks for your PM,:thumbsup:

Beathard, also thank you for taking your time and for your comments, this is my second year at it, I guess I was to exited to get cutting, I got into a lot of bad habits, that's why I am starting over,

Marcus, do you have time for this? :biggrin:
I appreciate your taking the time, I understand and see what you're saying, I have to apologize for this, I guess is one of my bad habits, as I intend to refine this drawings in Adobe Illustrator before transfer, I have neglected the shapes of some of the scrolls, I will pay more attention to the initial drawing and to get it as good as I possibly can,( then probably won't need Illustrator;))
I will take your advise and redraw this again with smooooth :eek: scrolls (if the brain connects with the hand:rolleyes:), by saying you like the one I have cut, makes me feel like dancing :banana:, Ok I'll come down now, :eek:

Rod, thank you very much for taking you time , all noted, I am printing all this and taking this to work to study,

Andrew,( I hate your buts :biggrin:) Yes my choice is the bottom one as well and that's the first one I drew, :rolleyes: so I will concentrate on that one for the moment, I know how the scrolls should look, but I must have the attention span of a gold fish, as soon as it starts looking like is coming together I loose the plot, :biggrin:, I will keep practicing and will do my best not to disappoint any of you, I'd hate for you think you have been wasting your time with me,

FYI, I have Ron Smith's book Drawing and understanding scrolls, Sam's Essential Guide to Drawing scroll, I am always reading information here, have seen Chris D tutorials ( you would think I'd be better by now) and am waiting on Marcus book and DVD set,
thank you all, will get on with the drawing,
Richard
 

billrice@charter.net

Elite Cafe Member
Joined
Nov 13, 2006
Messages
463
Location
Morro Bay, California, United States
Richard You are getting the finest advice about hand engraving from masters at this art from around the world. Keep it up and remember Practice makes perfect. I to do a lot of reading and viewing dvd's however it is my bench work that helps the most. Hang in there you are getting it.
 

tdelewis

Elite Cafe Member
Joined
Oct 10, 2010
Messages
791
Location
Volant, PA 60 miles north of Pittsburgh
Very nice. I chose a plane for my very first project. They are fun and the flat sides are easy. Lie Nielsen makes quality tools in bronze. Wayne Anderson makes the highest quality planes you will ever see. The workman ship is something to see. Search Wayne Anderson planes to find him.
 

KCSteve

~ Elite 1000 Member ~
Joined
Jun 19, 2007
Messages
2,882
Location
Kansas City, MO
One great tip from Lee Griffiths' “Art & Design Fundamentalsâ€￾ Book is that when you're drawing a scroll the line should cross at about 60% of the way across. To try and explain, imagine you're drawing the scroll inside a circle. Put a line across the circle and put your starting point at one end of the line. The scroll should hit the line again at the spot 60% of the way from where it is now and the far end each time. So the first intersection is at 60% of the whole circle, the next at 60% of the line from where you are to where the scroll crossed the line before (in this case, where it started).

Lee explains it much better than I, of course.
 

RDP

Elite Cafe Member
Joined
May 19, 2012
Messages
574
Location
Brisbane, Australia
Bill, yes I know how much good advise I am getting, and for practice,practice, and more practice, I wish I had more hours in the day to do it, it's hard when you also have to work, but have to battle on, thanks.

tdelewis, thanks for the info I know the brands, but it will be a long time before I scratch any of those planes, I know how much they cost, this ones I am practicing on only pay $5.00 at the recycling shop, cheap practice plates!!

Steve, I will have to read this post a few times to get what you're saying, lol, maybe a drawing will help, unfortunately my budget is gone at the moment, but I will keep that book in mind, thanks for that info.

Richard.
 

RDP

Elite Cafe Member
Joined
May 19, 2012
Messages
574
Location
Brisbane, Australia
Corrected Drawing (I hope)

Here is an update on the plane drawing, please note that I realize that the 4 intertwined main scrolls is a bit ambitious on my part, I misunderstood Andrews filler scroll reference, I am working on another drawing atm,
thanks for looking,
Richard.
 

Attachments

  • Kunz PlaneRedrawn1.jpg
    Kunz PlaneRedrawn1.jpg
    26.3 KB · Views: 220

JJ Roberts

:::Pledge Member:::
::::Pledge Member::::
Joined
Nov 10, 2006
Messages
3,549
Location
Manassas, VA
Richard, If your not sure of a design put on a practice plate and keep working on it till your happy. I'm working on an 1880's scroll design for a Colt Bisley I'll be work on. J.J.
 

Cloudy

~ Elite 1000 Member ~
Joined
Oct 27, 2007
Messages
1,051
Location
Chatham Center, NY
Great thread- yup- planes are a whole 'nother type of canvas, and I, too, appreciate Andrew's drawings! Glad to see you working with them as well, Richard!
 
Top