
You are using an out of date browser. It may not display this or other websites correctly.
You should upgrade or use an alternative browser.
You should upgrade or use an alternative browser.
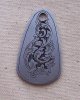
engraved key fob
- Thread starter Big-Un
- Start date
Jim-Iowa
Elite Cafe Member
Big-un,That looks pretty good to me. Better than I can do. With practice,the talent and willingness to coach and encourage the people on this board have. It won't take long before your turning out work you can show off in any crowd.
Andrew Biggs
Moderator
Well done
Yes, it's pretty rough round the edges and I'm sure that you can see that............but.........all the elements are there, all you need is more time and practice. It's a very nice design and fits the shape of the metal well and you seem to have all the right concepts in place. The next one will be better and the one after that better again. Keep posting pictures so we can see your progress.
Did you do the designing?
Best regards
Andrew
The design is all mine, with a little inspiration from Ron Smith's book on scrolls. I have a couple of design flaws in it, such as the small leaf coming from the wrong direction and a design flaw of the small scroll coming off the main one. I drew this one directly onto the piece from my mind's rendering without putting it on paper first. BIG MISTAKE!!! I'll not do that again! I also use a Optivisor with a #10 lense, not a microscope, which is my next purchase when the funds become available.
Marcus Hunt
~ Elite 1000 Member ~
Hi Big-Un, like Andrew says, all the design elements are there. I really can't see what you are beating yourself up over design wise. For something like this your design works just fine.
The execution could be a little better however. Are you using air assisted tools for cutting? If so, try and relax and don't try and force the tool around the curves on the scroll. That way you'll keep the back of the scroll smooth instead of having the little elbows all the way round. If you're hand pushing then learn to spin the vise as you're cutting, again you have to cut in a relaxed but controlled manner; tension in the muscles doesn't lead to fluidity in your cuts. Also, make sure your tools are sharp at all times. If the tip breaks when cutting you have to re-enter the same cut that broke it to complete the cut properly.
When you shade the scrolls, try and keep the cuts even i.e. fine cut, fine cut, fine cut. Not fine cut, slightly thicker cut, fine cut, fine cut, THICK cut. I hope you understand what I mean. Don't get me wrong, there can be a variation in cuts but they must be graduated.
Finally, when cutting away background to relieve scrolls this must be done evenly and as smoothly as possible. No amount of stippling will flatten out a rough background. Likewise, neither will engraving cover a badly prepared surface well; file and scratch marks have to be removed first.
I hope these tips help Big Un. This is a very good attempt and a brave move on your part as a beginner to post it here. Keep cutting and practicing and you WILL get better.
cheers,
Marcus
Just a commercial footnote, drawing things on paper first is a good idea if you are not confident about your design. As you progress however, you may find that you are able to draw directly onto the work piece, then scribe your lines and away you go. Do whatever works best for you. If you ever want to work commercially with engraving though, you may find you don't have the time to draw every line on paper first. Time is money and the client doesn't always want to pay for the extra hours a drawing would cost.
Last edited:
You've gotten some good advice from the members, Big-un. I think you're off to an excellent start, and from what I see your design's a bit better than your graver control. This is good! It's been my experience in teaching that it's normally the other way around. Your control will get better with practice, and your cuts will show uniformity and the periods of inconsistency will become fewer and fewer. Cut this same pattern again in a month or six months, and it'll show great progress. You have a couple of minor design elements that could be improved, but it's NOT bad at all. Let an experienced engraver cut the same pattern and you'd be suprised how it would look. You'll get there, Big-un. This layout shows me you have good potential. Improved cutting will come with practice, and I'll bet the farm it wont take that long. / ~Sam
p.s. You're also engraving in stainless steel which is a bit more demanding than softer metals.
p.s. You're also engraving in stainless steel which is a bit more demanding than softer metals.
Abigail
Administrator
Sam,
We don't have a farm.
Abigail
and Big-Un, please post your next one. It will be great to watch your progress.
Abigail
We don't have a farm.
Abigail
and Big-Un, please post your next one. It will be great to watch your progress.
Abigail
Abby: Yes, but if we ever GET a farm, I'd bet it on Big-un's progress. In the mean time, I'll bet the backyard.
~Sam
~Sam
KSnyder
Elite Cafe Member
Bigun, I wouldn't be ashamed of that, I'm a beginer too and mostly EVERYONE started the same way by stumbling along and learning as they go. I like your design I MUST get Ron Smith's second book.
keep on cuttin'.
Kent
keep on cuttin'.
Kent
Tira
~ Elite 1000 Member ~
Big-Un -- Very nice. I like the design a lot. Keep up the good work. =)
Marcus Hunt
~ Elite 1000 Member ~
I'll second that, j.c. It was the first thing I learned in my apprenticeship....week after week of learning to control and sharpen the graver. Not nice but necessary
Marcus
Marcus
Thanks to all for you input. The suggestions hit it right on...almost as if you were watching over my shoulder. I will try and slow down, not grip too tightly, and most of all, practice my tool control with the tedious but necessary obligatory geometric cuts. I will, I will, I will, as the Tin Man says!
pilkguns
~ Elite 1000 Member ~
Only thing I would add to all the excellant comments, is go back over it and try fix the rough edges. flare in if you need to, to smooth a line up, or flare out. Your line border can be cut deeper and more equal to get a consistent width. Yes with practice you won't have to do this so much, but on the other hand, I am sure every engraver on this board will go back and tweak a scroll or line here and there to make it more perfect.
Dave London
~ Elite 1000 Member ~
Good Start keep chipping away
Russ Sutton
Member
- Joined
- Nov 9, 2006
- Messages
- 45
It sure looks great to me. A microscope will make a big difference I think.
Ken Hurst
Elite Cafe Member
Bill, thats certainly an improvement over what you showed me last time you came for a visit. I'm sure the rough edges can be smoothed out when we have the N.C. engravers get together. Keep on practicing. Hope your mother is doing better. Ken
Again, thank you all for the kind words and encouragement. I appreciate the concern for my mother, Ken, Her cancer is growing rapidly, but hopefully the radiation will help her pain somewhat. She gained about 4 lbs last week and is more comfortable now that her medication was tweaked. Keep us all in your prayers; for Mom's comfort and my family's strength to deal with it.
Sponsors


