
You are using an out of date browser. It may not display this or other websites correctly.
You should upgrade or use an alternative browser.
You should upgrade or use an alternative browser.
Flintlock Butt Plate
- Thread starter LRB
- Start date
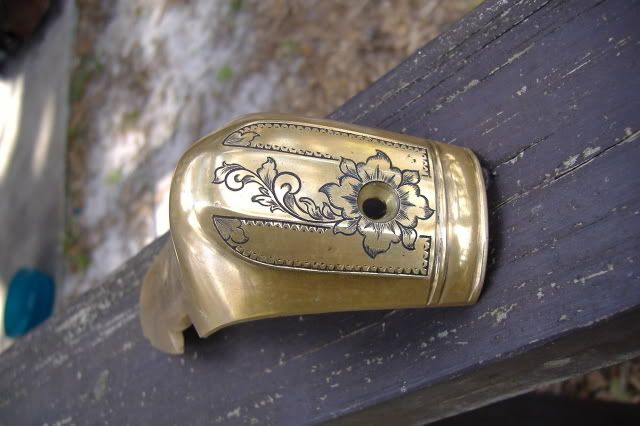
Nice job LRB. I like the leafy design around the screw. Shading looks good...I might have extened the lines a bit longer, but it still looks good. I might also have increased the spacing on the nick-and-dot borders just a bit. This is personal preference of course. Your cutting looks very clean and neat.
Jim-Iowa
Elite Cafe Member
Nice Job! Are you engraving the screwhead for the center of the flower?
Very nice, I see that the rifle is going to have a wooden patch box, and with that nice wide butt plate it is going to be an early rifle, I would love to see more pictures. I have not been able to do the nick and dot border very well. I have had a couple of people show me how they do it but I have not gotten the hang of it yet. I know practice, practice, practice but I am doing something wrong. I can not seem to make the perimid shaped cut with my square graver. Is this the right graver to do this job with?
FANCYGUN
~ Elite 1000 Member ~
I cut my nic and dot with a flat graver
Sam, thankyou for the tips, I will diffinetly try your suggestions. I am not even up to amatuer status yet. Any critiqueing is appreciated, and welcome.
Bama, I watched a Lynton Mckenzie tape, and immediately got the nicks to work, but do have a tendancy to space them too close. Try a flat graver. I made mine from a piece of file.
Bama, I watched a Lynton Mckenzie tape, and immediately got the nicks to work, but do have a tendancy to space them too close. Try a flat graver. I made mine from a piece of file.
William Grubb
Elite Cafe Member
Looks nice LRB . Thanks for posting
BAMA, to be sure you know the method. If you are right handed, go from right to left with the cut. Set your graver blade 90o to the line. Don't let it touch the outer edge of the line, or it will leave a mark. Dig in, making half of an inverted V, and sort of flick it out with a slight twist. If you don't get the depth you want first try, repeat. Having the graver as sharp as you can make it also helps. Work your series of nicks from left to right. That seems to make spacing easier. If you make your nick a bit smaller than the previous, you have the option to adjust it's position a tad, by a second cut either from the center of your cut, or the right edge of it, which ever direction you need to move it. I am sure those who do this on a regular basis do not have to do this.
KSnyder
Elite Cafe Member
LRB, nice job on the buttplate. The design is nice & not too busy. Is that either a Virginia or Bucks county?
Kent
Kent
KSnyder
Elite Cafe Member
LRB, yeah, it threw me off , I've not seen an E.Marshall rifle buttplate with a wedding band on the return. It will look great on the rifle.
Kent
Kent
Marcus Hunt
~ Elite 1000 Member ~
Bama, this 'nick'/'pyramid is one of engravings basic cuts. The most basic is the 'tear drop' cut from thin to thick, next is the straight line and the next is this pyramid cut. It is used on all sorts of things so leading on from this nick and dot you'd have a 'bead' border'. This is 2 parallel lines with 2 pyramids on one line directly facing 2 pyramids on the other which are joined to their oposite number by a tiny line. This forms what appears to be a small circle or oval depending on how far apart the pyramids are. The infill is the dot. The pyramid/nick is also used on Roman lettering forming the seraph.
Practice the cut by gently rolling the hand away from you to form the peak and then back towards where it started. You are aiming for a symetrical cut. Don't over roll the graver or the peak will hook back on itself forming what we call a 'sharks tooth' which isn't what's wanted. A square graver is all that's required, nothing fancy.
hope this helps,
Marcus
fegarex
~ Elite 1000 Member ~
Everyone seems to have a way to do the nicks using a square or flat graver, rolling away or toward you. I like to use a square but that's my preference. I will tell you that it takes some practice and "rhythm". Once you get it, the process makes a very fast and attractive border. I usually make a "dry run" on a practice plate if I'm doing a fancy job to get my mo jo working....
Sponsors


