Greetings from Croatia

rweigel

Elite Cafe Member
Joined
Dec 22, 2017
Messages
203
Location
France (north of Alsace, close to Germany)
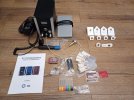
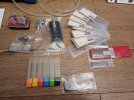
As I dug out my sharpening templates for this thread, it remined me of a method I devised (and somebody else might have devised as well) to hone a defined radiused heel onto flat gravers.


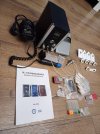
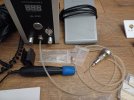
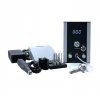
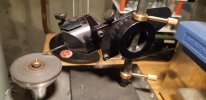
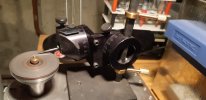
I do the same today with two adjustable stoppers on the post of the dual angle fixture, the top one set such that I could not go higher than the desired heel angle, and the lower one set to 5 degrees or so. The stoppers have to be set for each graver sharpening individually as their position depends on the length of the graver. Just leave the tool post angle loose, set the graver‘s heel onto the honing disc, go up to e.g. 20°, fix the top stopper such that it limits the movement further up, go down to 5°, fix the lower stopper accordingly. Now move the graver harmonically between the two stops, thus honing a radiused heel onto it.

Cheers

Ralf
 

Pešekan

Member
Joined
Mar 16, 2022
Messages
19
Location
Rijeka, Croatia
My ArtGraver is finally home and all set up!
Again, big thanks to all who gave me good advice and introduced me to the world of hand engraving!

I've made the templates myself, sharpening will be made with diamond sharpening stones 240-2000 grit, and my "vise" is a silk pillowcase filled with rice... :)

I think this will be a good setup for my first hand engraving steps. I believe I will soon invest in a real vise or at least try to make something better, but for now this will do.

The only problem is that the gravers that come with the set are 2.3mm, and I have made my graver holders on sharpening templates for 2mm gravers. This means I have to wait for the blanks I have ordered from ebay for my first engraving attempts :(

I guess i'm stuck with rotary tools until further notice ;)
viber_image_2022-05-05_16-49-03-768.jpg
viber_image_2022-05-05_16-49-03-314.jpg viber_image_2022-05-05_16-49-05-774.jpg
 

Sinterklaas

Elite Cafe Member
Joined
Dec 19, 2015
Messages
198
Location
Holland
What you can do, if you have enough thickness. Is to drill out the brass part of your template to 2,3mm or bigger. It will still work for smaller diameter if you have made a flat part where the locking screw will clamp. That way you will always orient the graver in the template the same way. If you dont make a flat spot you will have a hard time to line the angle of your graver up with the template. When you want to do resharpening.

The GRS QC collets also have a bigger hole than the graver-blanks I put in. And I have no problem sharpening them. Although I dont use templates. I use the multi angle tingy from GRS.
 

rweigel

Elite Cafe Member
Joined
Dec 22, 2017
Messages
203
Location
France (north of Alsace, close to Germany)
Correction: If you put a 2mm blank in a 2.3mm hole with the indexing screw on the top, it will sit no longer in the designated center of the template, but about 0.15mm too low. It does not change much for the shape of the graver, but it will alter the heel angle. Too what extent I could not tell now, as I’m on holydays and about 3000 km away from my CAD system. But I remember, when I designed those templates, that there was hell to pay for small differences in the height of the bench stones when it came to grind the heels. So I would not recommend to open the holders‘ hole for the 2.3mm blanks, but to wait for the 2mm blanks. The 2.3mm blanks could be made into stippling tools and such without templates.

You will anyway have to align the brass pieces in the templates once you‘ve got your 2mm blanks. I fixed a blank (with the indexing flat ground on already) in the holder (use set screws with a flat end, not pointed ones) and clamped parallel-yaw pliers on it to check if the position of the indexing flat was horizontal. Turn the brass piece slightly with a wrench if this not the case. Than grind the gravers faces onto the blank slowly. If they are the same width in the front but run along the graver for different lengths, the brass piece is not in the center, it‘s position needs to be pushed in the direction where face along the graver is shorter.

The next check is, if the graver now shaped in the smaller template gets parallel heels in the bigger template of the pair. Grind the face first. Once the face reaches completely down to the two lower faces, try to hone very small heels onto the graver. Check their shape with a strong magnifying glass or (better) a microscope. If both are distorted in the same angular direction, turn the brass holder in the big template slightly with a wrench. If only one is distorted, or the distortion is not in the same angular direction, the brass piece is not centered in the template. Try to correct the brass piece’s position slightly and hone the heels again. Do so (grind the face from time to time if the heels become too big) until the parallelism of the heels is OK. It does not have to be 100% perfect, just as close to parallel and symmetric as you can get. As I mentioned in former posts, for the beginner a consistently sharpened graver is most important. It takes out a lots of unknowns of the learning process.

BTW, the indexing screws in the bigger templates (face / heels) belong into the opposed side of the brass holder… Or your shaped blank will be upside-down for face / heels honing…

Otherwise, as far as I could see, nice work on the templates!

Cheers

Ralf
 

Pešekan

Member
Joined
Mar 16, 2022
Messages
19
Location
Rijeka, Croatia
Thank you again for the time you spend explaining these details :)

Correct me if i'm wrong, but i think i should turn the indexing screws of the smaller templates, not the bigger ones (according to the photo of your templates)?

Also, could you remind me one more time, the surface of the sharpening stone should be 13 or 13.5mm?
 

rweigel

Elite Cafe Member
Joined
Dec 22, 2017
Messages
203
Location
France (north of Alsace, close to Germany)
I can see where the confusion about the index screw comes from. My brass graver holders are completely drilled trough, hence they have two holes, one at the top and one at the bottom. The set screws have to be in the top, as the flat surface on the graver that serves as index is at the top of the graver as well. Just as they are arraged in my picture in the former post in this thread.

The aluminium tube below the gravers has got an M8 thread inside, I used to screw it onto the „round“ templates to get better handling properties while grinding and honing the round shape and heel.

My bench stones are 13.5mm high, if I remember correctly. I could check their height again middle of next week, when I‘m back home.

Cheers

Ralf
 
Top