Question: How to prevent copper plate from oxidizing?

Engraver10

Member
Joined
Jul 1, 2023
Messages
53
Location
Brazil
Hello Forum friends,

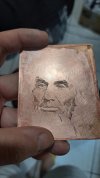
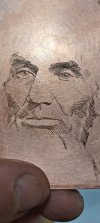
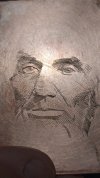
some time ago, I asked here how to prevent my copper plate from oxidizing. I'm practicing Intaglio, and the process takes a long time, so in a few days the plate is all stained.

I spoke to a great master engraver and he recommended cleaning my hands with alcohol before starting engraving. His tip helped a little. But the plate still oxidized, I tried to apply a thin layer of Lubricating Spray to create a small protective film, but when I went to work on the engraving, I removed the oil with absorbent paper.

But when I realized the transferred drawing was gradually being erased, I believe that the Spray acted like a solvent. Could a friend help me with some tips to avoid oxidizing the copper plate.

Thank you very much, any help will be welcome.

Best Regards
 

Attachments

  • 20240123_201441.jpg
    20240123_201441.jpg
    92.4 KB · Views: 35
  • Screenshot_20240123_212837_Gallery.jpg
    Screenshot_20240123_212837_Gallery.jpg
    120.8 KB · Views: 35
  • 20240123_201459.jpg
    20240123_201459.jpg
    138.8 KB · Views: 33

BWoodworker

Member
Joined
Nov 11, 2023
Messages
28
I am new to engraving but have quite a bit of experience with metals and oxidation.

How are you transferring the engraving?

Most spray lubricants include a solvent in the mix, and in many cases oils themselves have some solvent tendency.

If it wont interfere with your layout and transfer I would be tempted to try a spray laquer. When you are all done engraving it can be cleaned off with laquer thinner or acentone.

Maybe something to try on a practice plate?


Nice work BTW
 

Engraver10

Member
Joined
Jul 1, 2023
Messages
53
Location
Brazil
Sou novo em gravura, mas tenho bastante experiência com metais e oxidação.

Como você está transferindo a gravura?

A maioria dos lubrificantes em spray inclui um solvente na mistura e, em muitos casos, os próprios óleos têm alguma tendência a solventes.

Se isso não interferir no seu layout e transferência, ficaria tentado a tentar uma laca em spray. Quando terminar a gravação, ela pode ser limpa com diluente de laca ou acentona.

Talvez algo para experimentar em um prato de treino?


Bom trabalho,

I am new to engraving but have quite a bit of experience with metals and oxidation.

How are you transferring the engraving?

Most spray lubricants include a solvent in the mix, and in many cases oils themselves have some solvent tendency.

If it wont interfere with your layout and transfer I would be tempted to try a spray laquer. When you are all done engraving it can be cleaned off with laquer thinner or acentone.

Maybe something to try on a practice plate?


Nice work BTW
Hello,

thank you very much,

I transfer it as follows; I apply a light layer of dammar varnish, and use a laser print on plain paper, dampen some cotton wool with nail polish acetone, and use a burnisher to rub it on.
Then I wait for it to dry for 1 hour and then I take it under running water and remove the paper by rubbing it with my thumb, the paper crumbles,

I get good results with this technique.

Best Regards
 

tdelewis

Elite Cafe Member
Joined
Oct 10, 2010
Messages
777
Location
Volant, PA 60 miles north of Pittsburgh
I recommend using a laser printer and print on baking parchment paper. If the varnish is tacky but not too thick it should transfer by burnishing over the design. You will get 100% of the toner on the copper. Since the toner is fixed on the paper by heat in the printer, I use a heat gun to fix the toner on the metal. I don't know what that may do to the varnish. You will need to experiment. I use a Prismacolor artists marker to coat the metal, the one marked 40% gray. Any artists supply store has them. Tira Mitchell's Hand Engraving Tools, Jewelry Tools and Stone setting tools (engraver.com) Tira also sells a similar marker.

This is what I do.
1. Mark an arrow on the paper in the tray to show the direction of the feed.
2. Print a copy.
3. Cut a section of parchment paper to cover the image with enough to tape it down over the image. You need to tape only the leading edge.
4. You will need to sand the edge of the parchment where the tape is to be placed. I use 320. The paper is coated with silicon and the tape will not stick. The silicon must be removed for the tape to stick. The printer will pull the parchment from the tape, and you will get a jam If you don't remove the silicon.
5. Remembering your reference mark tape the parchment paper over the image and tape it down so that the taped edge feeds first. Run the paper through the printer a second time.
6. lay the image on the copper and burnish. If you tape the image on the metal yu will need to remove the silicon on both sides before you print.

You should get a good image that will leave all of the toner on the metal. I can't help with the tarnish on the metal. When I have finished an item in bronze I use a mixture of lighter and a good hard wax. Of course any wax would remove your design because they all have some sort of solvent.
 

Engraver10

Member
Joined
Jul 1, 2023
Messages
53
Location
Brazil
I recommend using a laser printer and print on baking parchment paper. If the varnish is tacky but not too thick it should transfer by burnishing over the design. You will get 100% of the toner on the copper. Since the toner is fixed on the paper by heat in the printer, I use a heat gun to fix the toner on the metal. I don't know what that may do to the varnish. You will need to experiment. I use a Prismacolor artists marker to coat the metal, the one marked 40% gray. Any artists supply store has them. Tira Mitchell's Hand Engraving Tools, Jewelry Tools and Stone setting tools (engraver.com) Tira also sells a similar marker.

This is what I do.
1. Mark an arrow on the paper in the tray to show the direction of the feed.
2. Print a copy.
3. Cut a section of parchment paper to cover the image with enough to tape it down over the image. You need to tape only the leading edge.
4. You will need to sand the edge of the parchment where the tape is to be placed. I use 320. The paper is coated with silicon and the tape will not stick. The silicon must be removed for the tape to stick. The printer will pull the parchment from the tape, and you will get a jam If you don't remove the silicon.
5. Remembering your reference mark tape the parchment paper over the image and tape it down so that the taped edge feeds first. Run the paper through the printer a second time.
6. lay the image on the copper and burnish. If you tape the image on the metal yu will need to remove the silicon on both sides before you print.

You should get a good image that will leave all of the toner on the metal. I can't help with the tarnish on the metal. When I have finished an item in bronze I use a mixture of lighter and a good hard wax. Of course any wax would remove your design because they all have some sort of solvent.
Hello dear friend,

Thank you very much for the tips, I will try to do it the way you explained in detail. Perhaps my only difficulty will be printing on baking paper because I print in printing stores, as I don't have a laser printer, I believe that the store attendant will not want to use this paper.

Could you tell me where I can buy it and what brand and weight of parchment paper you use.

Thank you very much
 

tdelewis

Elite Cafe Member
Joined
Oct 10, 2010
Messages
777
Location
Volant, PA 60 miles north of Pittsburgh
The parchment paper is used for baking cookies and bread. The silicon gives it a nonstick surface. It is placed under the cookies before putting them in the oven. After baking the cookies slide off cleanly.

You can find it in food stores that sell supplies for baking. It comes two ways, in a roll and flat sheets. Get the flat sheets. The rolls will not lay flat, and you will have a curl in the parchment after you cut it. That curl will cause problems. I first bought a roll and had to work with it to get it to lay flat before taping it down.
 

Meshach

Member
Joined
Jul 22, 2023
Messages
48
I would advise trying something like Renaissance wax.
According to the package info it was developed in the 1950s And "'designed' for long term protection of all classes of mueseum exhibits"
It says it can be used on steel, paper, leather, marble, ruber, platic seals ect..
I would lightly apply it over the whole plate transfer and all, lightly buff or just wipe away excess with a cloth if needed and maybe apply a little extra over fresh cuts if you are concerned about the cuts tarnishing.
After you finish, clean away your excess transfer / damar and then apply a final coat of the Renaissance, unless you prefer some other clear coat for the final finish..
My can was purchased from Brownells years ago and I imagine it is still available there and a quick search also shows it available from Amazon.
 

Mike576

Elite Cafe Member
Joined
Nov 20, 2020
Messages
257
Location
Ledyard Connecticut
I second the use of renaissance wax, I use it when I start a project and don’t have time to finish. I use the acetone transfer method with a laser printer and the wax doesn’t remove the transfer as long as I don’t rub it in too much. Keeps it from rusting completely on mild and carbon steel not sure about copper though although I know it’s safe to use on copper.
 

Engraver10

Member
Joined
Jul 1, 2023
Messages
53
Location
Brazil
Dear friend, thank you for your help.

I've never tried the Renaissance wax. Here in my country, Brazil, you cannot find this type of material, I will try to import it, but unfortunately everything here is very bureaucratic, it seems that we live in a disguised dictatorship.
I recently bought a set of used burins and, I believe, Customs banned them from entering the country.

Thanks
Best Regards
I second the use of renaissance wax, I use it when I start a project and don’t have time to finish. I use the acetone transfer method with a laser printer and the wax doesn’t remove the transfer as long as I don’t rub it in too much. Keeps it from rusting completely on mild and carbon steel not sure about copper though although I know it’s safe to use on copper.
 

Engraver10

Member
Joined
Jul 1, 2023
Messages
53
Location
Brazil
I would advise trying something like Renaissance wax.
According to the package info it was developed in the 1950s And "'designed' for long term protection of all classes of mueseum exhibits"
It says it can be used on steel, paper, leather, marble, ruber, platic seals ect..
I would lightly apply it over the whole plate transfer and all, lightly buff or just wipe away excess with a cloth if needed and maybe apply a little extra over fresh cuts if you are concerned about the cuts tarnishing.
After you finish, clean away your excess transfer / damar and then apply a final coat of the Renaissance, unless you prefer some other clear coat for the final finish..
My can was purchased from Brownells years ago and I imagine it is still available there and a quick search also shows it available from Amazon.
I would really like to try this Renaissance wax, but unfortunately I can't find it in my country, Brazil.
I'm going to try to import, but I'm afraid they won't let them into the country. I recently bought a set of 10 used burins, and they were banned from entering the country.

Best Regards
 

tdelewis

Elite Cafe Member
Joined
Oct 10, 2010
Messages
777
Location
Volant, PA 60 miles north of Pittsburgh
Try to find the hardest and sticky wax you can find. Then cut it with liter fluid. Renaissance wax leaves a hard surface and is difficult to spread. That is why I cut it with lighter fluid to apply to a surface. You just need to experiment to see what you get. Much of what I have suggested here was discovered by experimentation. From what you are trying to do waxing over a transfer will not work. It would smear. Perhaps there is some kind of spray surface protection that would work. You just need to do a lot of experimentation and look through the archives on this site. Go to the top of the and use the search icon and do some searching on transfers. Also check youtube if you can. I am sure your answer is somewhere. You just have to find it.
 

wild willie

Member
Joined
Jun 27, 2022
Messages
20
Hello Forum friends,

some time ago, I asked here how to prevent my copper plate from oxidizing. I'm practicing Intaglio, and the process takes a long time, so in a few days the plate is all stained.

I spoke to a great master engraver and he recommended cleaning my hands with alcohol before starting engraving. His tip helped a little. But the plate still oxidized, I tried to apply a thin layer of Lubricating Spray to create a small protective film, but when I went to work on the engraving, I removed the oil with absorbent paper.

But when I realized the transferred drawing was gradually being erased, I believe that the Spray acted like a solvent. Could a friend help me with some tips to avoid oxidizing the copper plate.

Thank you very much, any help will be welcome.

Best Regards
i used to clean with brasso and rinse in hot water
 

SiyuanZ

Member
Joined
Oct 10, 2023
Messages
7
My suggestion for you is do not bother with the idea of a clean plate,

Engraving is not etching,

A plate oxidizing is your friend once you need to cover your error or tracking changes, or even help to better brush away coppers from the edge.

A clean plate does give you a good advantage in keeping the engraver on the plate, but it can be easily solved by just sharpening your burin head.

Plus, a well-polished clean surface will deflect lights and make your judgment on the line harder.

If you want to preserve a plate, good old melted bee wax is your friend, otherwise don't bother with it.
 

FishrrJoe

New Member
Joined
Jun 17, 2022
Messages
1
You might try cleaning the plate throughly and treating it with auto antifreeze for a few minutes and rinse off. Antifreeze has corrosion inhibitors in it that will leave an invisible layer on the surface.
 

Chujybear

~ Elite 1000 Member ~
Joined
Nov 3, 2011
Messages
1,079
Location
Haida Gwaii
It might come under another brand name.. museums use it for long term preservation without compromising the integrity of other finishes, patina ets..
look for something that is microcrystalline wax.. it is in a solution with some kind of solvent. Smells like petrol.. but probably naphtha
 

monk

Moderator
Staff member
::::Pledge Member::::
Joined
Feb 11, 2007
Messages
10,962
Location
washington, pa
when doin guns, i found a simple way that worked: i covered the areas with just plain ole black magic marker. next day, a bit of isopropyl got rid of it. mot sure if that would suit yer needs. what the heck, give it a whack and see on a piece of scrap.
 

Engraver10

Member
Joined
Jul 1, 2023
Messages
53
Location
Brazil
when doin guns, i found a simple way that worked: i covered the areas with just plain ole black magic marker. next day, a bit of isopropyl got rid of it. mot sure if that would suit yer needs. what the heck, give it a whack and see on a piece of scrap.
That pen you mentioned, is it the one used as a permanent marker? Your suggestion sounds cool, especially because the use of alcohol helps to dry the surface and degrease it. Thanks
 

Engraver10

Member
Joined
Jul 1, 2023
Messages
53
Location
Brazil
Você pode tentar limpar bem a placa e tratá-la com anticongelante automático por alguns minutos e enxaguar. O anticongelante contém inibidores de corrosão que deixarão uma camada invisível na superfície.

You might try cleaning the plate throughly and treating it with auto antifreeze for a few minutes and rinse off. Antifreeze has corrosion inhibitors in it that will leave an invisible layer on the surface.
I liked your idea, where can I buy this product? When applying it to the copper plate, it will not remove the transfer of the design.
Thanks
 

Latest posts

Sponsors

Top