Inlay on a Kershaw Leek

KGDiebold

Member
Joined
May 28, 2019
Messages
23
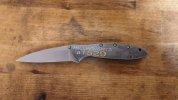
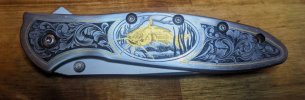
This is my most recent practice on a Kershaw Leek. I look at others work and see shading in their bulino. Mine looked like polka dots. So I went to smaller dots and more of them, but really struggled to get good contrast. This pic is the result of dozens of tries, trying to get something viewable. How can I get better contrast and smoother shading? I caught this catfish, and he was a lot bigger than he looks here! ;)
 

Attachments

  • PXL_20220109_201656236~2.jpg
    PXL_20220109_201656236~2.jpg
    80 KB · Views: 122

Goosebuster

Member
Joined
Jan 2, 2018
Messages
15
Very nice job and not just the cat. I really admire bulino but at 81 years the eyes are causing me to do less. The scroll work is still happening on regular basis.
 

KGDiebold

Member
Joined
May 28, 2019
Messages
23
Good looking cat! Looks comfortable under that branch. Was it channel or blue?
Channel cat. But you know, the size of the fish grows with every telling of the story! My wife was pretty accommodating when I asked her to help pose the fish and spread out the tail fins for pics.
 

papart1

:::Pledge Member:::
::::Pledge Member::::
Joined
May 23, 2015
Messages
1,308
Location
Michigan
KG, did you disassemble and how what trick did you use please? Rob
 

KGDiebold

Member
Joined
May 28, 2019
Messages
23
Yes, I disassembled the knife. Leeks are notorious for being hard. This comes from work hardening from the manufacturers process. I own a machine shop, so I am fortunate to have access to a heat treat oven. The scales can be annealed by heating to 1550-1650 deg F. After reaching temperature, I reduce the heat setting by 75-100 deg per hour throughout the day. When the oven is down to about 950 deg, I just turn it off leaving the door shut to cool overnight. The scales are butter soft after annealing and a real pleasure to cut. Normally, I make an envelope with really tight folds using stainless steel tool wrap and place the scale inside along with a piece of paper. Then another tight fold to seal it up. The paper will ignite burning off any oxygen in the package. This will help prevent decarburization or scaling, leaving a cleaner surface. I have forgotten to wrap and it wasn't terrible to clean up either.
On the Leek, there is a spring pocket in the middle of the scale. The factory material is only .018" thick and covers a pretty large area on the left side of the scale. I have been experimenting with larger and more inlays. I asked the advice of Ray Cover on my first one, and he told me that I would need an anvil to support the cavity. I used thermolock. I dented the scale on my first try. I should have released the scale to check for air pockets. Lesson learned! After getting a good solid fill, things improved for me. I did the one in the added photo for my son at Christmas. It had eighteen different inlays and I had no trouble. The catfish was a pretty wide cavity on top of the spring pocket. I either didn't have it seated in the Thermolock well enough, or there was just no structural integrity left, but things got a little ugly and I had to use a punch from the back side to try to straighten up the surface again. I won't try an inlay that big over the spring pocket again. I'm still in the practice phase of engraving. This knife will just never leave the shop.
 

Attachments

  • Noahs union knife.jpg
    Noahs union knife.jpg
    112 KB · Views: 50

papart1

:::Pledge Member:::
::::Pledge Member::::
Joined
May 23, 2015
Messages
1,308
Location
Michigan
What action did you take on the communist stripped out torx's screws that the assemblers tear up, thats what I have an extremerly hard time with.
 

KGDiebold

Member
Joined
May 28, 2019
Messages
23
I've never had any problem with the screws. They are assembled with loctite, so if you're having trouble, a little bit of heat will help free that up
 

Latest posts

Sponsors

Top