
Golabekrafts
Member
- Joined
- Oct 25, 2021
- Messages
- 34
First Id like to thank anyone who reads this and can offer me any suggestions.
I recently became interested in engraving as I'm working on a wakizashi sword, and after making some menuki using small files and one flat chisel I had made a while ago, I wanted to attempt some engraving on the tsuba. Primarily the part I'm not sure of how to approach is making small dot inlays for a constellation pattern inlay I'd like to do. The material the tsuba is made of is wrought iron, which from my extremely limited experience seems to work well. I'm wondering what would be the best way to form the hole for the inlay material to go into, the dots will be about 1-3mm in diameter, and will be inlaid with either gold, bronze, or silver depending on how my practice piece goes and what color Id like.
From the reading I've done it seems there might be two ways, but I havent seen any explanations or videos of this type of inlay shape yet.
1. punch with a very small flat round punch an indentation for the inlay, and then with another small punch form a bead around the edges of the hole
2. with some kind of very small graver cut a hole, and then undercut the sides.
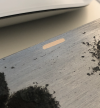
How should the tooling for either of these be made? or is there a better method? I've attached an example of my first inlay attempt with wrought iron and phosphor bronze, and a picture of the pattern im planning. The picture is just one version, and its not the complete drawing, which has a few changes, but it gets across the part that im wondering how to do best. I'm going to do practice with the exact same materials as the final piece before doing it so that I'm confident in my skills.
I recently became interested in engraving as I'm working on a wakizashi sword, and after making some menuki using small files and one flat chisel I had made a while ago, I wanted to attempt some engraving on the tsuba. Primarily the part I'm not sure of how to approach is making small dot inlays for a constellation pattern inlay I'd like to do. The material the tsuba is made of is wrought iron, which from my extremely limited experience seems to work well. I'm wondering what would be the best way to form the hole for the inlay material to go into, the dots will be about 1-3mm in diameter, and will be inlaid with either gold, bronze, or silver depending on how my practice piece goes and what color Id like.
From the reading I've done it seems there might be two ways, but I havent seen any explanations or videos of this type of inlay shape yet.
1. punch with a very small flat round punch an indentation for the inlay, and then with another small punch form a bead around the edges of the hole
2. with some kind of very small graver cut a hole, and then undercut the sides.
How should the tooling for either of these be made? or is there a better method? I've attached an example of my first inlay attempt with wrought iron and phosphor bronze, and a picture of the pattern im planning. The picture is just one version, and its not the complete drawing, which has a few changes, but it gets across the part that im wondering how to do best. I'm going to do practice with the exact same materials as the final piece before doing it so that I'm confident in my skills.
Attachments
-
 Screen Shot 2021-10-25 at 1.28.15 AM.png487.4 KB · Views: 115
 -
 Screen Shot 2021-10-25 at 1.28.21 AM.png406.7 KB · Views: 116
") . I’d like to do it traditionally.
. I’d like to do it traditionally.


