looking for critique on my work

Mike576

:::Pledge Member:::
::::Pledge Member::::
Joined
Nov 20, 2020
Messages
197
Location
Ledyard Connecticut
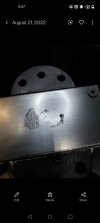
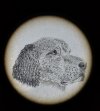
Worked on this "bulino style" dog over the past few days on a scrap of cold rolled steel. All hand push and hammer chisel. I have a few more sharpening templates on the way so this was done with a 116° lindsay point and a round stipple tip down to a needle point. Feel free to critique! To me it looks too dark on the ear and a some lines of the hair go in the wrong direction. This is my 3rd attempt at bulino style engraving, and my first piece after taking about a year off.

No ink on this piece just grub from my fingers and a light coat of air tool oil to prevent rust.

Thanks for taking a look!
 

Attachments

  • Screenshot_20220821-094013__01.jpg
    Screenshot_20220821-094013__01.jpg
    158.9 KB · Views: 127
  • Screenshot_20220821-094056.jpg
    Screenshot_20220821-094056.jpg
    48.5 KB · Views: 124

JJ Roberts

:::Pledge Member:::
::::Pledge Member::::
Joined
Nov 10, 2006
Messages
3,459
Location
Manassas, VA
Mike. The anatomy on the dog looks good you need to work on better direction of the hair on the dog and work on finer hair lines. J.J.
 

Mike576

:::Pledge Member:::
::::Pledge Member::::
Joined
Nov 20, 2020
Messages
197
Location
Ledyard Connecticut
Mike. The anatomy on the dog looks good you need to work on better direction of the hair on the dog and work on finer hair lines. J.J.
Thanks for the reply, what degree of a graver might you use in a situation like this? I have the lindsay bulino template kit coming. 70, 80, 90, 100, 105 etc. How does one decide when to use each? Or does it not matter, only the end result to the eye?
 

John B.

Lifetime Pledge Member
::::Pledge Member::::
Joined
Nov 9, 2006
Messages
3,955
Location
Los Angeles area, California.
Hello Mike, pretty good for a third try at bulino work.
The general anatomy, eyes. nose, muzzle and mouth are very well done.
Study and practice the smooth hair and also the ear hair.
Do it over and post it again, please.
 

Mike576

:::Pledge Member:::
::::Pledge Member::::
Joined
Nov 20, 2020
Messages
197
Location
Ledyard Connecticut
Hello Mike, pretty good for a third try at bulino work.
The general anatomy, eyes. nose, muzzle and mouth are very well done.
Study and practice the smooth hair and also the ear hair.
Do it over and post it again, please.
Thank you, it was going well till i went way to heavy on the ear, then trying to balance everything out it started to go a bit down hill, i tried bigger darker cuts to compensate but i should have done smaller and more cuts instead.

I will be trying this same design again from scratch this week. When i finish i will post in this thread. Ill be sure to keep my lines and form as smooth as i can.

Any resource out there you might know of for specifically hair? I have seen a few videos on YouTube by Thierry Duguet and am slowly using that as study material as well as taking an online bulino class with Wes Griffen, but that was before the year long break I just came back from.
 

Leland Davis

Elite Cafe Member
Joined
Nov 22, 2014
Messages
528
Location
Wells KS
Mike, as John said not bad for the 3rd try. I am still trying to figure this out too so my advice is free and you get what you pay for. I start with the eyes and the nose if the eyes aren't right nothing is and it's a smaller area to file off if I screw it up yours looks pretty good. What helped me is a blown up photo of the subject just pick out 1 area to work on and really study that area hair direction, density, shadows, bumps, anything you can add detail to. 1 thing that sticks out to me is the dogs eyebrows adding depth around the eyes goes a long way towards what you want to achieve. I look forward to your next try.
thanks for posting
 

Mike576

:::Pledge Member:::
::::Pledge Member::::
Joined
Nov 20, 2020
Messages
197
Location
Ledyard Connecticut
Mike, as John said not bad for the 3rd try. I am still trying to figure this out too so my advice is free and you get what you pay for. I start with the eyes and the nose if the eyes aren't right nothing is and it's a smaller area to file off if I screw it up yours looks pretty good. What helped me is a blown up photo of the subject just pick out 1 area to work on and really study that area hair direction, density, shadows, bumps, anything you can add detail to. 1 thing that sticks out to me is the dogs eyebrows adding depth around the eyes goes a long way towards what you want to achieve. I look forward to your next try.
thanks for posting
Thanks for the tip! i started with the border then went onto the nose, mouth, then eye on this project. Lost it with the hairs. Good tip with the eyebrow.

This photo was right before i way overdid the ears, even at this point the lines for the hair are too bold i think. Just have to go thinner and smaller.
 

Attachments

  • Screenshot_20220821-230737.jpg
    Screenshot_20220821-230737.jpg
    48.7 KB · Views: 47

Leland Davis

Elite Cafe Member
Joined
Nov 22, 2014
Messages
528
Location
Wells KS
I mostly use a 116 degree point but I taper the carbide down to a needle point then sharpen to 116 makes a very fine point that makes it easier to get fine lines.
 

oniemarc

Elite Cafe Member
Joined
Mar 29, 2021
Messages
356
Location
The Netherlands
I am at my beginning stages when it comes to engraving, so you may want to take this with a grain of salt.

I would start with laying down the basic forms, shadows and all, by using really, really light cuts(keeping your graver at a really shallow angle). I would keep all these light cuts in one direction and...as light as possible. They are just there to have a basic structure to work from. Then I would start deepening the image with mostly dots. Even the hair you could do with just dots if needed. Once all the darkened areas look at least somewhat like they should, I would start adding the details, such as hairs.


Marc
 

JJ Roberts

:::Pledge Member:::
::::Pledge Member::::
Joined
Nov 10, 2006
Messages
3,459
Location
Manassas, VA
Here are two patchwork covers in German silver I did years ago...hand push engraving with a Square engraving tool with a 40degree face & a 15degree belly. patchbox.deer.dogs.jpg
 

Attachments

  • patchbox.boar.dogs.jpg
    patchbox.boar.dogs.jpg
    139.4 KB · Views: 31
Last edited:

John B.

Lifetime Pledge Member
::::Pledge Member::::
Joined
Nov 9, 2006
Messages
3,955
Location
Los Angeles area, California.
Thank you, it was going well till i went way to heavy on the ear, then trying to balance everything out it started to go a bit down hill, i tried bigger darker cuts to compensate but i should have done smaller and more cuts instead.

I will be trying this same design again from scratch this week. When i finish i will post in this thread. Ill be sure to keep my lines and form as smooth as i can.

Any resource out there you might know of for specifically hair? I have seen a few videos on YouTube by Thierry Duguet and am slowly using that as study material as well as taking an online bulino class with Wes Griffen, but that was before the year long break I just came back from.
Hello Mike, and thank you.
A recent Cafe post of mine mentioned the book 'Sketching Your Favorite Subject in Pen & Ink" by Claudia Nice.
This book shows how to build up the required textures for most subjects, including smooth and rough hair.
And the pen strokes are the same strokes that you need to create with your graver for line style bulino.
Please check the Cafe for my recent post. One of the replies was kind enough to mention where you can presently buy this book in softcover for $19.95, I believe.
The illustrations are marvelous instructions for line form Bulino and the required textures.
The book is the next best thing to having a skilled instructor teaching you.
It pictures the original subject in a black and white photo and then depicts it as a pen and ink drawing or fine line cut bulino engraving. An almost magical transition!
 

Mike576

:::Pledge Member:::
::::Pledge Member::::
Joined
Nov 20, 2020
Messages
197
Location
Ledyard Connecticut
Hello Mike, and thank you.
A recent Cafe post of mine mentioned the book 'Sketching Your Favorite Subject in Pen & Ink" by Claudia Nice.
This book shows how to build up the required textures for most subjects, including smooth and rough hair.
And the pen strokes are the same strokes that you need to create with your graver for line style bulino.
Please check the Cafe for my recent post. One of the replies was kind enough to mention where you can presently buy this book in softcover for $19.95, I believe.
The illustrations are marvelous instructions for line form Bulino and the required textures.
The book is the next best thing to having a skilled instructor teaching you.
It pictures the original subject in a black and white photo and then depicts it as a pen and ink drawing or fine line cut bulino engraving. An almost magical transition!
Thanks for the tip! Just purchased this book found the soft cover edition for 10$ shipped on a used book site.
 

JJ Roberts

:::Pledge Member:::
::::Pledge Member::::
Joined
Nov 10, 2006
Messages
3,459
Location
Manassas, VA
Mike, I f your interested in drawing and engraving animals a book I recommend would be How to Drawing Animals by Jack Hamm. J.J.
 

Latest posts

Sponsors

Top