
You are using an out of date browser. It may not display this or other websites correctly.
You should upgrade or use an alternative browser.
You should upgrade or use an alternative browser.
Marking Gravers
- Thread starter rhenrichs
- Start date
coincutter
Elite Cafe Member
if you are talking about a way to mark them so you know the angles a trick i learned from a jewler friend was to grind the top shape of the gravers differently for each particular angle just an extra two seconds to make a facet on top saves sorting through the pile for what you are looking for. I just take a small slitter wheel and put a one line on top for 90 two for 110 3 etc ect.
hope this helps
sle
hope this helps
sle
Crazy Horse
Elite Cafe Member
Try acid etching.
Crazy Horse
Elite Cafe Member
Roger,
I sell graver ID bands for $5 a pack. They come 24 on a stick and 5 sticks of different colors in a package and directions for geting them off the stick and onto the graver. I have used them myslef for a while and they are the most permanant thing I have found. Every now and then I will get one caught in the sharpening fixture and pinch on off but other than that they stay. They have out lasted any paint or other marking system I have tried.
If you want some send me $5 and add a $1 for postage.
Ray
Attachments
-
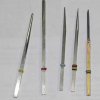 ID BANDS.jpg47.5 KB · Views: 185
I tried a small section of "shrink tubing" that is used for wire insulation. It works fairly well but as Ray mentioned in using the bands, they can get pinched when sharpening.
I was considering using a bit of paint or white out, but it probably would not be too permanent.
Peter
I was considering using a bit of paint or white out, but it probably would not be too permanent.
Peter
pilkguns
~ Elite 1000 Member ~
I have used cut off wheels to mark them in the past, but I like the idea of Ray's bands best, I need to get some
I use the old-school method of graver identification, which is to pick up every graver on my bench until I find the one I'm looking for. ")
msar24
Member
Nail polish. It's cheap and mst of us know someone that has a few bottles. In case you did not know, nail polish is like clothing, what's in fashion changes rather quickly, ususally before the whole bottle is used. My wife is a manicuist and I have a teenage daughter. Somewhere in the house is a box full of polsih that is no longer used. If you don;t have someone that uses it, you can get it at any Wally world or Target or even most supermarkets. A bottle will last a long time.
Another way is colored sharpie markers.
Another way is colored sharpie markers.
GeorgeKhayata
Member
- Joined
- Nov 17, 2006
- Messages
- 58
Hi every body,
Ray I would like to get a package for me if you don't mind please, I have been doing Sam's way for over 27 years ., but it's never too late.
Please pm me your address so I send you the money.
Thanks.
George
Ray I would like to get a package for me if you don't mind please, I have been doing Sam's way for over 27 years
., but it's never too late.Please pm me your address so I send you the money.
Thanks.
George
I use the old-school method of graver identification, which is to pick up every graver on my bench until I find the one I'm looking for.
Yah Sam that what I've been doing and made a small mistake because I didn't look close enough. I need to something so that don't happen again. I would like to diffrienciate between carbide and cobalt tools.
Roger
I have the multi-tiered fixture from GRS and have the different angled gravers in seperate holders with the angles (90,110,120 etc) written on the little plastic holders. I know that sooner or later I will run out of room, and I'm in the process of making a stairstepped holder (like Rex's on his bench) to hold the gravers I have permanently attached to metal handles and for those I have in some wooden handles. These will all be labeled at their appropriate place in the holding block.
i do it the stoopid way: i made a wooden carousel, painted a light color. drilled a jillion or so holes, segregate the gravers by shape/ size- and only have 1 graver out on my bench at a time. the holes are labelled with a sharpie. the thing rotates quickly and graver changes take place quickly.. i have to do it this way as my bench is too junky to place tiny gravers on. i'd never find them.
Hey Sam,
I think I remember you saying you painted the top of the quick change collets to identify which grave type they were.
So, what happened the paint rub off with all the engraving or what? Or it's on the to do list of thing your going to get around to?
Is this hunt and search method more satisfying and a good excuse to use foreign swear words you've pick up?
Jim: Blaine Lewis painted his collets. I've also used little pieces of colored plastic tubing for color-coding gravers. I think Ray sells a kit.
I still prefer the time wasting old-school method of picking up every graver on my bench to see what it is!
I still prefer the time wasting old-school method of picking up every graver on my bench to see what it is!
My latest attempt at marking gravers seems to be working out quite well. Assuming that a 3/32" square blank is used I insert the graver in the collet and then I write the size on the graver on the left side close to the collet with a .01 waterproof pen. After the ink is dry I the spray the marking with clear satin lacquer. With the marking close to the collet my thumb doesn't get on and I can always see what sise it is. All that is required is being able to print small but I do it under the scope.
Roger Henrichs
Roger Henrichs
Sponsors


