Hello all,
I have been meaning to make this post for a while now, I consider myself to be in advanced beginner or intermediate stages as I have only been Engraving for about 3 years now though I have a good mentor/teacher and a strong drive and stubbornness to figure things out so I do feel I have made great progress in learning this art.
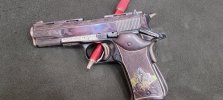
The following pictures are of my first real gun engraving project that I did from Feb 2022 through Feb of 2023, it wasn’t the ONLY thing I engraved but pretty much everything else was just short practice plate/gift projects.
It is a bit of a conglomeration of techniques as it was pretty much just a practice plate project for anything and everything that I wanted to try at the time.
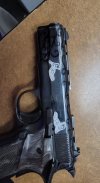
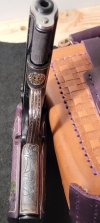
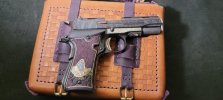
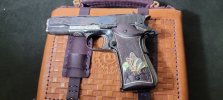
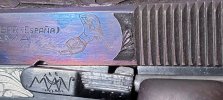
The slide is finished in a nitrite bluing of full purple. the Frame was finished in a hot blue.
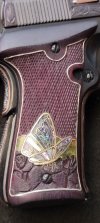
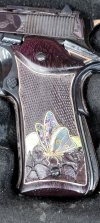
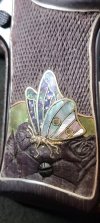
Grips are made from purple heart, trimmed in .999 fine silver wire, butterfly is made from brass wire with abalone and mother of pearl inlay.
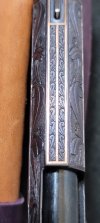
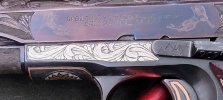
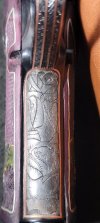
side panels of the frame are inlaid .999 fine silver sheet made from a round.
The back of the grip on the frame has silver wire inlay
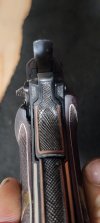
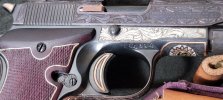
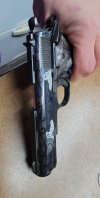
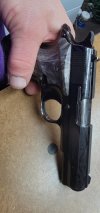
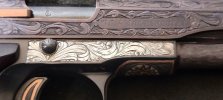
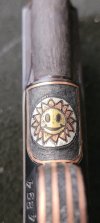
The Smiling sun emblem was done in silver, copper, and brass wire. The rest of the wire inlay on the trigger, safety, barrel bushing, hammer, slide rib, grip safety, hammer spring housing, front of grip, and trigger guard were all done in copper wire.
There was “checkering” cast into the grip safety and spring housing but it was pretty rough so I did my best to sharpen and clean it up in my engraving process but the checkering on the beaver-tail of the frame was added by me.
I have been meaning to make this post for a while now, I consider myself to be in advanced beginner or intermediate stages as I have only been Engraving for about 3 years now though I have a good mentor/teacher and a strong drive and stubbornness to figure things out so I do feel I have made great progress in learning this art.
The following pictures are of my first real gun engraving project that I did from Feb 2022 through Feb of 2023, it wasn’t the ONLY thing I engraved but pretty much everything else was just short practice plate/gift projects.
It is a bit of a conglomeration of techniques as it was pretty much just a practice plate project for anything and everything that I wanted to try at the time.
The slide is finished in a nitrite bluing of full purple. the Frame was finished in a hot blue.
Grips are made from purple heart, trimmed in .999 fine silver wire, butterfly is made from brass wire with abalone and mother of pearl inlay.
side panels of the frame are inlaid .999 fine silver sheet made from a round.
The back of the grip on the frame has silver wire inlay
The Smiling sun emblem was done in silver, copper, and brass wire. The rest of the wire inlay on the trigger, safety, barrel bushing, hammer, slide rib, grip safety, hammer spring housing, front of grip, and trigger guard were all done in copper wire.
There was “checkering” cast into the grip safety and spring housing but it was pretty rough so I did my best to sharpen and clean it up in my engraving process but the checkering on the beaver-tail of the frame was added by me.
Attachments
-
 20230220_201433.jpg129.3 KB · Views: 83
 -
 20230220_201628.jpg87.4 KB · Views: 88
 -
 20230220_202612.jpg95.1 KB · Views: 90
 -
 20230220_202654.jpg72.8 KB · Views: 89
 -
 20230220_202734.jpg100.1 KB · Views: 82
 -
 20230220_202739.jpg96.2 KB · Views: 77
 -
 20230220_202755.jpg93.6 KB · Views: 74
 -
 20230220_202809.jpg90.9 KB · Views: 71
 -
 20230220_202925.jpg115.7 KB · Views: 68
 -
 20230220_203057.jpg120.6 KB · Views: 77