
Weldon47
~ Elite 1000 Member ~
Here are some photos of my most recent work. Sometimes we (engravers) don't always get to do exactly what we want to do. This project is a case in point!
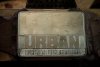
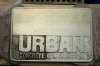
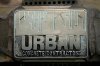
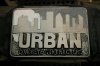
This has got to be some of the most boring work from the engraver's perspective. I felt somewhat like a human milling machine! Having said it was boring definitely doesn't mean that it was easy to do; just not to my (scroll minded) liking. I did this all intaglio; the only parts soldered on were the attachments on the back. I used a variety of gravers to do the initial cutting but most of the initial outlining work was done with a 90 and/or 120. I then went over the outline of the letters again with an onglette, leaning out away from the letters and into the background to be removed. Once that was done I lowered the background using flats of various sizes. The background was removed in steps (area by area) as I worked thru the project. The background matting was done with a couple of different techniques: 1. With a matting punch in the heavily textured areas and; 2. In the areas around the word URBAN, I used a dental air drill (ginning pretty fast!!) with a round tipped burr to give a very rough, convoluted texture. I then flattened this with a smooth faced round punch. Finally, I used a worn texture punch to further darken this area of the buckle. After all the work was done I shaped the buckle on a high-tech hand shaped wood 2x4 die and hobb.
Hope you enjoy,
Weldon
Attachments
-
 Urban-1.jpg59.4 KB · Views: 211
 -
 Urban-2.jpg72.1 KB · Views: 179
 -
 Urban-3.jpg81.1 KB · Views: 162
 -
 Urban-4.jpg69.8 KB · Views: 173
 -
 Urban-5.jpg44.5 KB · Views: 230
 -
 Urban-7.jpg42.4 KB · Views: 256
")


