vondershred
Member
- Joined
- Feb 21, 2024
- Messages
- 32
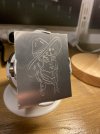
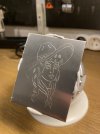
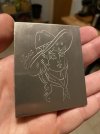
Lil’ after-dinner engraving on an aluminum practice plate… third engraving ever!
My experience: I feel like a lot of the success on straight lines depends on how confident you start one. I should leave the large curved lines for last when I’m really into it after a couple small ones, now they’re kinda jittery and crooked (see hat). Luckily I saved the lettering for last, kinda proud of myself for not messing that up. I also feel like the 0.4 graver is more for me rather than the 0.8 I used for something this afternoon and totally botched. The 0.4 is more forgiving and managable. I’ll keep the 0.8 for background removal. Now I really need to learn how to sharpen and do crosshatch shading. Any tips on those two topics?
Gear used: GRS Graversmith, 901 handpiece, QC flat graver 0.4mm, Optivisor, thermo-loc, cheap Amazon ball vise, laserprinter and acetone. Thanks for viewing and your feedback! All advice welcome!


