
KCSteve
~ Elite 1000 Member ~
Got my bench built on Sunday. Still have some work to do on it but it's all minor stuff - mostly drilling holes to run air and power lines through once I reach final decisions on just where those should be.
I got some cheap 2x4's and some expensive hard-wood plywood (3/4" stuff - it's heavy) and a box of 3" screws. Had one minor problem building it - dead battery on my power screwdriver so I had to do it by hand for the first couple of hours while the battery charged. Those cheap 2x4's have lots of knots so some of the screws were.... less than easy to put in. Not only stripped out the heads of several, I actually broke a screwdriver tip. Had to give up on some that I just couldn't get in the last bit even with the screwdriver tip on the rachet so I cut them off with a hacksaw. They'll hold and I have no plans to ever take this thing apart. Had power back by the time I was putting on the top.
The 'backsplash' is the extra 1' piece cut off from the sheet of plywood (4x8 sheet -> 3x6 bench == 2x4 quarter sheet for later use + 1x6 also for other use). I'll use it to put things like power strips after I get someone who knows what they're doing to run over electrical (living off an extension cord for now).
I built the bench with an overhang on purpose - lets me clamp things to the edge when I want.
The peanut-butter jar is the real key innovation though, and what makes it an engraving bench.
I used my cheap (and somewhat sloppy) hole saw to make a hole through the lid of an empty peanut butter jar using the next-to-largest size I had and the largest size to cut through the bench top. A few screws and the lid is attached to the underside of the bench. Screw on the jar and you've got a chip/dust collector. Right now I'm using the cut out plug to close the hole when not in use but I may improve on this later.
Oh - you'll notice I cut the bottom shelf short so my compressor sits on the floor - less noise and vibration this way.
If anyone wants the plans, here they are:
Cut 4 2x4's to 36" to be the end stringers.
Cut 4 2x4's to 35" to be the uprights (make sure you can tell which pile is which).
Since you want to the bench to be 6' long you can't cut the long stringers to 72" (6') because the end stringers go outside of them. I measured out 72" and then stood two 2x4 scraps to ge the length right (one at each end). Came out to 69" so cut four 2x4's to this length.
Lay one horizontal stringer along the long edge of a 4x3 plywood sheet. Using a scrap of 2x4 to keep it level lay an upright along the short edge so you get a nice, square corner. Drive in a pair of 3" screws at diagonally opposite corners of the joint. Slide the assembly to the other side of the sheet and add the other horizontal stringer (this puts your bottom shelf just off the ground). Flip this assembly around and add the other upright. Turn the whole thing over and drive another pair of screws into each joint from the other side in the other two corners of each joint.
Once you've got both the front and rear frames done, stand them up (they should be able to stand on their own) and use clamps (or an assistant) to hold the end stringers in place so you can drive in some screws to hold them on. Once again, 4 screws (one near the top and bottom of the end stringer going into each of the other two 2x4's). Unless you buy the expensive 2x4's you'll have to do some persuading to get everything neatly lined up. I did the both ends at the top and then flipped the whole frame over to do the other two. Since it's symmetrical it doesn't matter which way is up.
Now you can hork one of those big heavy sheets of 3/4" hardwood plywood up onto the framework so you can get at it. Oh - verify with your tape measure that the frame came out a nice 3' x 4' before you do. Cut the 2' section off of the end of the sheet first so you get a nice quarter sheet you can use later, then cut the 1' section off of the side. Do the same with the second sheet.
Whichever sheet you had the most problems cutting will become the shelf. Cut 1' off of one end to leave room for the compressor (more if you have a bigger compressor, none if your compressor lives elsewhere). With the sheet on top of the frame and neatly aligned trace the shape of the corners on the underside. Flip it over and use your square to mark what you have to cut off of each corner to get it to fit. Cut off those rectangles. Drop the bottom sheet into place and drive a few screws (I used 2" ones since this is a low-stress situation).
Lay the top on the bench, line it up neatly and drive a few screws to hold it in place. If you want to add your own chip collecting peanut butter jar do this before you screw down the top. In fact, you can secure the top as your very last step. With wood this heavy it's not going to move much anyway.
For the chip collector take a minute to figure out where you're going to work and pick a spot near enough to be handy but not in the way and make a mark. Take your peanut butter (I suppose you could use something else") ) jar and look at the lid. You want to leave just enough lid to have room for some screws to hold it in place. The size of hole saw you have available also matters. Pick about the biggest hole saw you can work with and very gently start the hole. You just want to 'kiss' the lid with the saw so you have a mark of where the hole in the table goes and a perfectly marked center. Now switch to a slightly smaller hole saw and actually cut through the lid. You'll now have a lid with a hole in the center and a ring around it. Use that larger hole saw to drill through the table top where you marked. Flip the sheet over (easier than working from underneath) and set the lid over it, using the mark to get it centered. Drive in a few short screws (don't want to go through the table) to hold it in place. Flip back over and then screw the jar onto the lid from underneath. Your cut out plug should sit on the lip of jar lid and stay in place. With a good hole saw it should fill the hole very neatly - you might have to put something through the center hole to get it back out. My saw's cheap enough there's plenty of slop (although it still keeps anything important - like a graver - from falling in).
) jar and look at the lid. You want to leave just enough lid to have room for some screws to hold it in place. The size of hole saw you have available also matters. Pick about the biggest hole saw you can work with and very gently start the hole. You just want to 'kiss' the lid with the saw so you have a mark of where the hole in the table goes and a perfectly marked center. Now switch to a slightly smaller hole saw and actually cut through the lid. You'll now have a lid with a hole in the center and a ring around it. Use that larger hole saw to drill through the table top where you marked. Flip the sheet over (easier than working from underneath) and set the lid over it, using the mark to get it centered. Drive in a few short screws (don't want to go through the table) to hold it in place. Flip back over and then screw the jar onto the lid from underneath. Your cut out plug should sit on the lip of jar lid and stay in place. With a good hole saw it should fill the hole very neatly - you might have to put something through the center hole to get it back out. My saw's cheap enough there's plenty of slop (although it still keeps anything important - like a graver - from falling in).
For the backsplash you need those big clamps / an assistant again. Stand the 1' section upright along the back edge and use the clamps / assistant to hold it in place. Drive in some screws to hold it in place. I used the 2" screws again. If you're careful about getting them as close to center in the upright bit as possible it will come out nice. If you screw up on one or two just back them out and try again - it's a workpiece not a showpiece.
If you know where you want them go ahead and drill / cut holes through the top for any air or power lines you want to run through it now.
Once everything's done with drive in a few screws to secure the top and then use sheer brute force to get the bench in place.
As I said, I need to do some more fiddling, including drilling my air / power line holes. First thing I need to do is put on a cup-hook for my dustpan. I might lightly sand the front edge but since it looks like I wound up putting the factory edge on the front it's not really needed. I plan to add some outlet strip to the backsplash - it's a metal strip with outlets every few inches you'll see at various workspaces. Used it when I built my darkroom. Just need to get an electrician to run a line over from the breaker panel. Need to add a light overhead too.
The nice thing about a bench like this - besides it's being nice and sturdy - is that you can whack on it any way you want. If I want to put something in place for a while I can clamp it to the front edge. If I want to keep it there I can just bolt it down. Heck, the whole thing cost less than $150 to build and that's with some of the best plywood they had - and I've got left overs of that.
Built it on Sunday, finally got play with it yesterday (Tuesday). Much better than the 2'x4' folding table I was using to get started. Still need to get a good chair, maybe add some storage drawers sitting on the shelf, etc. but it's a good start.
Picture by picture details:
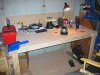
1 - there's the bench, sitting in the corner of the garage. Yes, still some cleanup needed on that corner.?
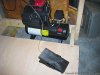
2 - Here you can see the cut-out for the compressor so it sits on the floor isolated from the bench.
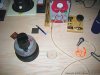
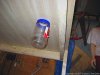
3 - you can see the (plugged) chip collector hole.
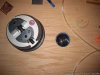
4 - hole with the plug out - I just use the brush from the dustpan to sweep everything into the jar.
5 - shot from underneath showing the 'lip' at the front for clamping stuff and the peanut butter jar.
I got some cheap 2x4's and some expensive hard-wood plywood (3/4" stuff - it's heavy) and a box of 3" screws. Had one minor problem building it - dead battery on my power screwdriver so I had to do it by hand for the first couple of hours while the battery charged. Those cheap 2x4's have lots of knots so some of the screws were.... less than easy to put in. Not only stripped out the heads of several, I actually broke a screwdriver tip. Had to give up on some that I just couldn't get in the last bit even with the screwdriver tip on the rachet so I cut them off with a hacksaw. They'll hold and I have no plans to ever take this thing apart. Had power back by the time I was putting on the top.
The 'backsplash' is the extra 1' piece cut off from the sheet of plywood (4x8 sheet -> 3x6 bench == 2x4 quarter sheet for later use + 1x6 also for other use). I'll use it to put things like power strips after I get someone who knows what they're doing to run over electrical (living off an extension cord for now).
I built the bench with an overhang on purpose - lets me clamp things to the edge when I want.
The peanut-butter jar is the real key innovation though, and what makes it an engraving bench.
I used my cheap (and somewhat sloppy) hole saw to make a hole through the lid of an empty peanut butter jar using the next-to-largest size I had and the largest size to cut through the bench top. A few screws and the lid is attached to the underside of the bench. Screw on the jar and you've got a chip/dust collector. Right now I'm using the cut out plug to close the hole when not in use but I may improve on this later.
Oh - you'll notice I cut the bottom shelf short so my compressor sits on the floor - less noise and vibration this way.
If anyone wants the plans, here they are:
Cut 4 2x4's to 36" to be the end stringers.
Cut 4 2x4's to 35" to be the uprights (make sure you can tell which pile is which).
Since you want to the bench to be 6' long you can't cut the long stringers to 72" (6') because the end stringers go outside of them. I measured out 72" and then stood two 2x4 scraps to ge the length right (one at each end). Came out to 69" so cut four 2x4's to this length.
Lay one horizontal stringer along the long edge of a 4x3 plywood sheet. Using a scrap of 2x4 to keep it level lay an upright along the short edge so you get a nice, square corner. Drive in a pair of 3" screws at diagonally opposite corners of the joint. Slide the assembly to the other side of the sheet and add the other horizontal stringer (this puts your bottom shelf just off the ground). Flip this assembly around and add the other upright. Turn the whole thing over and drive another pair of screws into each joint from the other side in the other two corners of each joint.
Once you've got both the front and rear frames done, stand them up (they should be able to stand on their own) and use clamps (or an assistant) to hold the end stringers in place so you can drive in some screws to hold them on. Once again, 4 screws (one near the top and bottom of the end stringer going into each of the other two 2x4's). Unless you buy the expensive 2x4's you'll have to do some persuading to get everything neatly lined up. I did the both ends at the top and then flipped the whole frame over to do the other two. Since it's symmetrical it doesn't matter which way is up.
Now you can hork one of those big heavy sheets of 3/4" hardwood plywood up onto the framework so you can get at it. Oh - verify with your tape measure that the frame came out a nice 3' x 4' before you do. Cut the 2' section off of the end of the sheet first so you get a nice quarter sheet you can use later, then cut the 1' section off of the side. Do the same with the second sheet.
Whichever sheet you had the most problems cutting will become the shelf. Cut 1' off of one end to leave room for the compressor (more if you have a bigger compressor, none if your compressor lives elsewhere). With the sheet on top of the frame and neatly aligned trace the shape of the corners on the underside. Flip it over and use your square to mark what you have to cut off of each corner to get it to fit. Cut off those rectangles. Drop the bottom sheet into place and drive a few screws (I used 2" ones since this is a low-stress situation).
Lay the top on the bench, line it up neatly and drive a few screws to hold it in place. If you want to add your own chip collecting peanut butter jar do this before you screw down the top. In fact, you can secure the top as your very last step. With wood this heavy it's not going to move much anyway.
For the chip collector take a minute to figure out where you're going to work and pick a spot near enough to be handy but not in the way and make a mark. Take your peanut butter (I suppose you could use something else
) jar and look at the lid. You want to leave just enough lid to have room for some screws to hold it in place. The size of hole saw you have available also matters. Pick about the biggest hole saw you can work with and very gently start the hole. You just want to 'kiss' the lid with the saw so you have a mark of where the hole in the table goes and a perfectly marked center. Now switch to a slightly smaller hole saw and actually cut through the lid. You'll now have a lid with a hole in the center and a ring around it. Use that larger hole saw to drill through the table top where you marked. Flip the sheet over (easier than working from underneath) and set the lid over it, using the mark to get it centered. Drive in a few short screws (don't want to go through the table) to hold it in place. Flip back over and then screw the jar onto the lid from underneath. Your cut out plug should sit on the lip of jar lid and stay in place. With a good hole saw it should fill the hole very neatly - you might have to put something through the center hole to get it back out. My saw's cheap enough there's plenty of slop (although it still keeps anything important - like a graver - from falling in).For the backsplash you need those big clamps / an assistant again. Stand the 1' section upright along the back edge and use the clamps / assistant to hold it in place. Drive in some screws to hold it in place. I used the 2" screws again. If you're careful about getting them as close to center in the upright bit as possible it will come out nice. If you screw up on one or two just back them out and try again - it's a workpiece not a showpiece.
If you know where you want them go ahead and drill / cut holes through the top for any air or power lines you want to run through it now.
Once everything's done with drive in a few screws to secure the top and then use sheer brute force to get the bench in place.
As I said, I need to do some more fiddling, including drilling my air / power line holes. First thing I need to do is put on a cup-hook for my dustpan. I might lightly sand the front edge but since it looks like I wound up putting the factory edge on the front it's not really needed. I plan to add some outlet strip to the backsplash - it's a metal strip with outlets every few inches you'll see at various workspaces. Used it when I built my darkroom. Just need to get an electrician to run a line over from the breaker panel. Need to add a light overhead too.
The nice thing about a bench like this - besides it's being nice and sturdy - is that you can whack on it any way you want. If I want to put something in place for a while I can clamp it to the front edge. If I want to keep it there I can just bolt it down. Heck, the whole thing cost less than $150 to build and that's with some of the best plywood they had - and I've got left overs of that.
Built it on Sunday, finally got play with it yesterday (Tuesday). Much better than the 2'x4' folding table I was using to get started. Still need to get a good chair, maybe add some storage drawers sitting on the shelf, etc. but it's a good start.
Picture by picture details:
1 - there's the bench, sitting in the corner of the garage. Yes, still some cleanup needed on that corner.?
2 - Here you can see the cut-out for the compressor so it sits on the floor isolated from the bench.
3 - you can see the (plugged) chip collector hole.
4 - hole with the plug out - I just use the brush from the dustpan to sweep everything into the jar.
5 - shot from underneath showing the 'lip' at the front for clamping stuff and the peanut butter jar.
Attachments
-
 Bench1.jpg51.6 KB · Views: 431
 -
 Bench2.jpg51.4 KB · Views: 268
 -
 Bench3.jpg49.4 KB · Views: 276
 -
 Bench4.jpg47.2 KB · Views: 280
 -
 Bench5.jpg40.6 KB · Views: 276


