Help, please: old gravermeister advice

Joined
Feb 12, 2016
Messages
98
Location
pittsburgh pa
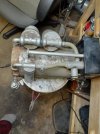
20 years ago, I bought an engraving machine out of guilt which is a really long story I am sure no one wants too here about. after buying 2 used gravemaxes I have up graded lol. yeah, I know I'm like that. the first one didn't work so I bought another to teach me how to fix the first one lol. yeah, I admitted that in public. now I was cleaning out my basement and low and behold I found the old gravermeister that I didn't want to buy 20 years ago. I am now considering selling all the used machines and I have cleaned and re-hosed the maxes inside and out but this old gravermeister I really don't know much about them. this is the original one that uses oil. I have changed the filters and cleaned it up and I must say it was filthy. I was about to change the belt but the old one is in good shape. I am going to give that into whoever if anyone out there wants it. here is the big question. What else should I go over before selling it. I have a hand piece, but it was stripped of the piston and spring. I do have a hand piece that I can test it out with. you see it looks like it has no wear on it, but I don't want to sell something I don't know for sure works. should I pull the head off of it? if I do are their gaskets that I will need to put it back together. I checked grs and the manual stops at the upper end of the machine and really doesn't delve into what's on the bottom end. I'm not afraid to rip things apart but what am I getting into. I'm sorry for how long this post is but it is being written with the best intentions. mainly I don't want to sell something I'm not sure works. oh, and what type of oil does it use lol. the manual said to use grs oil only. thank you in advance for any info you can pass on
 
Joined
Feb 12, 2016
Messages
98
Location
pittsburgh pa
you are a gentleman and a scholar thank you for replying actually I took it to grs when I attended school and got a quote for $400 or so to clean it up, replace the belt, change the gaskets on the upper bottles, change the filters and give it the once over. due to world circumstances, they were not able to look at it while I was there. now if I left it there, I would be shiping it back home for them to look at it. just what I needed, more cost to sell it lol., plus, I figured I could replace those myself. this item is so old that I figured I would barely get that out of it, especially with the condition of the hand piece. when I ripped it apart to change the belt, I pulled out the large upper pully and was surprised that there wasn't any wear on a spinning part. if this sounds like I am talking crap on grs, you might be thinking wrong. I have nothing but good things to say about them. lol I have Aaron searching down some foot pads for it because they are like rocks after what I figure is 50 years, what did I expect. there I go again talking to much lol. again, thank you for the response.


i
 
Joined
Feb 12, 2016
Messages
98
Location
pittsburgh pa
to me it's worth more than you can imagine. I bought my first gravermax off of eBay. when I got it, it didn't work at all and when I shook it lol. it just rattled. I will not do that to anyone. truth be told, I learned a lot from that experience on how to clean the valve body and how to rechose them. lol now all I have to learn is how to post a pic
 
Joined
Feb 12, 2016
Messages
98
Location
pittsburgh pa
thank you tdelewis. it's going to be a little bit more than $4 but not much more. I just put $150 into making sure it works. maybe I'll just use it for a week or 2 first
 
Joined
Feb 12, 2016
Messages
98
Location
pittsburgh pa
you know that the guy you are working with is straight up a good guy when he tells you that parts are too expensive here go to the hardware store lol. these guys at grs are great.
 
Joined
Feb 12, 2016
Messages
98
Location
pittsburgh pa
my apologies for not knowing what I am doing on posting pics. i have been reconsidering this post as a how to fix your old gravermeister. if this is something you would like to see? drop a note 20211211_194757_resized_4.jpg
20211211_194757_resized_4.jpg
 

Aventuraal

Member
Joined
Oct 13, 2007
Messages
58
Location
East Central Florida
If your Meister has been sitting that long, you might want to look at the vanes in the pump end. If it originally used oil, then the vanes may be stuck. The giveaway is the sound; if the vanes are stuck, you don't hear the pulsing sound, just the motor running. To get at the vanes, you need to remove the end plate by the oil bottle, about 6 bolts or so, and remove the plumbing connected to it to get it apart; think how you would assemble it, and then reverse the process, it's easy. There isn't a gasket (at least, there wasn't on mine; it's a very well machined fit) and you are looking at the vacuum/pressure chamber. The 4 vanes need to be clean, free and slide in their respective grooves on the rotor, put a smear of ATF on them when you reassemble them. Pay close attention to the orientation of the vanes, note the angled face on the ends and how they fit into the chamber. Mine had slight burrs on the back face of the vanes, from running in contact with the body; remove them carefully with some emery paper. You should also clean the chamber and rotor with some good solvent (GRS's old service and parts info lists a spray (!!!) can of trichloroethane you shot into the oil wick port in the body with it running to clean them without disassembly. Fancy that, what would OSHA think about atomized trich blowing around..... The oil wick I ended up using was a 3 or 4 mm miniature oil lamp wick from E-Bay; (works way better than the pipe cleaner thing) the feet I replaced with some from McMaster Carr, they were the soft ones, ( as I recall, about 40 durometer) and made a significant difference in the running noise; unfortunately, I can't find the part number for them, they were 1/4x20, and I needed some hardware store fender washers and nuts to mount them in the slots on the mounting brackets. You also have the older, low speed valve, and, apparently, no throttle. If you have the throttle, you can replace the hoses with vinyl tubing from hardware stores or Home Depot, just keep them the same length. If you have the throttle, there may be a bushing in the line at the throttle end, it is no longer used, and by all means, make sure the throttle plate is clean, lightly lubed and the opening isn't clogged. Nowadays, you use ATF instead of oil, it stays cleaner, and doesn't foul the handpiece bore so quickly. You adjust the oil feed into the pump by moving the wick back and forth in the tube; it's a venturi system, so make sure the bleed hole in the fitting body is open; it is supposed to use about a bottle of oil in about 10 to 25 or so hours of use, although they caution that the use will vary with how continuously you run it. Play with it to get it right, it will take a few tries; I put a Hobbs meter into the power circuit of mine to make it easier to monitor. You should be able to replace the spring and piston in the handpiece from GRS, as well as download the Meister manual and service information as well, if you don't already have it.
 
Joined
Feb 12, 2016
Messages
98
Location
pittsburgh pa
If your Meister has been sitting that long, you might want to look at the vanes in the pump end. If it originally used oil, then the vanes may be stuck. The giveaway is the sound; if the vanes are stuck, you don't hear the pulsing sound, just the motor running. To get at the vanes, you need to remove the end plate by the oil bottle, about 6 bolts or so, and remove the plumbing connected to it to get it apart; think how you would assemble it, and then reverse the process, it's easy. There isn't a gasket (at least, there wasn't on mine; it's a very well machined fit) and you are looking at the vacuum/pressure chamber. The 4 vanes need to be clean, free and slide in their respective grooves on the rotor, put a smear of ATF on them when you reassemble them. Pay close attention to the orientation of the vanes, note the angled face on the ends and how they fit into the chamber. Mine had slight burrs on the back face of the vanes, from running in contact with the body; remove them carefully with some emery paper. You should also clean the chamber and rotor with some good solvent (GRS's old service and parts info lists a spray (!!!) can of trichloroethane you shot into the oil wick port in the body with it running to clean them without disassembly. Fancy that, what would OSHA think about atomized trich blowing around..... The oil wick I ended up using was a 3 or 4 mm miniature oil lamp wick from E-Bay; (works way better than the pipe cleaner thing) the feet I replaced with some from McMaster Carr, they were the soft ones, ( as I recall, about 40 durometer) and made a significant difference in the running noise; unfortunately, I can't find the part number for them, they were 1/4x20, and I needed some hardware store fender washers and nuts to mount them in the slots on the mounting brackets. You also have the older, low speed valve, and, apparently, no throttle. If you have the throttle, you can replace the hoses with vinyl tubing from hardware stores or Home Depot, just keep them the same length. If you have the throttle, there may be a bushing in the line at the throttle end, it is no longer used, and by all means, make sure the throttle plate is clean, lightly lubed and the opening isn't clogged. Nowadays, you use ATF instead of oil, it stays cleaner, and doesn't foul the handpiece bore so quickly. You adjust the oil feed into the pump by moving the wick back and forth in the tube; it's a venturi system, so make sure the bleed hole in the fitting body is open; it is supposed to use about a bottle of oil in about 10 to 25 or so hours of use, although they caution that the use will vary with how continuously you run it. Play with it to get it right, it will take a few tries; I put a Hobbs meter into the power circuit of mine to make it easier to monitor. You should be able to replace the spring and piston in the handpiece from GRS, as well as download the Meister manual and service information as well, if you don't already have it.
again, I can't thank you enough. nice to see others that like to fix Thier own stuff. I have it ripped down to the point of removing that end that has the valves and vanes in it, but the manual doesn't show anything about the lower end of the gravermeister at all. it just shows the upper end and the pully side of the machine. to say I was a little nervous about splitting this open is putting it mild. especially because they don't make this anymore and I'm not sure ... no I know not all parts are available. I considered myself lucky because the money I have into it was forgotten about to many years ago to be worried about it now. I got all the gaskets, filters, bottles and pully from grs but when I opened it up, the old leather pully looks new. I have only turned it on for a second to make sure it wasn't frozen and when it moved, I figured it was worth cleaning up and rebuilding. I can rip out your car motor and rebuild it but this thing yikes, lol. I was over thinking the heck out of this. the upgrade isn't available from grs anymore, they said it was causing more problem than it was worth. their opinion not mine lol. so, whoever ends up with it will have to deal with slower but powerful hits. thank you so much for the input. the knowledge is more important to me than, well anything right now. I do have 1 more question if you can share one more thought. when looking at the arbore or should I call it the main axil., from the belt side or the side that has the on/off switch. does it spin clockwise or counterclockwise. just in case I get the polarity wrong. I doubt that will happen, but it would be nice to know the correct way. like I said it sat sooo long I was afraid I would run gunk through it if I ran it. it might even be more like 30 years ago. it sat so long I seriously forgot about having it. taking the time to wright such a detailed explanation is something I hope I to can pass on as well. thank you again!!!! oh, the throttle peddle grs did have one. I have it in the house now
 
Last edited:

Aventuraal

Member
Joined
Oct 13, 2007
Messages
58
Location
East Central Florida
Offhand, I don't know the direction of rotation, but, since it's an A/C motor, the polarity shouldn't matter. My gut sense is it rotates CCW, but don't take that as gospel. If you can do motor rebuilds, you will have no problem whatsoever with the Meister. It's simple, super rugged and reliable. By all means, get the PDF manual from the GRS site. It is a wealth of information, from a time when it was expected you would repair things, rather than throw them away.
Here is the link if you need it:
 
Joined
Feb 12, 2016
Messages
98
Location
pittsburgh pa
Offhand, I don't know the direction of rotation, but, since it's an A/C motor, the polarity shouldn't matter. My gut sense is it rotates CCW, but don't take that as gospel. If you can do motor rebuilds, you will have no problem whatsoever with the Meister. It's simple, super rugged and reliable. By all means, get the PDF manual from the GRS site. It is a wealth of information, from a time when it was expected you would repair things, rather than throw them away.
Here is the link if you need it:
yes sir, I have that downloaded. life got in the way today and tomorrow. I will pound this out on Friday. you are a lifeline tho. I was picturing there was a compressor in there with a piston, rings gaskets. I figured if nothing else there had to be O-rings all over the place. and all the springs that were going to pop the second I split the case. like I said over thinking the heck out of it. in my defense if there is one lol. I figured the manual wasn't showing the bottom of it for a reason. Aaron told me they were made to be bomb proof. he wasn't fibbing at all; it is so over built. I will stop there. I might start sounding like a salesman, but I will say this. it doesn't surprise me that people have them for 30-45 years without a problem. it's just a huge motor with a little pump. no wonder they last. you, sir have been a tremendous amount of help and I can't thank you enough, but honestly, I kind of figured that this is exactly what I would find. I have been coming in here for years. I have always been pretty quiet. mainly because life was in the way of my learning the skills of being amongst pears but more like just coming in and being in awe of what I was seeing and meeting people that were of the highest quality people a person could meet. I enjoy the time I spend in here. I am so glad to see that the world with all its flaws and me with mine, but I am so glad that this place has remained the same. good people trying to help good people. springs everywhere is what my mind pictured. lol. thank you
 
Last edited:

John B.

Lifetime Pledge Member
::::Pledge Member::::
Joined
Nov 9, 2006
Messages
3,950
Location
Los Angeles area, California.
Tortlieb, I expect you know this.
The Gravermiester is an adaptation built on a basic Gast pump.
Gast pumps are still made and you might check with the company for old parts and instruction books availability.
Gast pumps are widely used in industry and many are installed to extract condensate in the bottom of elevator shafts. Best of luck with your rehab project.
 
Joined
Feb 12, 2016
Messages
98
Location
pittsburgh pa
Tortlieb, I expect you know this.
The Gravermiester is an adaptation built on a basic Gast pump.
Gast pumps are still made and you might check with the company for old parts and instruction books availability.
Gast pumps are widely used in industry and many are installed to extract condensate in the bottom of elevator shafts. Best of luck with your rehab project.
lol, oh no john. i had no idea. I am an expert at nothing at all. I know a little bit about a little bit lol. I welcome any information I can get thank you sir for any help at all. I am thankful for everything I can learn!!!! thank you all for the guidance.
 

Aventuraal

Member
Joined
Oct 13, 2007
Messages
58
Location
East Central Florida
Here is a very old (seems to be dated 3/87) 4 page document from Gast, listing parts and a very brief bit of maintenance information. If you contact Gast, you can at least give them the part numbers, and, just maybe, they may have some in a box on the back shelf in the warehouse. By a process of comparing part numbers shown, I'm guessing the model number is 0-322, and the version difference only changes the body part itself. Everything else seems to be the same. Image (9).jpg Image (8).jpg Image (10).jpg Image (11).jpg
 
Joined
Feb 12, 2016
Messages
98
Location
pittsburgh pa
there it is, exactly. thank you again aventuraal. I was on Gasts web site yesterday thanks to john. I couldn't find the right pump, but it explained the way this works and the kiss principle that was used made me giggle as to how simple this was made. fortunately, there is absolutely no wear on this at all. the guy I bought this off of obviously hardly ever used it. so, I blew out the cobwebs and there actually were cobwebs in it. now I'm putting it back together. thank you one and all for the insight. I'm in my 60s and never seen a pump like this before. your help is much appreciated. I have never sold anything before and was nervous about selling something I knew nothing about and didn't want to give it to someone unless I knew for sure I was selling something of value. I baked on a fresh coat of enamel and its ready to go. if this sounds like a sales pitch, I'm sorry you see it that way. I know I'm not the normal guy that sells things but, I never said I was normal. lol. again, thank you so very, very much. you people in here are fantastic. I hope you are proud of this site; you should be indeed.
20211218_205201_resized.jpg 20211216_195941_resized.jpg 20211218_205511_resized.jpg 20211218_205201_resized.jpg 20211216_195941_resized.jpg 20211218_205511_resized.jpg
 
Last edited:
Top