
You are using an out of date browser. It may not display this or other websites correctly.
You should upgrade or use an alternative browser.
You should upgrade or use an alternative browser.
Old School High Relief Engraving
- Thread starter 1911maker
- Start date
Andrew Biggs
Moderator
What do you mean by high relief engraving?? That can mean a lot of things. ")
Don't get hung up on the hammer and chisel thing...............It is all hammer and chisels.
GRS handpiece, Lindsay handpiece, Enset handpiece, Magnagraver handpiece, Foredom handpiece and chasing hammers.................they are just adjustable hammers. Nothing else!!!!
So when you read about, or see a technique, it's just a matter of adjusting that technique to the tool you are using.
The tools you use and the techniques are basically the same. The only difference is the way you hold the tool and what applies the force to make the graver cut the metal.
The best way to learn how to do it........is by doing it. About 99% of your questions will be answered as you go.
Cheers
Andrew
Roger Bleile
~ Elite 1000 Member ~
Here is a link to a complete tutorial on the subject by my brother, Carl: http://www.engravingforum.com/showthread.php?t=3341
Great question, high relief in my case is with a 1911 slide and frame where I'm removing about .050" to create my design. Much of the negative space will be removed as part of the high relief engraving. It turns out that the slide I will be using has thicker side walls than most 1911s allowing me to remove more material without compromising the integrity of the slide/frame. I've spent a lot of time trying to find anyone who has attempted this in the past on a firearm. I'm sure they are out there but haven't found any examples yet. Of course, there are incredible examples on this website of 1911 engravings and gold inletting which are truly aspirational!
Roger, thanks so much for the link!
Of course, there are incredible examples on this website of 1911 engravings and gold inletting which are truly aspirational!Roger, thanks so much for the link!
Fifty thou is deep cutting. You might also want to investigate acid removal of background. Barry Lee Hands uses that to good effect but I cannot remember if he has done any tutorials on the subject. It would likely save a lot of time.
Welcome to the forum 1911maker. I sure hope you plan extensive practice on a hundred practice plates before you jump into your gun project!
Cheers / ~Sam
Cheers / ~Sam
Roger Bleile
~ Elite 1000 Member ~
Here is a close-up example of the top of a 1911 slide cut in high relief by Weldon Lister. It was a work in progress when this picture was taken. FWIW, Weldon had about 40 years of training and experience when he cut this gun.
Attachments
-
 Turnbull commander-WIP-Tcu.jpg47.6 KB · Views: 438
Roger, thanks for finding this tremendous example of High Relief. It truly is gorgeous and Weldon is very talented! I knew there had to be at least one example out there!
So yes, this is what I'll be attempting to do but with modern day subject matter that will resonate with men! Now, can I make it look like my drawing that is the $100K question? I enjoy painting (oil, airbrushing), sand casting, woodworking, and metal work a la my Bridgeport so I'm hoping I can pull these skills together with a chasing hammer and chisel.
Sam, thanks for the tip, I've already made aluminum plates that are the exact dimensions of a 1911 "monolith" slide and frame to practice on. A "monolith" slide gives me a bigger palette to work on as it extends the dust cover as well as a small portion of the frame.
Thanks again,
Todd
Todd, you will find aluminum engraves much different than steel...as you may well be aware of via machining qualities. Frequently use a good lube such as an anti-seize lube (I like Never-seez best) to keep the aluminum from sticking to the face of your tools.
JMiller
Elite Cafe Member
I think this is the one you were thinking of Sam.... http://www.engraverscafe.com/showthread.php?11981-Carved-Lee-Helgeland-Winchester-Model-70-458-Magnum-by-Barry-Lee-Hands/page8
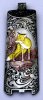
Here is another example of what I think of as deep sculpting. The depth is about .020" with some perhaps as deep as .025". The sculpting done with metal removal as opposed to chasing with punches.
PS...the red areas indicate where I put soft iron (or steel) inlays for a more raised effect or color effect in the case of the fox parts.
PS...the red areas indicate where I put soft iron (or steel) inlays for a more raised effect or color effect in the case of the fox parts.
Attachments
-
 fox prog 10.jpg142.5 KB · Views: 103
Last edited:
rmgreen
Elite Cafe Member
Sam - The iron inlays shown, is this with soft iron wire or sheet steel? Some it seems to be large enough that it would take multiple piece of iron wire to make the complete inlay. Cold forging of soft iron wire?
Roger
Roger
Hi Roger,
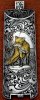
Here is the floor plate in its finished form (actually a bolo tie). The rock the fox stands on is sheet metal with silver soldered to the back to help take the teeth in the bottom of the cavity cut to fit it. Or rather, the "rock" was cut to fit the cavity. Then 4 pieces of wire were inlayed above the upper edge to bring the rock up to the feet properly. All the rest were done in various sizes of wire. The rock by the way is the only sculpted part done with chasing punches. The mouse was just cut into the floor plate. John Barraclough gave me the soft sheet steel with the silver backing so I cannot tell you how that was done.
Here is the floor plate in its finished form (actually a bolo tie). The rock the fox stands on is sheet metal with silver soldered to the back to help take the teeth in the bottom of the cavity cut to fit it. Or rather, the "rock" was cut to fit the cavity. Then 4 pieces of wire were inlayed above the upper edge to bring the rock up to the feet properly. All the rest were done in various sizes of wire. The rock by the way is the only sculpted part done with chasing punches. The mouse was just cut into the floor plate. John Barraclough gave me the soft sheet steel with the silver backing so I cannot tell you how that was done.
Attachments
-
 Bolo recut.jpg180.8 KB · Views: 94
rmgreen
Elite Cafe Member
Sam, I must admit that finding the mouse was elusive!!!!!!!! LOOKING and SEEING are 2 different abilities! Neat! Great idea of a soft backing on sheet steel as a way for the "teeth" to grab and hold the steel in place. In the same manner that the removal of metal adds to the dimensionalizm of the project so does the raised inlay add to this same effect. I especially appreciate the raised scrolls and vines. Super nice work and thanks for sharing.
atexascowboy2011
Elite Cafe Member
- Joined
- Feb 13, 2012
- Messages
- 997
Sam, your scrolls have so much depth !
Another way of inlaying the steel, "the Mexican way", is to raise a good lip, then slightly dome the steel, then hammer it into the cavity forcing it under your undercut. After this hammer the lip down and stone smooth. This technique wad developed by the Mexicans in order to save the cost of silver. A lot of their inlays were made of 30 gauge silver and gold, which were too thin to "flow" into the undercuts.
Another way of inlaying the steel, "the Mexican way", is to raise a good lip, then slightly dome the steel, then hammer it into the cavity forcing it under your undercut. After this hammer the lip down and stone smooth. This technique wad developed by the Mexicans in order to save the cost of silver. A lot of their inlays were made of 30 gauge silver and gold, which were too thin to "flow" into the undercuts.
mvangle
Elite Cafe Member
Sam your fox looks like it could jump right off my phone screen and scamper into the woods without making a sound.
Sponsors


