jlutz
Member
I had the good fortune to join Ray recently for his Basic Engraving class and saw his homemade vise stands. I thought they were the best designed, and with the most readily available materials, of the DIY options I had seen. I made one at home he was kind enough to give me permission to share the details for other interested parties. I will point out I made one modification, but I’ll tell you how what I did that was different from Ray so you can try either way. Ray also mentioned he still has spaces available in his upcoming Basic Engraving Class Sep. 21-25. The next basic class after that will be next year, March 6-10.
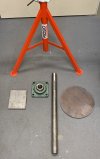
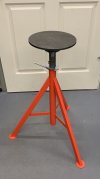
I’ll make several posts with photos, so if you would be so kind, give me a few minutes to get everything up before commenting or asking questions. I’ll start with a photo of the finished stand so you have a frame of reference.
I’ll make several posts with photos, so if you would be so kind, give me a few minutes to get everything up before commenting or asking questions. I’ll start with a photo of the finished stand so you have a frame of reference.
Attachments
-
 E95F5D16-2D6D-4C07-8A6A-91CF8BA82878.jpeg53.8 KB · Views: 143