Ray Cover DIY Vise Stand

jlutz

Member
Joined
Nov 9, 2019
Messages
33
Location
Fort Wayne, IN
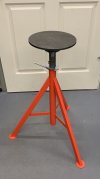
I had the good fortune to join Ray recently for his Basic Engraving class and saw his homemade vise stands. I thought they were the best designed, and with the most readily available materials, of the DIY options I had seen. I made one at home he was kind enough to give me permission to share the details for other interested parties. I will point out I made one modification, but I’ll tell you how what I did that was different from Ray so you can try either way. Ray also mentioned he still has spaces available in his upcoming Basic Engraving Class Sep. 21-25. The next basic class after that will be next year, March 6-10.

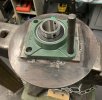
I’ll make several posts with photos, so if you would be so kind, give me a few minutes to get everything up before commenting or asking questions. I’ll start with a photo of the finished stand so you have a frame of reference.
 

Attachments

  • E95F5D16-2D6D-4C07-8A6A-91CF8BA82878.jpeg
    E95F5D16-2D6D-4C07-8A6A-91CF8BA82878.jpeg
    53.8 KB · Views: 135

jlutz

Member
Joined
Nov 9, 2019
Messages
33
Location
Fort Wayne, IN
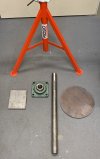
Here are the parts I used, minus the bolts and washers. Parts list is as follows:

*Rigid Pipe Stand, Model VJ-99

(Available on Amazon here: https://a.co/izpdbwp, though I found it cheaper on Zoro. Ray pointed out he has used the type with collapsible legs and finds the fixed leg option to be more stable)

*10” steel disc

(Targets for shooting work well. I found a seller on Ebay who was happy to sell me a plate with no hole cut in it. Message him to request one.


**1.5” OD steel pipe, approx 24” long
(I used cold rolled DOM with a with a 0.125 wall thickness, but lots of variations would work. The OD is most critical measurement)

**UCF208-24 Solid Pillow Block Flange Mounted Bearing 1-1/2" Bore

(https://www.ebay.com/itm/3030905617...F4tRVoBRr-&var=&widget_ver=artemis&media=COPY)

**Block of steel 5 7/8” L x 5” W x .5” thick

(That just happened to be the size I had handy. It needs to be long enough and wide enough to mount the above pillow block to, and thick enough to hold the bolts once tapped.)

**Bolts washers x4

(You can decide what size to use. I used 3/8 x 1”bolts with lock washers because of availability, but the flange on the pillow block will accept up to 5/8 diameter bolts.

i mentioned a difference in my build. Ray drills and taps the steel plate, then mounts the pillow block directly to the underside before he cuts off and grinds smooth bolts that are protruding through what is the top side of the plate. I decided to weld a block to the underside of the plate and mount to that so nothing is coming through the top of the plate. Having done that now, I’d say it’s probably not worth the extra effort, but you can try either way.
 

Attachments

  • EB6F0304-880D-4CE0-A303-43B39A53C71C.jpeg
    EB6F0304-880D-4CE0-A303-43B39A53C71C.jpeg
    106.6 KB · Views: 57
  • E52DD07C-F6D5-4033-B91F-524E959E9E25.jpeg
    E52DD07C-F6D5-4033-B91F-524E959E9E25.jpeg
    47.7 KB · Views: 54
Last edited:

jlutz

Member
Joined
Nov 9, 2019
Messages
33
Location
Fort Wayne, IN
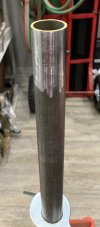
First, I had to remove a little metal from my pipe so it would fit the pillow block. If you have a large enough lathe, that’s obviously the most precise way. I did not, so I just used sandpaper and the slack portion of my belt grinder. Just go slow and try and work the sides evenly. You want it to fit snugly in the pillow block when you are done. I also went back and polished the top of the pipe to smooth it up since it will be i contact with the plate under the disc.
 

Attachments

  • 68A84EF2-881C-489D-A54E-2B2D3B94FAAB.jpeg
    68A84EF2-881C-489D-A54E-2B2D3B94FAAB.jpeg
    60.8 KB · Views: 24

jlutz

Member
Joined
Nov 9, 2019
Messages
33
Location
Fort Wayne, IN
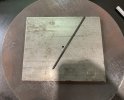
Next, mark the center of your plate and disc. To get them to line up, I drilled a hole through the bottom plate and dimpled the top plate. I then used a transfer punch to “feel” when I found the dimple on the disc.
 

Attachments

  • 9AE56934-15D5-46CB-A1CB-E38EAED9A18E.jpeg
    9AE56934-15D5-46CB-A1CB-E38EAED9A18E.jpeg
    182.9 KB · Views: 27

jlutz

Member
Joined
Nov 9, 2019
Messages
33
Location
Fort Wayne, IN
Once your bottom plate is centered, secure in place. I then pre-heated the steel with a torch before welding. After welding was complete, I covered it fully in vermiculite and let cool. I am a rather poor welder, so pay no attention to that!
 

Attachments

  • A6E7E28A-BE9A-4929-9D40-81CA0608175B.jpeg
    A6E7E28A-BE9A-4929-9D40-81CA0608175B.jpeg
    279.7 KB · Views: 42

jlutz

Member
Joined
Nov 9, 2019
Messages
33
Location
Fort Wayne, IN
Next up, mark the block you just welded in place so you can drill and tap mounting holes. A transfer punch works well if you have the right size or if you don’t and you fake it like I did. Ince that’s complete, drill and tap the holes to fit your bolts.
 

Attachments

  • DD702B83-044C-4F64-BA7F-1B6FD5FFD4A6.jpeg
    DD702B83-044C-4F64-BA7F-1B6FD5FFD4A6.jpeg
    154.5 KB · Views: 35

jlutz

Member
Joined
Nov 9, 2019
Messages
33
Location
Fort Wayne, IN
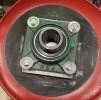
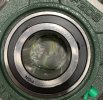
Just a few more steps now. Using washers and lock washers, bolt the pillow block in place. I then added a bit of lithium grease in the center where the pipe will make contact with our mounting block, just to keep things smooth. Finally, install it on your pipe and use the set screws in the pillow block to secure in place before re-inserting everything into the pipe stand.

An observation about the pillow block, it is self aligning, which means it can cant slightly, so double check that if things aren’t quite level. I had no luck finding a similar pillow block that was not self aligning.
 

Attachments

  • 058BC15F-5817-4595-8AB9-81CE20C4C45B.jpeg
    058BC15F-5817-4595-8AB9-81CE20C4C45B.jpeg
    220.4 KB · Views: 31
  • A864B8EF-EE50-473F-AA87-7426E9E46FC6.jpeg
    A864B8EF-EE50-473F-AA87-7426E9E46FC6.jpeg
    216.2 KB · Views: 31

jlutz

Member
Joined
Nov 9, 2019
Messages
33
Location
Fort Wayne, IN
That’s it! All told I had around $150 in materials. I just finished it up, so I can’t give a report yet, but I used the ones in Ray’s shop for a week and thought they worked great. I can detect a very slight unevenness in mine on rotation, I believe because the plate is not precisely level. I could put it on the surface mill and true things up, but I don’t think it will be very noticeable in actual use so I plan to use it a bit and see what I think.

I’m happy to answer any questions.
 

monk

Moderator
Staff member
::::Pledge Member::::
Joined
Feb 11, 2007
Messages
10,962
Location
washington, pa
i've always been a fan of diy. i thank you for taking the time to share your project. any newb interested can easily reduce the cost that you paid. it could be done far cheaper by going to most any junk/salvage yard. it is surprizing some of the quality materials that can be found in such places. the prices are generally quite low.
 

jlutz

Member
Joined
Nov 9, 2019
Messages
33
Location
Fort Wayne, IN
i've always been a fan of diy. i thank you for taking the time to share your project. any newb interested can easily reduce the cost that you paid. it could be done far cheaper by going to most any junk/salvage yard. it is surprizing some of the quality materials that can be found in such places. the prices are generally quite low.
For sure! I see this as a good middle of the road option for someone who can’t (or chooses not to) spend the money on something top of the line like Steve Lindsay’s vise stand, but maybe doesn’t want to go full engineer and build it from scratch. The pipe stand is certainly where the money is on this build. I do more blacksmithing than engraving, so I know well the lure of the scrap yard!
 

monk

Moderator
Staff member
::::Pledge Member::::
Joined
Feb 11, 2007
Messages
10,962
Location
washington, pa
i used to hang out in dimly lit beer joints. quite a few years ago i quit the booze and now hang out in a local "materials supply yard" i also did and still do a bit of blacksmithing. i built all my own tools, jigs, and portable forge. lotsa fun.
 

mongo40

Member
Joined
Mar 26, 2014
Messages
7
Hey Ja
I had the good fortune to join Ray recently for his Basic Engraving class and saw his homemade vise stands. I thought they were the best designed, and with the most readily available materials, of the DIY options I had seen. I made one at home he was kind enough to give me permission to share the details for other interested parties. I will point out I made one modification, but I’ll tell you how what I did that was different from Ray so you can try either way. Ray also mentioned he still has spaces available in his upcoming Basic Engraving Class Sep. 21-25. The next basic class after that will be next year, March 6-10.

I’ll make several posts with photos, so if you would be so kind, give me a few minutes to get everything up before commenting or asking questions. I’ll start with a photo of the finished stand so you have a frame of reference.
Hey Jacob, is it possible to just weld the bearing to the steel! Be a lot easier than drilling and tapping!
Chris
 

jlutz

Member
Joined
Nov 9, 2019
Messages
33
Location
Fort Wayne, IN
Hey Chris - I know we had a sidebar on this via email. For other interested parties, it certainly may be possible; like I mentioned, the mystery metal composition of the cheap pillow blocks made me uncertain. Also being a novice welder (see my welds for evidence!), I wasn’t sure if I’d need to preheat the pillow block and in general I wanted to keep heat away from the bearing assembly. I’ll be interested to hear how it works for you though; it would certainly speed things up.
 

monk

Moderator
Staff member
::::Pledge Member::::
Joined
Feb 11, 2007
Messages
10,962
Location
washington, pa
Hey Chris - I know we had a sidebar on this via email. For other interested parties, it certainly may be possible; like I mentioned, the mystery metal composition of the cheap pillow blocks made me uncertain. Also being a novice welder (see my welds for evidence!), I wasn’t sure if I’d need to preheat the pillow block and in general I wanted to keep heat away from the bearing assembly. I’ll be interested to hear how it works for you though; it would certainly speed things up.
spark test or drill test a small area. that will determine if it is steel or cast iron.
 

Latest posts

Sponsors

Top