Requesting design help on 1851 navy barrel

MICHAEL

Elite Cafe Member
Joined
Dec 14, 2009
Messages
340
Location
Harriman, Tn.
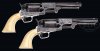
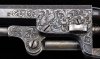
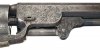
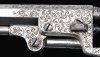
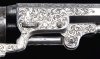
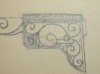
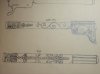
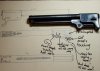
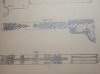
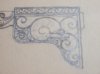
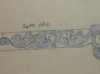
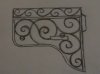
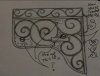
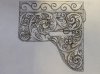
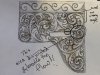
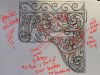
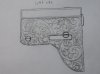
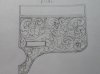
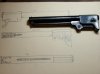
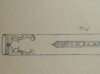
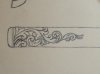
I started to come up with idea's today for a black powder pistol. I'm starting with the barrel. I want to take this slow and do it right. I'm mostly concerned if the scroll backbones are flowing properly? Any help or idea's to make this design better will be much appreciated. :)
 

Attachments

  • 100_0211.jpg
    100_0211.jpg
    37 KB · Views: 188
  • 100_0210.jpg
    100_0210.jpg
    25.6 KB · Views: 184
  • 100_0209.jpg
    100_0209.jpg
    36.3 KB · Views: 200

John B.

Lifetime Pledge Member
::::Pledge Member::::
Joined
Nov 9, 2006
Messages
4,009
Location
Los Angeles area, California.
Michael,
In the first picture, middle drawing, where you have the two small scrolls above the front screw you are going to have a very difficult area with the internal leaves.
A little revision and further study in this area might be worth while.
Best of luck with this project.
 

FANCYGUN

~ Elite 1000 Member ~
Joined
Nov 10, 2006
Messages
1,871
Location
West Grove, PA
Michea
If you look at old Colt engravings you will notice they engrave right through the assembly wedge as if it was not there. This is one way they got around the design problem John mentioned

Marty
 

Roger Bleile

~ Elite 1000 Member ~
Joined
Oct 4, 2007
Messages
2,997
Location
Northern Kentucky
Michael,

Here are some pics that will show how Gustave Young designed the area you are considering . Most of these are octagon barrels not round like your dragoon but I think you will get some ideas from them. There is a set of Dragoons pictured with what Colt collectors call "donut scroll." I never cared for it and it was only used on a small number of guns.

When you look at the work on these guns you may wonder "what's the big deal about the engraving on antique Colts. I see better scroll every day on the forum." Collectors are crazy for this because of its antiquity and they don't compare it with today's work. Anyway the designs are good for beginners to learn from.

I hope this helps,

Roger

Roger
 

Attachments

  • 3rd Dragoons-VITTORIO EMMANUELE II.jpg
    3rd Dragoons-VITTORIO EMMANUELE II.jpg
    39 KB · Views: 127
  • 1849 #91998-G.Young eng-bbl.jpg
    1849 #91998-G.Young eng-bbl.jpg
    87.7 KB · Views: 157
  • 1849-G.Young-103919-bbl-L.jpg
    1849-G.Young-103919-bbl-L.jpg
    45 KB · Views: 142
  • 1851 Navy #91923-G.Young-Lbbl.jpg
    1851 Navy #91923-G.Young-Lbbl.jpg
    59.4 KB · Views: 134
  • Navy bbl left.jpg
    Navy bbl left.jpg
    83.3 KB · Views: 147
  • Navy bbl right.jpg
    Navy bbl right.jpg
    81 KB · Views: 134

MICHAEL

Elite Cafe Member
Joined
Dec 14, 2009
Messages
340
Location
Harriman, Tn.
Roger thanks. That helped alot. I originated my design from the back screw (not sure if this is acceptable). I like this better but not there yet. I appreciate you, john, and fancygun for taking the time to help me.:thumbs up: This has been the harderst area to design so far.
 

Attachments

  • 100_0213.jpg
    100_0213.jpg
    56.4 KB · Views: 111
  • 100_0214.jpg
    100_0214.jpg
    39.4 KB · Views: 92

Andrew Biggs

Moderator
Joined
Nov 10, 2006
Messages
5,035
Location
Christchurch, New Zealand
Hi Michael

One of the biggest mistakes I see nearly all beginners make.............. is not putting in their borderlines first.

After you have outlined the piece to be engraved the very first step should always be to put in your borderlines. These borderlines are your guidelines and without them you simply are floundering away in the dark because these are your guidelines that are essential to the design. It frames the design. It defines the area you have to work in.

Even if you are not going to cut them, you still have to draw them in the design faze. Everything has a border weather it be a cut line following the contour of the shape to be engraved...............or be it a frame that is broken up like Mario has on his English scroll thread where the border exists but is much softer than a hard line. Again, this frames the work.

The next step is...........stick to the borderline. Take your scrolls to the borderline and make them touch even to the point of overlapping very slightly. Otherwise what is the point of having them.

Another thing is...............try to make your drawings bigger than actual size. It is almost impossible to draw accurately at the real size simply because your pencil lead is generally to thick. You can do this with a photocopier, grid method, computer or even one of those old and cheap pantograph things we used as kids and are still available.

Use the real size outline for thumbnail sketches.............once you have an idea then start drawing it out on the larger outline. You can create more detail and get a far better idea of what you are doing. Once you are more experienced, then maybe you can start drawing smaller because you can fill in the gaps during the cutting process because you know more about what you are doing.

As Marty says........you can just ignore the wedge slot and go through it like it isn't there. Or, you can work around it and make everything flow around it and make it part of the design. The same applies to screw holes and screw heads.

I've also pointed out a few areas that won't work when filling in with leaves.

Cheers
Andrew
 

Attachments

  • mike.jpg
    mike.jpg
    110.1 KB · Views: 121

MICHAEL

Elite Cafe Member
Joined
Dec 14, 2009
Messages
340
Location
Harriman, Tn.
Hey Andrew, thanks for taking the time to help me. I need alot! I put borders in and studied some of my books. I came up with this new scroll structure. My biggest question is concerning the right uppermost scroll coming out of the larger one and having the screw as an origination point. Is this o.k.?
I'm glad you pointed out about the borders, even if not cutting them. I know most people would think that is basic engraving 101 but I didn't have a clue. If this scroll structure is not acceptable I may use the scroll structure on page 107 of Dennis Adler's Colt book. I'm engraving this pistol for a good friend and he said he liked the scroll structure on that pistol, he didn't like the leaves though. Thanks for reminding me about the thumbnail sketch versus enlarged detailed drawing. I had already drawn the leaves on the barrel but will redraw larger because they aren't showing up in the pic's I took. I've been drawing this type of barrel design for the last 6 months and feel like it's the best part so far. Looking forward to all the help I can get, thanks again!:thumbs up:
 

Attachments

  • 100_0216.jpg
    100_0216.jpg
    38.3 KB · Views: 74
  • 100_0215.jpg
    100_0215.jpg
    31.3 KB · Views: 85
  • 100_0218.jpg
    100_0218.jpg
    49.3 KB · Views: 79
Last edited:

Andrew Biggs

Moderator
Joined
Nov 10, 2006
Messages
5,035
Location
Christchurch, New Zealand
That's better but you still have problems in some areas. Just keep at it, your doing fine. Rome wasn't built in a day.

I can't emphasize this enough............get your scroll spines touching/overlapping the border and each other slightly. This comes into play with the actual cutting and backgrounding.

There's nothing wrong with copying a scroll structure from another source. Just don't copy it verbatim :)

Cheers
Andrew

Oh yeah...always remember that this is just my own way of looking at things. Listen to what others have to say as well. John B has forgotten more about this stuff than I will ever remember :)
 

Attachments

  • mike-1.jpg
    mike-1.jpg
    116 KB · Views: 90

MICHAEL

Elite Cafe Member
Joined
Dec 14, 2009
Messages
340
Location
Harriman, Tn.
Andrew, thanks for sticking with me and for your patience. I did a complete new thumbnail sketch from the colt book because I can't figure out how to fill the space and follow all the rules. I changed the scroll structure on the right side to add a little originallity. Please let me know if this is acceptable. I feel like it looks pretty good but I am the beginner. I've learned alot already and appreaciate you taking your time to help me. :thumbs up:

p.s. I went back and made my scrolls along the top touch the borders. Getting too tired, I'd better get to bed.
 

Attachments

  • 100_0224.jpg
    100_0224.jpg
    37.3 KB · Views: 73
Last edited:

Andrew Biggs

Moderator
Joined
Nov 10, 2006
Messages
5,035
Location
Christchurch, New Zealand
Tricky stuff isn't it :)


It's a process of trial and error...........Don't be afraid to lightly draw in the occasional leaf just to see how an area will fill up with them.

Cheers
Andrew
 

Attachments

  • mike-2.jpg
    mike-2.jpg
    119 KB · Views: 90

monk

Moderator
Staff member
::::Pledge Member::::
Joined
Feb 11, 2007
Messages
11,007
Location
washington, pa
ONE thing andrew mentions about size: quite true. much easier to see where you're doing good, and esp. not so good. you can get rolls of paper from vinyl suppliers, and draw on both sides. cheap way to draw large, easy to transfer & work down to a more useable size.
 

MICHAEL

Elite Cafe Member
Joined
Dec 14, 2009
Messages
340
Location
Harriman, Tn.
O.K. I did this quick sketch hoping that maybe I'm getting closer. I used some of the scroll structure from pic #5 that Roger posted for me. I did try to change it up some an add elements to make it my own. Andrew, I still see a 3-scroll in lower right section but the only other option I see is too shoot a scroll out of a scroll like I did in the top left section (which I don't particularly like alot but was needed to get design to work...I think?). I appreciate everyone's comments and help so far. Thanks for sticking with me, I know it can be frustrating when you're helping engravers through the same issues over and over. I have been pouring over the forum for the past 7-8 months but I might have retained only a very small portion of it (And I mean very, very small portion). I'm really fired up about getting this pistol ready to engrave and as hard as the design process is I have started to enjoy it also (although I'm in withdrawal from not cutting this week). Well, it's been a hard day, time to pop open a beer and get ready for bed. Thanks to everyone here for helping to keep the dream alive! :thumbs up:
 

Attachments

  • 100_0226.jpg
    100_0226.jpg
    63.5 KB · Views: 87

Andrew Biggs

Moderator
Joined
Nov 10, 2006
Messages
5,035
Location
Christchurch, New Zealand
Hi Michael

You're getting there. This is the hard part. The actual cutting is a technical exercise in skill. Still hard but in some ways a little easier to get to grip with.............the design is the artistic side and the one that is critical. Pencil time is every bit as important as cutting time. One will improve the other.

Bad design will not be saved by expert cutting!!! However a good design cut not all that brilliantly will still look good..........provided you don't really bugger it up of course!! :)

I have seen so many rush through the design stage just so they think that they can be an engraver by cutting metal. If cutting metal was the only requirement of engraving then we could all become butchers of the art very quickly. The design/composition is everything...........cutting the metal is only the means to get the design onto the metal.

If the only requirement to become an artist painter was to get paint onto the canvas then we could all just stand there and throw paint at it and call ourselves artist painters!!! Some people do!!

Never, ever, rush the design phase. You are doing this for pleasure, not profit, so your livelihood doesn't depend on this. If it takes 1000 drawings and revisions to get one good design, then so be it. Later on it will only take you 500 then 300, the 20 then 10. At this phase of your learning curve do not let anyone, under any circumstances, friends or family, put pressure on you for anything. Do it in your time, not theirs. Learn to say "NO"

You are doing some good things in all this. Your scrolls are looking balanced and well formed and you have some very pleasing combinations. It's only a matter of time and more practice and it will click into place for you :)

I've given you a couple of things to think about.

Cheers
Andrew
 

Attachments

  • mike-3.jpg
    mike-3.jpg
    150.8 KB · Views: 84
  • mike-4.jpg
    mike-4.jpg
    76.5 KB · Views: 83

Roger Bleile

~ Elite 1000 Member ~
Joined
Oct 4, 2007
Messages
2,997
Location
Northern Kentucky
Michael,

You are on the right track. I wouldn't worry too much about the 3 thing. On the other hand I do recommend (like Andrew) avoiding C scrolls and S scrolls for begining designers.

Roger
 

Christopher Malouf

~ Elite 1000 Member ~
Joined
Jun 19, 2007
Messages
2,037
Location
5mi from the nearest Dunkin Donuts in Tennessee
Michael,

I am impressed with your treatment of symmetry as you look down at the top of the gun. Leonard Francolini has a few photos in his gallery here which illustrate the importance of those details.

You may already know this ... but this is also a fantastic opportunity to hone your burnishing and filing skills before you begin to cut your design by removing the "Black Powder Only" stamp. The steel on these is very soft so burnishing with a flat, steel punch will not take you very long. If you really want to get some practice ... selectively remove the "Black Powder Only" stamp and leave the "44 cal" stamp. On any Colt single action you engrave in the future, you'll have to engrave around the caliber marking. As you draw file and sand the burnished area smooth, periodically recut the "44 cal" stamp so you don't lose it. I had to do this on a customer's Colt at his request .... removing one line of the markings on the side of the slide while preserving others (including the rampant colt) for gold inlay.

Remember, you are engraving with the intention to make money. These guns offer the opportunity to try different scenarios that will help take the challenge out of a commissioned project and even the odds of success.

As Roger states earlier, this is a great engraving style to begin with as you will learn the most from it. You'll also always be happy with this gun because the style is period correct.

As you progress through and complete each part, you may feel unsatisfied with your efforts .... that is normal. I guarantee that when you do the final assembly, you will amaze yourself with your achievement.

Outstanding work .... keep going.

Chris
 
Last edited:

MICHAEL

Elite Cafe Member
Joined
Dec 14, 2009
Messages
340
Location
Harriman, Tn.
I've drawn about 100 versions for this side of the barrel design, so I should only have about 900 left!:beat up:
Thanks Andrew, Chris, and Roger for the motivation.:thumbs up:
I started to draw the design on the top of the barrel (where the Colt's info is)and realized when I set my bottom border and used the info line as the top of my border, the design would look the same, on each side and top, when I engraved it, so I stopped trying to draw the top view. Yea Chris, I plan on prepping the barrel with help from my friend the gunsmith. Jerry Harper (engraver) has been showing me how to prep guns with a beltgrinder and buffing wheels (still working on these skills with unserviceable gun parts / barrels) but I'll be using files, stones, and automotive paper, along with my gunsmith friends help. He's even going to blue it for me (well it is his gun). He's told me the better I get, the more that makes him want to get better at metal prep and blueing (He's the one that taught me how to make pistol grips also). Hopefully, in the future I will be able to make a finished design and engrave it and he can do the chore's for me (I still want to know how to do them).
In the first picture I tried to fix what Andrew showed me were problem areas.
I added a border around the wedge hole and screw. I forgot to draw a border around the front screw prior to posting the picture but I have fixed that just now.
I went to visit Jerry on friday and he was able to give me a few hours time and show me his Nimschke book. He also helped me to come up with this new design. Let me know which of the left side designs you think is the better design (first 2 pic's).
The 3rd pic is the latest of my right side design. I know I added c-scrolls but after seeing the Nimscke book I couldn't resist. I ordered my book by the way and I'm checking the mail for it daily! I'm going to make outlines of the rest of the gun tonight and make copies at work tomorrow. Will work on creating design for other sections of gun and tieing them together. Should I only post 1 section of the gun at a time until that section is complete to prevent confusion? I appreciate all the help and time everyone is giving to me, thanks again!:thumbs up:
 

Attachments

  • 100_0228.jpg
    100_0228.jpg
    46.2 KB · Views: 48
  • 100_0229.jpg
    100_0229.jpg
    44.9 KB · Views: 49
  • 100_0230.jpg
    100_0230.jpg
    46.1 KB · Views: 50
Last edited:

KSnyder

Elite Cafe Member
Joined
Nov 13, 2006
Messages
613
Location
Toledo, Ohio
Michael,
your design is coming along but I must say the barrel in the photo doesn't belong to a 1851 Navy, they had octagon barrels. Barrel looks like it came from a dragoon.
 

MICHAEL

Elite Cafe Member
Joined
Dec 14, 2009
Messages
340
Location
Harriman, Tn.
KSnyder, you are absolutely correct. I am new to firearms and forgot to mention that the pistol is a confederate version of the 1851 .36 cal, cap / ball pistol that was made with a brass frame due to the shortage of steel (to the best of my knowledge). The back of the barrel is octagonal but the rest forward is round. Roger said it best when he mentioned it fit closer to designs that fit a Colt Dragoon. Now that I think about it, I wonder if the Confederates combined the best parts of the Navy / Dragoon to make this pistol? I started with a design that more Gustave Young and then went Nimschke after seeing R.L. Wilsons book on Nimschke. Let me know which design you think I should persue furthur. :thumbs up:
 

Roger Bleile

~ Elite 1000 Member ~
Joined
Oct 4, 2007
Messages
2,997
Location
Northern Kentucky
I think that type of confederate revolver was made by Griswald & Gunnison. Since LDN or Young never engraved any of those just pick what you like. You are not recreating a historic piece. It is an exercise in design and execution and any 19th century style will look good if well executed.

RB
 
Top