Ruger MK II Target

Meshach

Member
Joined
Jul 22, 2023
Messages
41
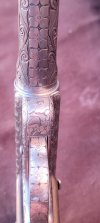
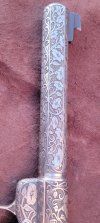
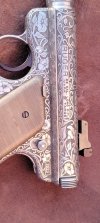
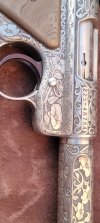
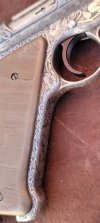
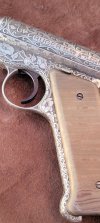
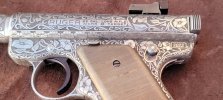
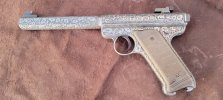
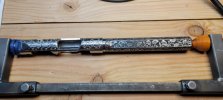
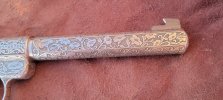
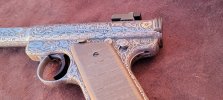
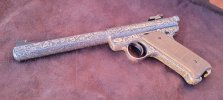
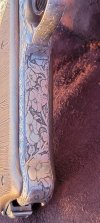
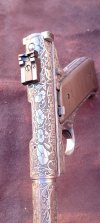
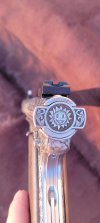
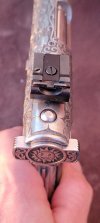
This is my second complete firearm engraving project, I started early in 2023 I worked on and off on it over about a years time before finishing it this spring, on this project I was trying to be a little more congruent in the pattern than with my first.
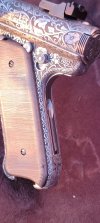
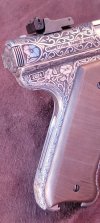
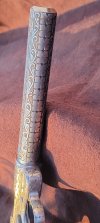
the grips were made from a piece of damascus steel and finished with nitrite bluing to achieve the straw brown color.
 

Attachments

  • 20240801_202754.jpg
    20240801_202754.jpg
    138.7 KB · Views: 96
  • 20240801_202846.jpg
    20240801_202846.jpg
    141.6 KB · Views: 98
  • 20240801_202859.jpg
    20240801_202859.jpg
    138.5 KB · Views: 88
  • 20240801_202917.jpg
    20240801_202917.jpg
    124.5 KB · Views: 81
  • 20240801_202934.jpg
    20240801_202934.jpg
    116.4 KB · Views: 77
  • 20240801_203028.jpg
    20240801_203028.jpg
    100 KB · Views: 72
  • 20240801_203056.jpg
    20240801_203056.jpg
    104.6 KB · Views: 74
  • 20240801_203122.jpg
    20240801_203122.jpg
    62.6 KB · Views: 70
  • 20240801_203136.jpg
    20240801_203136.jpg
    64.6 KB · Views: 66
  • 20240801_203147.jpg
    20240801_203147.jpg
    60.7 KB · Views: 88

Meshach

Member
Joined
Jul 22, 2023
Messages
41
more pictures
 

Attachments

  • 20240801_203159.jpg
    20240801_203159.jpg
    116 KB · Views: 27
  • 20240801_203211.jpg
    20240801_203211.jpg
    125.1 KB · Views: 26
  • 20240801_203239.jpg
    20240801_203239.jpg
    74.5 KB · Views: 24
  • 20240801_203255.jpg
    20240801_203255.jpg
    143.6 KB · Views: 22
  • 20240801_203308.jpg
    20240801_203308.jpg
    136.8 KB · Views: 23
  • 20240801_203416.jpg
    20240801_203416.jpg
    133.5 KB · Views: 25
  • 20240801_203427.jpg
    20240801_203427.jpg
    95.2 KB · Views: 21
  • 20240801_203434.jpg
    20240801_203434.jpg
    131.7 KB · Views: 24
  • 20240801_203453.jpg
    20240801_203453.jpg
    130.7 KB · Views: 22
  • 20240801_203653.jpg
    20240801_203653.jpg
    155 KB · Views: 28

Meshach

Member
Joined
Jul 22, 2023
Messages
41
I love it! I'm a Browning Buckmark guy historically, but I've been eyeing the new Ruger MK IV recently. How did the MK II cut?

HA!
The barrel (where I started) cut something like a dream (to lure me in!) and I think I chipped or dulled maybe 10 gravers in the whole thing.

The action on the other hand... I made new sharpening fixtures shortly before this project that work like a charm letting me re-sharpen a point in about a minute and re-do a bad chipped tip in around 5, and I'm glad I did because there were times when I got less then 5 minutes of cutting time on the action before chipping (Lindsay Carbalt, C-max, or M40 tool steel) or severely dulling (Glensteel, C-max) I think the longest I cut with a single tool in the action without re-sharpening was maybe 30 minutes when I was doing the background removal but I think I averaged 10-15 minuets between sharpening tools over all, it seemed like the surface was harder (and around the ejection port as I recall) but I also cut flat noses on my angled tools to do background removal so the added martial in the tip helped, although I did chip the whole nose off a few times.. I also changing the face angle and that helped too, but it was still hard on tools, I dubbed points a few times, it helped but then they would gouge in or just dull and slip all over the place so I decided it wasn’t worth the extra haste to dubb the point most of the time. I never did try any lubricant and I probably should have...

The frame was much better than the action but not as nice as the barrel, I think I was re-sharpening between 2-4 tools every couple hours of cutting. Honestly there was a point that I thought I was just getting better about tool handling until I went back to do a little touch up on the action shading and I was back to chipped and dulled tools in no time haha!

The bolt was also a dream to cut on.
Frame had some angle issues to attend to, the trigger guard, round as it is, limits cutting angles. Same with the front end where it rolls out of the trigger guard and around the front of the frame under the barrel, as well as the bottom radius on the top back of the frame, the beaver tail type portion. And those wings on the top that cradle the action don’t allow for cutting from the bottom side.

I want to try cutting a blued Ruger MK pistol at some point and see if the action cuts any easier then the stainless does. but all that being said I would still be willing to do another, (although maybe just because I love the MK pistols). I’d just keep in mind that the action is going to be hard to keep the same level of detail of work and expect to be re-sharpening tools often... but that's all part of the fun of the challenge right?
 

Attachments

  • 20240120_122702.jpg
    20240120_122702.jpg
    213.7 KB · Views: 40

Meshach

Member
Joined
Jul 22, 2023
Messages
41
A lot of work! You did well. Did you have any trouble getting the barrel back on?
Thank you!
In all honestly I never took the barrel off.. I just put it all into a fixture and left it at that. taking the barrel off would have given a little shorter package to work with but it wasn't too bad as it was so I just left it.
in hind sight I would make brass barring points for the fixture, at least for the front end just for more rigidity. and the bolts for adjusting length should be top or bottom to allow for the vice to grab anywhere along the side.. but there are always improvements to be discovered and made..
 

Attachments

  • 20230730_234446.jpg
    20230730_234446.jpg
    96.1 KB · Views: 40

papart1

:::Pledge Member:::
::::Pledge Member::::
Joined
May 23, 2015
Messages
1,375
Location
Michigan
HA!
The barrel (where I started) cut something like a dream (to lure me in!) and I think I chipped or dulled maybe 10 gravers in the whole thing.

The action on the other hand... I made new sharpening fixtures shortly before this project that work like a charm letting me re-sharpen a point in about a minute and re-do a bad chipped tip in around 5, and I'm glad I did because there were times when I got less then 5 minutes of cutting time on the action before chipping (Lindsay Carbalt, C-max, or M40 tool steel) or severely dulling (Glensteel, C-max) I think the longest I cut with a single tool in the action without re-sharpening was maybe 30 minutes when I was doing the background removal but I think I averaged 10-15 minuets between sharpening tools over all, it seemed like the surface was harder (and around the ejection port as I recall) but I also cut flat noses on my angled tools to do background removal so the added martial in the tip helped, although I did chip the whole nose off a few times.. I also changing the face angle and that helped too, but it was still hard on tools, I dubbed points a few times, it helped but then they would gouge in or just dull and slip all over the place so I decided it wasn’t worth the extra haste to dubb the point most of the time. I never did try any lubricant and I probably should have...

The frame was much better than the action but not as nice as the barrel, I think I was re-sharpening between 2-4 tools every couple hours of cutting. Honestly there was a point that I thought I was just getting better about tool handling until I went back to do a little touch up on the action shading and I was back to chipped and dulled tools in no time haha!

The bolt was also a dream to cut on.
Frame had some angle issues to attend to, the trigger guard, round as it is, limits cutting angles. Same with the front end where it rolls out of the trigger guard and around the front of the frame under the barrel, as well as the bottom radius on the top back of the frame, the beaver tail type portion. And those wings on the top that cradle the action don’t allow for cutting from the bottom side.

I want to try cutting a blued Ruger MK pistol at some point and see if the action cuts any easier then the stainless does. but all that being said I would still be willing to do another, (although maybe just because I love the MK pistols). I’d just keep in mind that the action is going to be hard to keep the same level of detail of work and expect to be re-sharpening tools often... but that's all part of the fun of the challenge right?
where did you get those templates please?
 

papart1

:::Pledge Member:::
::::Pledge Member::::
Joined
May 23, 2015
Messages
1,375
Location
Michigan
The sharpening templates? I 3D modeled them in Blender and printed them.
Do you have access to a 3D printer?
YES my son-in-law has pretty big one. Can they be printed with different soft ware
 
Last edited:

Gargoyle

Official Cafe Stone Carver
Joined
Feb 18, 2007
Messages
745
Location
Chicagoland
YES my son-in-law has pretty big one. Can they be printed with different soft ware
Blender is software for 3d modeling. The printers are fed with software called "slicers". All that matters is that you have the file in a compatible format. The most common for feeding the printers is .stl and blender and most other modeling software can output .stl. If not, there are other formats which can be used, like .obj.
 

papart1

:::Pledge Member:::
::::Pledge Member::::
Joined
May 23, 2015
Messages
1,375
Location
Michigan
Blender is software for 3d modeling. The printers are fed with software called "slicers". All that matters is that you have the file in a compatible format. The most common for feeding the printers is .stl and blender and most other modeling software can output .stl. If not, there are other formats which can be used, like .obj.
thanks.....he's going to show me how to do it on his machine
 

Latest posts

Sponsors

Top