Question: Scrimshaw question

Mike576

Elite Cafe Member
Joined
Nov 20, 2020
Messages
257
Location
Ledyard Connecticut
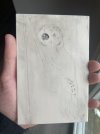
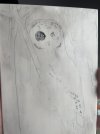
I’m attempting my first bit of scrimshaw. This is on a piece of col 849/tm which is an imitation ivory. What I’m noticing is when I ink the piece it makes the area around smudged. I’m using a paper towel with a bit of water to wipe away the excess after about 15 seconds of drying. The piece is prepped up to 600 grit.
What can I do to avoid this smudging? Don’t dry as long? Prep to a higher grit?
For ink I’m using higgens pigment base drawing ink.

thanks for the help!
 

Attachments

  • IMG_5461.jpeg
    IMG_5461.jpeg
    66.5 KB · Views: 41
  • IMG_5459.jpeg
    IMG_5459.jpeg
    67.7 KB · Views: 41

SamW

:::Pledge Member:::
::::Pledge Member::::
Joined
Jan 31, 2007
Messages
2,446
Location
Castle Valley, UT in the Red Rock country
Try a coat of Renaisance wax before scrimming. After each color is added to the design, coat that as well so that the ink is not thinned wihile working on the next area. I used to have trouble with the design fading away as I added each area of color until I used the wax. A trick I learned from Sandra (?) Brady.
 
Last edited:

Mike576

Elite Cafe Member
Joined
Nov 20, 2020
Messages
257
Location
Ledyard Connecticut
Thanks for the tip I will give that a go, I was also spreading the ink pretty thin, I’ll add it a bit thicker to not allow it to dry on the surface as much.
 

papart1

:::Pledge Member:::
::::Pledge Member::::
Joined
May 23, 2015
Messages
1,406
Location
Michigan
O.K...........I love this. I've read and thought I understood that after each color added, the thing to use was 4-0 steel wool? Now my buddy TOS gave the tip about wax..............does the steel wool still apply? #1 coat piece with wax after desired prep: add color etc. steel wool now? then wax again and do more color, steel wool and wax..etc?
 

SamW

:::Pledge Member:::
::::Pledge Member::::
Joined
Jan 31, 2007
Messages
2,446
Location
Castle Valley, UT in the Red Rock country
Pap, I never used steel wool on ivory or its synthetics. I gave it a high polish, layed out the design then waxed. Starting with the darkest color (usually black) then waxing before moving on to the next darkest color area. Waxing after each color is added. The wax keeps you from wiping off previous inkings as you progress. Before I learned this my scrims always ended up very pale and unsatisfactory.
 

Mike576

Elite Cafe Member
Joined
Nov 20, 2020
Messages
257
Location
Ledyard Connecticut
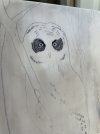
One thing I just found works really well is switching ink types. I stopped using the higgens and started to use some calligraphy ink I had laying around. Drys different and doesn’t smudge as much as long as you wipe it while it’s still wet and buff it off lightly.
I added a layer of renaissance wax to the piece so we will see how that helps with the smudging on the surface and from pulling out previous ink from the areas done already.
I switched from using paper towels to a stiffer lint free wipe and that seems to be a bit better. I’ll update as a move along.

thanks for all the help!
(Also I know the right eye shape is a bit off, I’ll be adjusting that tomorrow)
 

Attachments

  • IMG_5467.jpeg
    IMG_5467.jpeg
    68.1 KB · Views: 28

papart1

:::Pledge Member:::
::::Pledge Member::::
Joined
May 23, 2015
Messages
1,406
Location
Michigan
Mike........that process you eluded to is the trick I believe. Just jumps out.
 

papart1

:::Pledge Member:::
::::Pledge Member::::
Joined
May 23, 2015
Messages
1,406
Location
Michigan
With the help and tips from all, including Mr. Sam, I believe I will side step a bunch of needless work and get to the sweet spot. I am going to step into this part of my engraving journey soon.
 

IOAN

Member
Joined
Jan 3, 2024
Messages
19
When finishing with 600 grit, fine scratches remain that retain paint. Try grits towards 2000, the more polished the piece is, the easier it is to remove the paint. I also experienced this thing. Success!
 

Latest posts

Sponsors

FEGA
Top