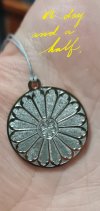
still kicking

Sinterklaas

Elite Cafe Member
Joined
Dec 19, 2015
Messages
216
Location
Holland
Dont try to do different styles of setting.

If you want to get better. Do flat setting first. No rings etc only flat sheet. The rest comes later.

If you are getting mushy beads. --> Prongs to big, make em smaller OR use bigger beaders. OR beaders need sharpening. (You can make a cheap tool for that)

Layout is not easy by hand. I use an expensive CAD software for jewelry design.
But maybe a free Cad package will work as well.
Otherwise you have to measure the free space and calculate how many stones will fit in a row.

Courses are a great way to get better. But yes unfortunately they are not cheap.
In the mean time watch every Youtube video and go on Instagram an follow high end setters and setting schools. You can pick up little things. And learn from seeing how they work.

If you work methodical you can solve problems.
Example: You get mushy beads with flashing over the stones.

Prepare a new plate but dont set the stones. Then do like a row of 5 stones 1 way and 5 stones an other way. Then see what is better. Write that down. Keep doing that until you find what works for you.
 

Dani Girl

:::Pledge Member:::
::::Pledge Member::::
Joined
May 6, 2012
Messages
1,241
Location
NSW, Australia.
Dont try to do different styles of setting.

If you want to get better. Do flat setting first. No rings etc only flat sheet. The rest comes later.

If you are getting mushy beads. --> Prongs to big, make em smaller OR use bigger beaders. OR beaders need sharpening. (You can make a cheap tool for that)

Layout is not easy by hand. I use an expensive CAD software for jewelry design.
But maybe a free Cad package will work as well.
Otherwise you have to measure the free space and calculate how many stones will fit in a row.

Courses are a great way to get better. But yes unfortunately they are not cheap.
In the mean time watch every Youtube video and go on Instagram an follow high end setters and setting schools. You can pick up little things. And learn from seeing how they work.

If you work methodical you can solve problems.
Example: You get mushy beads with flashing over the stones.

Prepare a new plate but dont set the stones. Then do like a row of 5 stones 1 way and 5 stones an other way. Then see what is better. Write that down. Keep doing that until you find what works for you.
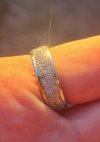
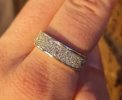
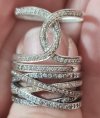
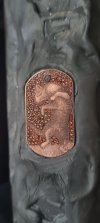
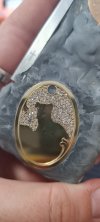
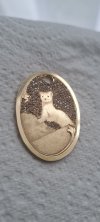
thankyou for that advice. I haven't logged on for a few days and have done this ring since then. took me 3 whole days. at least 180 stones in it. Today I'm working on this cat for fun. I want to plate it but I'm not sure if the patina that develops so fast in copper will prevent the plating taking hold.

I believe it's usually a case of polish, ultrasonic clean, rinse, degrease with anode in solution, rinse, plate (nickel then precious metals when using coloured cheap base metal like brass, copper, nickel solver etc)
 

Dani Girl

:::Pledge Member:::
::::Pledge Member::::
Joined
May 6, 2012
Messages
1,241
Location
NSW, Australia.
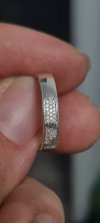
Dad will be getting that watch, which is the only one I have done to date. on the cross over ring I only put the pink stones in. the top one has white, champagne and pink stones and was thinner than ideal. the cat is in copper. I have decided I prefer staggered and snow pavé to side by side, which is doable but I don't love the look. I also personally think shared beads usually don't look as good but some folk can do them well, it's just most folk don't.
 

Dani Girl

:::Pledge Member:::
::::Pledge Member::::
Joined
May 6, 2012
Messages
1,241
Location
NSW, Australia.
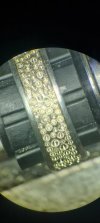
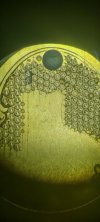
20250108_092934.jpg I'm getting a little flashing (where the metal mushes out around the beading tool)... should I go up a beading tool size? different angle of attack?
 

dhall

:::Pledge Member:::
::::Pledge Member::::
Joined
Jan 1, 2008
Messages
152
Location
San Diego, California
Hi Dani,

I applaud your diligence and hard work.
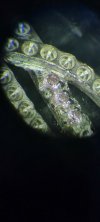
My observation is that the setting is incompletely prepared. Edges on parts of the casting are a bit wavy, and too much metal is left in the area where the beads are to be formed. You're "forced" to use too large of a beading tool, and the shape is less than ideally formed and has the undesirable mushrooming. The vast majority of the time, this setting style would have a semi-cylindrical scallop or scoop going across the main axis of the row of stones, at a depth between 1/2 the pavilion and the culet, and at a width maybe just larger than the table. Next, a similar size scallop between each stone, though not necessarily as deep. These scallops, along both sides of the stones and between the stones can be done with either a round graver or a cylinder bur. Doing these steps will refine the shape of the remaining metal from triangular to an approximately square-ish or rectangular column. It looks as if most of your beads were formed from a more triangular shaped column of metal. Creating a square/rectangular shape will allow you to be able to use a smaller beading tool and there will be much less mushrooming. If the remaining metal is more rectangular, many setters will split the column of metal to make two beads. If the metal shape is more square, it's more likely it will be a shared bead, which is what you're currently creating; one bead that holds/touches two stones. With a split bead there will be 4 bead touching/holding each stone. You can finesse the size/shape of the "column" of remaining metal by the stone spacing and/or the size of the width of the scallops.
It looks like you are doing some of the bur/graver work to make the scallops, but it's not quite coming out as desired. It's asking a lot for a beading tool to make a decidedly rectangular shape into a semi-spherical shape. A slightly smaller beading tool might look better, but you'll need make sure all of the column just fits into the beading tool. If you need to shave the corners a bit, you might get a better fit in the beading tool. The beading tool shouldn't overlap the column by very much. Being scrupulous about the dimension of the remaining metal makes for more uniform beads. If the stone spacing is tighter, the column will be more square and form into a single bead more readily. This is often a deciding factor, tipping the setter to choose split beads over shared beads. If there isn't enough metal for beads, setting the stones slightly deeper will allow the column of metal to be a bit taller, if this is an issue.
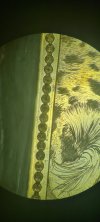
On the crossover ring, it looks as if much of the setting should have been bead and bright-cut, but the bottom two bands are missing the bright cut and the beads and outside edge sort of "smear" together. The bright cut "releases" the back/outside of the bead so it can be pushed over to actually hold the stone. Make sure the graver has a mirror finish for the bright cut, and is very consistent. You might need to crispen-up or refine the outer edge vertical walls to make the bright cuts look more consistent, so they don't appear to drift closer to the edge and then further from the edge.
You've done a pretty good job on a large setting project. From what you've learned, I imagine were you to do this again, you'd find it to go more smoothly and be able to work more efficiently. It's the fussy little details that make large setting jobs go from acceptable to spectacular. Every cut matters!
Keep up your efforts!
Best regards,
Doug
 

Dani Girl

:::Pledge Member:::
::::Pledge Member::::
Joined
May 6, 2012
Messages
1,241
Location
NSW, Australia.
I KNOW I WAS ADVISED that there are better metals to practice stone setting in and this will be my last ever brass practice plate for setting stones, boy oh boy did so many of my beads snap off shear themselves in half as i tried to form them. I tried a shortcut layout method too. it didn't work... there's no getting around scribing and using dividers. 20250112_180157.jpg 20250114_163516.jpg
 

Dani Girl

:::Pledge Member:::
::::Pledge Member::::
Joined
May 6, 2012
Messages
1,241
Location
NSW, Australia.
that is very beautiful and fantastic work Danae, I have only started posting on the forum myself since your absence but I have seen other posts in the archives of your engraving and I must say that I am a fan of your work! I am glad to see you are still at it =)
meshach your real name? Meshach in the bible went through the flames and walked back out if I recall. Thanks for that. I have not hardly done any engraving for several years after leaving home. I'm a bit more settled now I'm married and am working casually and am enjoying learning something new to add to what I'd learned, it's fun. I did have to tell myself I was doing this to myself because it was fun today, brass and stone setting isn't fun. bronze or silver are far better. the copper was much better than the brass too. this is engravers brass.
 

Dani Girl

:::Pledge Member:::
::::Pledge Member::::
Joined
May 6, 2012
Messages
1,241
Location
NSW, Australia.
Hi Dani,

I applaud your diligence and hard work.
My observation is that the setting is incompletely prepared. Edges on parts of the casting are a bit wavy, and too much metal is left in the area where the beads are to be formed. You're "forced" to use too large of a beading tool, and the shape is less than ideally formed and has the undesirable mushrooming. The vast majority of the time, this setting style would have a semi-cylindrical scallop or scoop going across the main axis of the row of stones, at a depth between 1/2 the pavilion and the culet, and at a width maybe just larger than the table. Next, a similar size scallop between each stone, though not necessarily as deep. These scallops, along both sides of the stones and between the stones can be done with either a round graver or a cylinder bur. Doing these steps will refine the shape of the remaining metal from triangular to an approximately square-ish or rectangular column. It looks as if most of your beads were formed from a more triangular shaped column of metal. Creating a square/rectangular shape will allow you to be able to use a smaller beading tool and there will be much less mushrooming. If the remaining metal is more rectangular, many setters will split the column of metal to make two beads. If the metal shape is more square, it's more likely it will be a shared bead, which is what you're currently creating; one bead that holds/touches two stones. With a split bead there will be 4 bead touching/holding each stone. You can finesse the size/shape of the "column" of remaining metal by the stone spacing and/or the size of the width of the scallops.
It looks like you are doing some of the bur/graver work to make the scallops, but it's not quite coming out as desired. It's asking a lot for a beading tool to make a decidedly rectangular shape into a semi-spherical shape. A slightly smaller beading tool might look better, but you'll need make sure all of the column just fits into the beading tool. If you need to shave the corners a bit, you might get a better fit in the beading tool. The beading tool shouldn't overlap the column by very much. Being scrupulous about the dimension of the remaining metal makes for more uniform beads. If the stone spacing is tighter, the column will be more square and form into a single bead more readily. This is often a deciding factor, tipping the setter to choose split beads over shared beads. If there isn't enough metal for beads, setting the stones slightly deeper will allow the column of metal to be a bit taller, if this is an issue.
On the crossover ring, it looks as if much of the setting should have been bead and bright-cut, but the bottom two bands are missing the bright cut and the beads and outside edge sort of "smear" together. The bright cut "releases" the back/outside of the bead so it can be pushed over to actually hold the stone. Make sure the graver has a mirror finish for the bright cut, and is very consistent. You might need to crispen-up or refine the outer edge vertical walls to make the bright cuts look more consistent, so they don't appear to drift closer to the edge and then further from the edge.
You've done a pretty good job on a large setting project. From what you've learned, I imagine were you to do this again, you'd find it to go more smoothly and be able to work more efficiently. It's the fussy little details that make large setting jobs go from acceptable to spectacular. Every cut matters!
Keep up your efforts!
Best regards,
Doug
Thankyou Doug. I look forward to trying another of these referring to your words and some videos of people doing it impeccably as I go. I only set the pink stones in this ring, the white were there when I bought it. ok so the groove down the middle goes depth wise about half way between the bottom point of the stone and the girdle (widest bit). I've been struggling with exactly how wide and deep to make that. been trying to get my stones closer together without touching, overlapping, smashing, being on an angle.... this is hard work.
 

Sinterklaas

Elite Cafe Member
Joined
Dec 19, 2015
Messages
216
Location
Holland
does anyone know where on earth to buy cz pr any kind of stones smaller than .7mm?
0.7mm is about the lower limit of stones. It would be very difficult to find any stone smaller than 0.7mm.
They do exist but hardly anyone sells them because there is no demand.
 

IOAN

Member
Joined
Jan 3, 2024
Messages
21
https://pt.aliexpress.com/item/4000...il.pcDetailTopMoreOtherSeller.3.5574kUD3kUD3v t&gps-id=pcDetailTopMoreOtherSeller&scm=1007.3&09scm=1007.3&gps-id=pcDetailTopMoreOtherSeller&scm=1007.3&09scm =1007.14452.396806.0&scm-url=1007.14452.396806.0&pvid=48ee69c7-c398-433d-b67c-d0d7695b21 eb&_t=gps-id%3ApcDetailTopMoreOtherSeller%2Cscm-url%3A1007.14452.396806.0%2Cpvid%3A48ee6 9c7-c398-433d-b67c-d0d7695b21eb%2Ctpp_buckets%3A668%232846%238107%231934&pdp_npi=4%40dis %21RON%2147.01%2121.63%21%21%219.52%214.38%21%40210384cc17369167674277076e8027%211000000 2849505145%21rec%21RO%211956444334%21XZ&utparam-url=scene%3ApcDetailTopMoreOtherSeller%7 Cquery_from%3A&search_p4p_id=202501142052474682132046614581649801_2&gatewayAdapt=glo2bra

https://pt.aliexpress.com/item/1005...Seller.4.7665uTKOuTKO1T&gps-id=pcDetailTopMai mult Altul Vânzător&scm=1007.14452.396806.0&scm_id=1007.14452.396806.0&scm-u rl=1007.14452.396806.0&pvid=e077781e-23d6-42c5-a878-935d606f5b7e&_t=g ps-id%3ApcDetailTopMoreOtherSeller%2Cscm-url%3A1007.14452.396806.0%2Cpvid%3Ae0777 81e-23d6-42c5-a878-935d606f5b7e%8Cpvid%3Ae077781e-23d6-42c5-a878-935d606f5b7e%8Ct 846%238116%232002&pdp_npi=4%40dis%21RON%21869.63%21869.63%21%21%2117 6,12%21176,12%21%40210384cc17369164516084414e8027%2112000044054479287

succes
 

dhall

:::Pledge Member:::
::::Pledge Member::::
Joined
Jan 1, 2008
Messages
152
Location
San Diego, California
Hi Danae,
Another niggling bit of setting detail I see in your brass piece to which more attention could be paid is the degree to which all of the stones/tables should be level. In the photo, there are a few stones on the left and one on the upper right whose table is reflecting light. The more consistently level all of the stones are, theoretically you should get a table flash from all or none of the stones at a given angle of reflectance from a single light source. A few glittering sparkles randomly scattered as you tilt the piece in the light tells you that the stones aren't uniformly level. That's the goal, anyway, and it's a challenge to achieve.
As you press the stones in place to seat them, especially with diamonds, if the hole is ever so slightly undersize, as the stone is pressed home, if there is some resistance, the stones will hold in place better and be less inclined to tilt out of level as pressure is applied as beads are pushed into position to hold the stones. If there is no resistance and the stone can move in the setting, you must sneak up on the setting by applying small amounts of pressure on the bead to ever so slightly move them into position, a little bit at a time. If you move one bead fully into position, the lateral pressure will shift the position of the stone and it will no longer be level, and you'll get the random table flashes.
Granted, setting in brass is no fun, but neither is high carat rose gold or nickle white gold; both are notoriously tough.

Best regards,
Doug
 

Sinterklaas

Elite Cafe Member
Joined
Dec 19, 2015
Messages
216
Location
Holland
An other tip.

Scribe 2 lines where your hole must stay between. So 2 borderlines and 2 lines for the width of your brightcut.
So on each side of your hole there should be 2 perpendicular lines. Now It looks like you scribed only 1 line on each side. You engrave the bright cut between these 2 lines.

Also I recommend first to make the holes. Then do the bright cutting. And after that do remove the metal between the holes. That way you get a better idea of your final prong size.
And I recommend using a thin tapered burr to remove the metal. I dont use a graver. When using a burr you dont risk bending any metal.

The pendant with the little animal looks very cute! I bet it will sell.
 
FEGA
Top