I DID NOT KNOW THAT STABILIZATION ADJUSTMENTWhat do you think would be the challenge for you about the tracing? I find this to be a pretty simple step. Drag your photo in, size it to the canvas, make it lighter opacity, then trace a few key areas to follow later. Nice thing about procreate is you can adjust the stabilization of the pen being used if you don’t have a steady drawing hand. It will automatically adjust your stroke in real time to make the a smoother line of curve.

You are using an out of date browser. It may not display this or other websites correctly.
You should upgrade or use an alternative browser.
You should upgrade or use an alternative browser.
the old puma
- Thread starter papart1
- Start date
I see you just the dot/diamond technique............yes?I’ll make sure to upload when I’m done I’m about 75% done with just the head at the moment. Maybe 20% overall, lots of dark areas will take a while!
I’ll make sure to upload when I’m done I’m about 75% done with just the head at the moment. Maybe 20% overall, lots of dark areas will take a while!

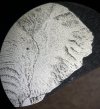
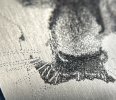
no more.............almost over shaded............or probably did, my first going this far with line. I'm also thinking that with just dots and dashes I could achieve more accurately what I want to finish. Could in some circles be mistaken for a werewolf, besides he's been in quite a few fights
Last edited:
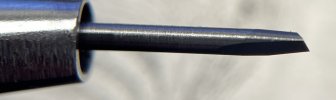
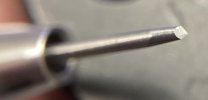
Yes for the most part I just use dots of varying depths and sizes. The darker an area needs to be the closer and deeper the dots. Hopefully these photos help. For a graver I use a 90 degree with no heel but recently switched to 70 degree with no heel.I see you just the dot/diamond technique............yes?
I need to clean up the whiskers a bit but shows how those are formed from the black background. Complete absence of cuts.
One of the hardest things about bulino is the lack of information out there on the subject. Christian dcamilis did a good video but shows a more line heavy technique which I don’t prefer. That makes for a quicker and more easily seen piece In the end though. Although less detailed to some degree vs someone like firmo/fransessca fracassi or Thierry duguet.
it’s definitely good to know both! I’ll try and help out where I can with questions but I’m no expert so take it with a grain of salt.
Attachments
-
 IMG_7017.jpeg232.2 KB · Views: 22
 -
 IMG_7018.jpeg301.7 KB · Views: 19
 -
 IMG_7015.jpeg272.6 KB · Views: 17
 -
 IMG_7019.jpeg302.8 KB · Views: 18
 -
 IMG_7097.jpeg213.5 KB · Views: 22
 -
 IMG_7236.jpeg219 KB · Views: 24
 -
 IMG_6926.jpeg31.6 KB · Views: 23
 -
 IMG_6927.jpeg51.8 KB · Views: 20
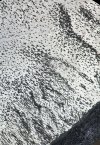
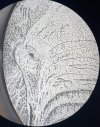
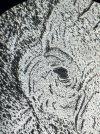
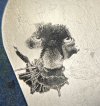
Biggest thing I think you can work on at this point is scale down the size of your cuts. Think of it like the pixel resolution on a photo. A camera with a higher resolution will have smaller more closely spaced pixels. Your cuts should be tiny tiny tiny. If an area needs to be dark like the pupils, slowly build up that darkness with hundreds of tiny cuts. For example in the dark black shading of the elephant or the darkest parts of the puma there is about 300 tightly packed dots per square mm (I counted as I cut and got an average just out of curiosity) This excavates the area a bit lower and makes it so the light catches.
smaller cuts take a ton of patience and practice but that was the biggest change I found helped get my pieces looking a bit better.
smaller cuts take a ton of patience and practice but that was the biggest change I found helped get my pieces looking a bit better.
Looks really nice Papa.
thank you sir!Looks really nice Papa.
Mike do you need to get that magic pencil with gen 4 system please?I have the iPad Pro 12.9 gen 5
you don’t need such a powerful iPad to use procreate though. The nicer the iPad the more layers you can add to a drawing based on the amount of system ram. When I’m drawing i usually have the layers as follows
1) a photo of the object
2) an outline of the object traced with a thin line pen tool
3) the backbones of all scrolls so I can mess with them a bunch till I get the basics right
4 and 5 are my working layers as I draw the details of scroll
6) the shading
7) the animal or object I want to add if I’m doing an inlay or the like
I have never used more than 10 layers.
Even an iPad Air gen 4 which you can get for about 450$ can do 19 layers at a high resolution. Depending on your budget look into an old generation iPad Pro. Quick google search will tell you based on the generation how many layers you can do. I do recommend the larger screen size if you can get one. Nice to have!
By magic pencil do you mean the Apple Pencil? Yes it’s much better to draw with the pencil vs your fingerMike do you need to get that magic pencil with gen 4 system please?
thanks......much appreciating the helpBy magic pencil do you mean the Apple Pencil? Yes it’s much better to draw with the pencil vs your finger
I wasn’t aware there was a CD of his work. I have his book which was great to learn from but I wish the photos were closer up. Still have never seen a bulino engraving in person! Other than my own that is.Mike I have Furrmio cd and to tell you truth............it was a waste of 50 buck in my opinion
It was from the FEGA site.............again nothing clear, no close-ups and cloudy hazey envirnmentI wasn’t aware there was a CD of his work. I have his book which was great to learn from but I wish the photos were closer up. Still have never seen a bulino engraving in person! Other than my own that is.
Sponsors


