
Steve Adams
Elite Cafe Member
- Joined
- Jan 2, 2007
- Messages
- 320
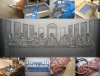
It's been a while since I've posted anything, so I thought I'd share a "Last Supper" die I am about to wrap up. It is about 95% done. This will be for a hammered aluminum tray. This project has been ongoing for some time now, as are some others. It's good to be back in the swing of things and getting things done at last.
It all starts out with a hand engraved a pattern two times larger than the engraved design area. I set up a Gorton pantograph at 2:1 and engrave flat levels, then lines to indicate areas to model. Then it is off to the bench where I use chisels for the bulk of the 3D work, although a foredom flex shaft is used quite a bit as well. I go back and forth between the machine and bench because each time I model, I lose my indication lines. Eventually I don't even use cutters in the machine, but instead use spindle mounted scribe tools to basically draw on the steel. These lines keep showing me proper placement of detail so I can model. As detail become finer, I start using punches and gravers. Once the modeling is complete, I use mold and diemaker stones to smooth imperfections.
It all starts out with a hand engraved a pattern two times larger than the engraved design area. I set up a Gorton pantograph at 2:1 and engrave flat levels, then lines to indicate areas to model. Then it is off to the bench where I use chisels for the bulk of the 3D work, although a foredom flex shaft is used quite a bit as well. I go back and forth between the machine and bench because each time I model, I lose my indication lines. Eventually I don't even use cutters in the machine, but instead use spindle mounted scribe tools to basically draw on the steel. These lines keep showing me proper placement of detail so I can model. As detail become finer, I start using punches and gravers. Once the modeling is complete, I use mold and diemaker stones to smooth imperfections.
Attachments
-
 LS progress.jpg111.1 KB · Views: 301


