Trophy Cup engraving advice

davidshe

Elite Cafe Member
Joined
Sep 24, 2012
Messages
658
Location
Santa Barbara, CA
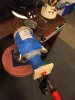
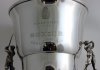
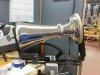
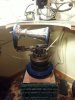
I just got a new job in to engrave 3 really nice antique silver trophy cups for a high end golf course. I will be engraving the course logo and lettering. I know that at least a few of you out there have done this type of job and I was hoping to get some advice, tips or tricks on how you handled the project as far as securing the cup under the microscope etc. I could use a visor for this but I think I would rather do it under the scope if I can. The sterling silver skin of the cup where the engraving will go seems to be about about .035 thick (about 20 guage) Would you backup the area to be engraved with thermo loc or something along those lines? Or, perhaps fill the cup with concrete? ha ha... just kiddin :) Anyway, any tips or ideas from those of you who have done similar jobs would be appreciated!! Thanks.
IMG_6034.JPG
 

dlilazteca

~ Elite 1000 Member ~
Joined
May 10, 2013
Messages
2,659
Location
Laredo, Texas
David, i remember reading something, i think it was by Tira but not sure. Contact her im sure she'll stear you in the right direction. Please share your results. I would try sitting it on a brean bag and another inside the cup to help absorb vibrations and placed on top of a turn table. Just analyzing the item, brainstorming.

Saludos,
Carlos
 

Southern Custom

~ Elite 1000 Member ~
Joined
Mar 8, 2013
Messages
1,026
Location
Baton Rouge
image.jpg On a larger scale piece like this I'd advise making a dedicated jig that can be used with the turntable unless you have another rock solid way of holding it. Or if you are very comfortable cutting on sandbags on the turntable and held by hand, this works. You will definitely want to back the area to be cut. I use benchrest (shot) bags or something similar. Stuff them in and tape them secure. :Any hollow area will ring your ears. Before doing the final layout, I'd suggest blue painters tape to mask all areas around where you cut and mask any areas that might get rubbed or nicked.
Be sure of your layout, problem areas, tricky curves, handles and the like. You don't want suprises. Lay out the design and hold a graver above it to visualize where and how you'll cut.
Lastly, remember you are cutting a piece you cannot replace. Triple check everything. Do a little cutting on some soft silver to get the feel for it if you've never done it or it's been a while. Silver is slippery stuff and the curves compound it. You need to be sure of your cuts.
Outside of that take your time.
This is an example of a jig I made to hold a rather large punch bowl a few months ago.
 

sam

Chief Administrator & Benevolent Dictator
Staff member
Joined
Nov 6, 2006
Messages
10,542
Location
Covington, Louisiana
I rest them in a rifle sandbag and hold it by hand. Southern Custom's method looks great!
 

monk

Moderator
Staff member
::::Pledge Member::::
Joined
Feb 11, 2007
Messages
10,998
Location
washington, pa
first--- i'd never use a scope for work like this. without a very complex, well made, purpose made holding fixture, this would ( for me ), be a total nightmare. i can't imagine for a minute trying to manipulate this using a scope. i would simply use a small pillow and some way to put such atop a large lazy susan bearing. the larger ones will support a lot of weight, and rotate fairly smoothly. large ones go for around10 -15 bucks at hardware outlets. for vision, i'd use a # 10 lens on my optivisor. 4" focal length, but this would be far better than the problems a scope would create.
 

davidshe

Elite Cafe Member
Joined
Sep 24, 2012
Messages
658
Location
Santa Barbara, CA
first--- i'd never use a scope for work like this. without a very complex, well made, purpose made holding fixture, this would ( for me ), be a total nightmare. i can't imagine for a minute trying to manipulate this using a scope. i would simply use a small pillow and some way to put such atop a large lazy susan bearing. the larger ones will support a lot of weight, and rotate fairly smoothly. large ones go for around10 -15 bucks at hardware outlets. for vision, i'd use a # 10 lens on my optivisor. 4" focal length, but this would be far better than the problems a scope would create.

Thanks for your input Monk, I appreciate that.
 

Doc Mark

~ Elite 1000 Member ~
Joined
Nov 16, 2006
Messages
1,284
Location
Hampton, Virginia
I've done similar work and I always cover the silver with layers of "clingy" plastic wrap or thin soft cotton, leaving only the area to be engraved open. This helps to protect the trophy from tiny scratches and dings. The size of the lettering and the space it needs often determines whether you can use a scope or not.
 

davidshe

Elite Cafe Member
Joined
Sep 24, 2012
Messages
658
Location
Santa Barbara, CA
I've done similar work and I always cover the silver with layers of "clingy" plastic wrap or thin soft cotton, leaving only the area to be engraved open. This helps to protect the trophy from tiny scratches and dings. The size of the lettering and the space it needs often determines whether you can use a scope or not.

Thanks for those ideas Doc!
 

monk

Moderator
Staff member
::::Pledge Member::::
Joined
Feb 11, 2007
Messages
10,998
Location
washington, pa
Thanks for your input Monk, I appreciate that.

david: as mentioned above-- take your time on this. complete the entire procedure in your mind before picking up a graver. i have used cotton gloves to do shiney objects such as you show.get them at any drugstore. even after washing your hands, a lot of junk will end up on the silver. are you direct drawing on this, or going to use a transfer?
my old hp inkjet prints on clear acetate. it transfers nicely direct on the metal. no damar, china white, or any other stuff that must later be cleaned off the surface.
love to see this when finished.
 

davidshe

Elite Cafe Member
Joined
Sep 24, 2012
Messages
658
Location
Santa Barbara, CA
david: as mentioned above-- take your time on this. complete the entire procedure in your mind before picking up a graver. i have used cotton gloves to do shiney objects such as you show.get them at any drugstore. even after washing your hands, a lot of junk will end up on the silver. are you direct drawing on this, or going to use a transfer?
my old hp inkjet prints on clear acetate. it transfers nicely direct on the metal. no damar, china white, or any other stuff that must later be cleaned off the surface.
love to see this when finished.

I will use the transparency transfer method. I have had good results with it on silver bracelets and hopefully it will work out fine. I will post pics when I am done. Thanks for the tips.
 

davidshe

Elite Cafe Member
Joined
Sep 24, 2012
Messages
658
Location
Santa Barbara, CA
I just finished the first of the 3 trophy cups. I played around with the sandbag idea but ended up cutting it under the scope. I built a jig using some of the ideas that you all shared with me. That worked pretty well once you get used to the slight jiggle and bounce that comes with using that kind of setup. I can see why some of you prefer to use sandbags. But, it came out pretty good and I hope to improve on the next two which are slightly larger and heavier cups. Gotta say it was sort of nerve wracking on this first one! Also very hard to get a good picture on these round shiny cups.
 

Attachments

  • IMG_1635.JPG
    IMG_1635.JPG
    56.1 KB · Views: 132
  • Senior-Cup.jpg
    Senior-Cup.jpg
    117.5 KB · Views: 131

Dragonsfire

Member
Joined
Jun 17, 2009
Messages
49
Location
Southwest Iowa
I was urged by another member to post my related project. I am currently reproducing the engraving from a silver Chalice (the only one of 6 remaining)made in 1665 to 10 new chalices made by Fred Danforth at Danforth Pewter. Luckily, I have a buddy that would make MacGyver look like a chimp with a Rubik's cube. The new ones are a touch over 11 inches tall with top and base having 4 1/2" openings. I had the centering stand that goes into my vise. my buddy built the risers with the adjustable, thumb screw pins. The wooden blocks are covered with felt and fit pretty well.
 

Attachments

  • 20150805_095809.jpg
    20150805_095809.jpg
    113 KB · Views: 128
  • 20150917_204653.jpg
    20150917_204653.jpg
    91.1 KB · Views: 128
  • 20150920_195827.jpg
    20150920_195827.jpg
    88.5 KB · Views: 127

colinskelly

Member
Joined
Apr 10, 2011
Messages
81
Location
Seattle, WA
Thank you all for the input on this subject. It was perfect timing for me since I had just brought in a silver plated bowl to add another engraved name onto. I think I'm crazy because I like the idea of the extra pressure of no room for error. Whats wrong with me. I ended up using one of those "U" shaped neck pillows on my turntable. Wrapping the entire thing with lots of clear plastic wrap worked great and much cleaner and easier to remove than tape. Thanks Doc for that one. Sorry no pictures. The customer couldn't get it back quick enough. I really appreciate all the generous knowledge shared hear. Thank you all!
 

Brian Marshall

~ Elite 1000 Member ~
Joined
Nov 9, 2006
Messages
3,112
Location
Stockton, California & Taxco, Guerrero, Mexico
Another method:


Cutting an original master template by hand in plastic takes an average of 20 min. - depending on the "ornateness"? (Yes, you can transfer to plastic)

A New Hermes TX pantograph comes with pretty solid cup & bowl fixtures - specifically designed for the purpose.

The result is perfect layout that will not rub off.


Hand cutting over that will take whatever time it takes.


The fixture above is quite similar to the New Hermes setup - and it is removable from the machine base.

In fact I have seen a couple of them for sale as "parts only" over the years. Might be handy just to have that vise around if you do this work often enough?


Brian


I take NO plated objects. Having the plating peel back on one job 30+ years ago cured me of that. Life is too short...
 
Last edited:

Latest posts

Sponsors

Top