Question: Tiny hands and graver blank length

SarahLadd

Member
Joined
Oct 13, 2015
Messages
31
Location
Minneapolis
Hi everyone,

I've done the best I can to search these forums and elsewhere on the web to find the answer to my question but have come up empty handed. If I missed this information somewhere I apologize!

I'm brand new to this and have yet to get started, but I'm reading as much as possible and trying to get educated before I start. By trade I am a goldsmith/bench jeweler, and got interested in doing engraving because within the company I work for, real engraving knowledge and skill is extremely limited and I wanted to expand my talents repertoire. I purchased the Lindsay Classic Foot Control Airgraver and have yet to put the point to metal.

I have very tiny hands (size 3.25 ring finger), and based on how I should be holding the tool, it looks like the graver blank's length is pretty long. The business end is a good distance from where my thumb and pointer finger can support it. I would assume that this would be a control issue, and that there is a way to cut down the graver blank to customize the fit for my small hand. If this is something I should probably do, what is the best way to go about this with both the pre-sharpened Carbalt graver supplied and the high speed steel blanks?

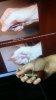
I took a picture of my grip in front of the example photos on Steve Lindsay's site. The graver in the tool is the supplied pre-sharpened Carbalt one.

Thank you kindly in advance for tips,

Sarah
 

Attachments

  • holdinggraver.jpg
    holdinggraver.jpg
    28.3 KB · Views: 301
Last edited:

JJ Roberts

:::Pledge Member:::
::::Pledge Member::::
Joined
Nov 10, 2006
Messages
3,547
Location
Manassas, VA
Sarah,I think your big problem is going to be the hose,I would rap the hose around wrist and then strap half way up your arm to get it out of your way.Give that a try that may help.:thumbsup: J.J.
 

SarahLadd

Member
Joined
Oct 13, 2015
Messages
31
Location
Minneapolis
Sarah,I think your big problem is going to be the hose,I would rap the hose around wrist and then strap half way up your arm to get it out of your way.Give that a try that may help.:thumbsup: J.J.

It's not actually connected to anything, but I will do this when I fire it up! I'm just about to head out the door to the shop to connect it all up and try it for the first time. Very excited. I'm sure I will break it, knowing my luck. :)
 

sam

Chief Administrator & Benevolent Dictator
Staff member
Joined
Nov 6, 2006
Messages
10,542
Location
Covington, Louisiana
I don't use Lindsay handpieces, but I can tell you that my graver control using GRS palm actuated handpieces is better with shorter gravers than long ones. It's not so critical with foot pedal, but graver length affects the way I grip an Airtact handpiece which affects how it actuates. It might or might not affect you.
 

Addertooth

Member
Joined
Sep 4, 2015
Messages
65
Location
Far Southern AZ
Keep in mind, if you shorten the graver bit too much, some of the standard templates for sharpening may not cut it at the angle you expect.
 

Marrinan

~ Elite 1000 Member ~
Joined
Nov 11, 2006
Messages
2,917
Location
outside Albany in SW GA
I personally work with the graver higher-deeper in my palm. Gives a more secure grip. There is a lot written about graver length and how to shorten but my truth is I adjust my grip as the tool gets shorter through sharpening. With time it will become second nature to you to hold the tool comfortably and with the control you require. I have both the Lindsay like yours and the GRS GraverMach . They work equally well. I find the Lindsay sharpening system useful for new gravers but as the tool shortens they no longer work. I do most of my sharpening with a Powerhone. To shorten a graver blank you can either cut it with a cutoff wheel in you flex shaft tool or place in a vice so the extra length at the back of the tool is sticking out above the vice and hit it sharply with a hammer and it will break at the vice line. Fred
 

SarahLadd

Member
Joined
Oct 13, 2015
Messages
31
Location
Minneapolis
General consensus I'm hearing is that I need to adjust my grip and get used to the tool and how it works first before worrying too much about the graver being a little long. Having only worked with manual push-gravers in the past, length of the steel was important for being able to properly drive the tool. With the pneumatic action, the stress of having to both guide and provide power is relieved, leaving me to (mostly) guide. I played with my graver for a paltry 10-15 minutes today, just to hook it up and make sure that it was working, and to try it out for the very first time. I fiddled on a thick sheet of sterling silver and attempted a variety of cuts, straight and curved, deep and shallow, and a few for repeat consistency. I found that the grip recommended in the image I posted just wasn't working- my pointer finger gets in the way- so I would grip the handle with my pinky, the piston area with my ring finger, cuddle my thumb on the side of the blank, rested my pointer finger on top of the blank, and used my middle finger as a "monopod" pivot point. I'm weary of developing "bad habits" in muscle memory, as a result of flying solo and learning with the resources available in print/media/long distance social circles. In goldsmithing, I was taught "traditional" methods of approach in technique; as my expertise increased, I adjusted my angle of attack in solving problems for what felt or worked better for me as an individual, so long as the result was superior. I would hazard a guess that when it comes to grip on the graver itself, and achieving consistently beautiful marks with it, this concept is the same...?
 
Last edited:

tsterling

Elite Cafe Member
Joined
May 20, 2007
Messages
271
Location
NW Florida, USA
and used my middle finger as a "monopod" pivot point.

It's good to see you're experimenting with the airgraver, but using your finger as a rest on the work will tend to wipe away your design after you've transferred it to the metal. A bad habit to start with, transfers are a big enough pain without wiping them off, and if you've hand drawn your guide lines on you'll really be upset when halfway through they disappear. Don't ask me how I know this...

Best to learn to keep your fingers off the work from the start.

Good luck, and welcome to the madness...

Tom
 

monk

Moderator
Staff member
::::Pledge Member::::
Joined
Feb 11, 2007
Messages
10,998
Location
washington, pa
using a diamond cutoff disk in a dreml, cut off say 1/8" at a time till you feel you have hit the sweet spot. you must be in a bit of comfort to really enjoy this work. the comfort is aided by proper lighting, adjustable seating, and a way to adjust the height of your ball vise. it takes a bit of time to get this all synchronized.
btw-welcome to the forum. one can learn much here. we may also learn from you-- tips & "tricks" you've learned.
 
Last edited:

SarahLadd

Member
Joined
Oct 13, 2015
Messages
31
Location
Minneapolis
Thank you all for your kind welcome and expert advice. People like me would not get very far in niche skills such as these without your willingness to reach out to others :)

I figured I would share what I have managed to accomplish within one hour of tinkering with my shiny new toy. It's not much, and I know I should be focusing on much more droll things like doing a lot of straight and gently curved lines for practicing consistency, but I just couldn't help myself...I Wanted to draw. I freehanded a very horrible portrait of my dog on a scrap piece of brass.

As far as comfort goes... I'm never comfortable... Deadlifts, back extensions, lateral pull downs, excedrin, they help but sitting all day no matter how comfy the chair doesn't seem to make for a very pain-free existence. I have accepted this. Life hurts!
 

Attachments

  • brassplate1.jpg
    brassplate1.jpg
    85.5 KB · Views: 139
Last edited:

atexascowboy2011

Elite Cafe Member
Joined
Feb 13, 2012
Messages
997
Another avenue to try would be standing and cutting with an Optivisor.
Trying to stay in focus with a microscope would IMO just add to your stress of staying rigid while cutting. By placing your engraving block on an upright or post you can either walk around the vise or cut a small distance, reposition your vise and cut some more.
There is an excellent class in Trinidad, Colorado that is a week long, has room and board and is really inexpensive. Check out the NRA Summer program at Trinidad, Colorado.
And take into consideration that there will always be some discomfort when your body is adjusting to new contortions while learning to engrave, whether it be sitting or standing.
 

JJ Roberts

:::Pledge Member:::
::::Pledge Member::::
Joined
Nov 10, 2006
Messages
3,547
Location
Manassas, VA
Sarah,It well take practicing and filling many practice plates we've all been down that road,don't get discourage you'll get control over the tool and it well all work out just fine.:thumbsup: J.J.
 

diandwill

Elite Cafe Member
Joined
Aug 10, 2008
Messages
864
Location
Eastern, Washington State
I am assuming that, as a jeweler, you will mostly be cutting softer metals. If you use Carbide (I really like C-Max by GRS) it can be long periods of time between sharpening. Of course that also depends on the shape of graver...omglettes and points will break tips easier, but a 120 of flat (for bright cutting) will need only minor attention to the point/face once you get going. That would mean that the length will stay pretty constant. With HS Steel, you may be sharpening several to many times a day, each of which will shorten the length of the graver. Finding a sweet spot/length may be frustrating.

Try to use the graver as long, in length, as you are comfortable with and adjust you grip as it shortens. It seems like a small thing but when you are having to buy new blanks on a regular basis, it adds up.
 

Latest posts

Sponsors

Top