Inlaying copper

Ryan Lockhart

Member
Joined
Jan 14, 2021
Messages
27
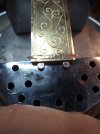
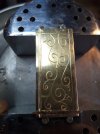
Hi all I was just wondering if anyone could help me with a problem with inlaying copper or any inlays for that matter I just need to know what graver I need to cut the channel for the copper to go into it's my first attempt at inlaying and could really use a hand thanks guys
 

John B.

Lifetime Pledge Member
::::Pledge Member::::
Joined
Nov 9, 2006
Messages
3,950
Location
Los Angeles area, California.
Hello Ryan,
Is it a line inlay or a form? If line, how wide.
What, and what metal is the inlay going into?
What engraving system do you use, hammer and chisel or power assist.?
 

Ryan Lockhart

Member
Joined
Jan 14, 2021
Messages
27
Yes its line inlay I use a pnumatic engraving machine the copper wire I'm trying to inlay is around 1mm round wire I just wanted to know how to go about removing material and what tool I need to make for cutting the material away I watched alot of YouTube videos on the subject but nothing really explains tooling for the job I tried making a flat 45° face 15° heel but didn't have much luck any help would be really appreciated thanks for your reply mate oh I forgot to say its being inlayed into just a scrap piece of mild steel I'm just trying to have a go really
 
Last edited:

AllenClapp

Elite Cafe Member
Joined
Aug 7, 2019
Messages
376
Location
Raleigh, NC
Brian Powley did a great demonstration on gold inlay at Scott Pilkington's 9th Annual Engrave-In. It is on YouTube. Very good discussion of making the channel and undercutting/adding teeth to secure the inlay in place. Also a bunch of other subjects after that, including some design transfer methods. It is worth going through the whole hour+ for all the goodies in there!!!!!
 

John B.

Lifetime Pledge Member
::::Pledge Member::::
Joined
Nov 9, 2006
Messages
3,950
Location
Los Angeles area, California.
Hi Ryan, thank you for your answers.
First, make sure your copper wire is fully annealed and your mild steel plate is well supported in your vise so that there is no bounce. Use a backing plate if necessary.
My choice of graver for line inlay is an Onglette with a slightly rounded bottom.
Your 1.mm wire is quite a heavy copper wire to start with but maybe you can make it work.
Cut your line wide and deep enough to accept about 75-80% of the volume of your wire.
Undercut both sides of your groove using a small tool shaped like a tiny flat screwdriver, but with a strong/sharp bottom edge. Mount this in your power graver and drag it along the bottom edges of the channel. Also create some angled teeth in the bottom of your channel with a very narrow flat graver.
This would be best done with a light hammer hitting the flat graver. No hammer? Just hit with a piece of wood.
My advise is to seat your copper wire using a hammer and a brass punch.
You can use a punch in your handpiece but I get more "feel" using a hammer.
Plan on setting it firmly with the first blows as copper work hardens with repeated blows.
When you have it set, burnish it with a steel burnisher. Start sanding it down using a backer for your paper,
Before the line is fully flush sanded inspect it and move the copper to correct any gaps.
Best of luck with your project and please post some results and pictures if possible.
 

Ryan Lockhart

Member
Joined
Jan 14, 2021
Messages
27
Brian Powley did a great demonstration on gold inlay at Scott Pilkington's 9th Annual Engrave-In. It is on YouTube. Very good discussion of making the channel and undercutting/adding teeth to secure the inlay in place. Also a bunch of other subjects after that, including some design transfer methods. It is worth going through the whole hour+ for all the goodies in there!!!!!
Thanks Brian that video was so helpful your a diamond
 

Ryan Lockhart

Member
Joined
Jan 14, 2021
Messages
27
Hi Ryan, thank you for your answers.
First, make sure your copper wire is fully annealed and your mild steel plate is well supported in your vise so that there is no bounce. Use a backing plate if necessary.
My choice of graver for line inlay is an Onglette with a slightly rounded bottom.
Your 1.mm wire is quite a heavy copper wire to start with but maybe you can make it work.
Cut your line wide and deep enough to accept about 75-80% of the volume of your wire.
Undercut both sides of your groove using a small tool shaped like a tiny flat screwdriver, but with a strong/sharp bottom edge. Mount this in your power graver and drag it along the bottom edges of the channel. Also create some angled teeth in the bottom of your channel with a very narrow flat graver.
This would be best done with a light hammer hitting the flat graver. No hammer? Just hit with a piece of wood.
My advise is to seat your copper wire using a hammer and a brass punch.
You can use a punch in your handpiece but I get more "feel" using a hammer.
Plan on setting it firmly with the first blows as copper work hardens with repeated blows.
When you have it set, burnish it with a steel burnisher. Start sanding it down using a backer for your paper,
Before the line is fully flush sanded inspect it and move the copper to correct any gaps.
Best of luck with your project and please post some results and pictures if possible.
That's brilliant John just what I was looking for I'll show some pictures soon they will be very basic lines though as it's my very first attempt thanks a million mate
 

John B.

Lifetime Pledge Member
::::Pledge Member::::
Joined
Nov 9, 2006
Messages
3,950
Location
Los Angeles area, California.
Basic lines are the way to start and learn.
And there is noting to hide any mistakes.
That is the way to learn. Number, date and save the plates, mistakes and all.
They will be a great demo pieces when you teach others to inlay.
And a reminder to yourself.
 

Ryan Lockhart

Member
Joined
Jan 14, 2021
Messages
27
Basic lines are the way to start and learn.
And there is noting to hide any mistakes.
That is the way to learn. Number, date and save the plates, mistakes and all.
They will be a great demo pieces when you teach others to inlay.
And a reminder to yourself.
Yea great I never thought about that I'll do this for sure cheers John I don't suppose you know anywhere I can get practice plates from do you I just want them around 50mmx50mm I would like some soft mild steel that's brushed and some brass and copper
 

Ryan Lockhart

Member
Joined
Jan 14, 2021
Messages
27
It's not finished yet but I gave it a shot without a onglette graver because if I'm honest I don't know what angels to use on the grs duel angle it sort of seemed a bit overwhelming to even try I only have 2mm tungsten carbide rod aswell oh I forgot to say I done away with the mild steel it was taking ages to get the groove right
 

Attachments

  • 20210221_155017.jpg
    20210221_155017.jpg
    104.5 KB · Views: 86
  • 20210221_154956.jpg
    20210221_154956.jpg
    117.9 KB · Views: 84
Last edited:

Ryan Lockhart

Member
Joined
Jan 14, 2021
Messages
27
Cheers Alan appreciate that mate helped out alot I couldn't find on there how to find how to shape out a onglette graver though if you come across any information on making one though bud I'd be well grateful thanks to everyone for helping me though it really is a great place to get information
 

John B.

Lifetime Pledge Member
::::Pledge Member::::
Joined
Nov 9, 2006
Messages
3,950
Location
Los Angeles area, California.
Hi Ryan, Some of it looks OK from what I can see from you pictures.
I'm not much of a photographer myself but it would be a help if you could get better pics with some close ups.
To sharpen an Onglette is a piece of cake.
Just sharpen the face to 50 degrees.
Then, holding it in your hand with the bottom at about 15 to the stone or lap, touch the point to the abrasive while twisting the front sides of the graver into a wiping motion from side to side.
All you are trying to do is create a 15 degree lift at the point and have both bottom sides taper in about 15 degrees for about a quarter of a millimeter.
If I knew where you were located I would be happy to send you a sharp ongelette but it might be a problem if it requires sending it out of the country. I have a guess you might be in Australia or NZ.
 

Ryan Lockhart

Member
Joined
Jan 14, 2021
Messages
27
Hi Ryan, Some of it looks OK from what I can see from you pictures.
I'm not much of a photographer myself but it would be a help if you could get better pics with some close ups.
To sharpen an Onglette is a piece of cake.
Just sharpen the face to 50 degrees.
Then, holding it in your hand with the bottom at about 15 to the stone or lap, touch the point to the abrasive while twisting the front sides of the graver into a wiping motion from side to side.
All you are trying to do is create a 15 degree lift at the point and have both bottom sides taper in about 15 degrees for about a quarter of a millimeter.
If I knew where you were located I would be happy to send you a sharp ongelette but it might be a problem if it requires sending it out of the country. I have a guess you might be in Australia or NZ.
Thanks john that's a very kind gesture of you I'm in England south east coast
Hi Ryan, Some of it looks OK from what I can see from you pictures.
I'm not much of a photographer myself but it would be a help if you could get better pics with some close ups.
To sharpen an Onglette is a piece of cake.
Just sharpen the face to 50 degrees.
Then, holding it in your hand with the bottom at about 15 to the stone or lap, touch the point to the abrasive while twisting the front sides of the graver into a wiping motion from side to side.
All you are trying to do is create a 15 degree lift at the point and have both bottom sides taper in about 15 degrees for about a quarter of a millimeter.
If I knew where you were located I would be happy to send you a sharp ongelette but it might be a problem if it requires sending it out of the country. I have a guess you might be in Australia or NZ.
I'm going to have a go at making one do I need to shape the graver down the sides or could I just use 2mm rod with 50°face and a 15° heel
 

John B.

Lifetime Pledge Member
::::Pledge Member::::
Joined
Nov 9, 2006
Messages
3,950
Location
Los Angeles area, California.
Ryan,
I'm from England since 1950. Lived on the south coast at Shorham-by Sea and in London.
You need to shape the sides of your rod if you are going to make it into an Onglette,
Look at the GRS and/or other catalogs to see the general shape of the tool.
Or any engraver in your area should be able to show you what an Ongelette looks like.
If I can get to the Post Office next week I will see what the problems are of shipping one to England.
Now days they are a bit funny about private people shipping sharp objects.
 

Ryan Lockhart

Member
Joined
Jan 14, 2021
Messages
27
Your a gentleman mate that's very kind of you thanks bud so where do you live now mate. I live in a town called herne bay in kent. I've got a slightly clearer picture here of the inlay I had a go at I'm going to try my best to do the rest of the edges a bit later on had a order come in today of 20 quick change tool holders so I can change around a bit more efficiently.
 

Ryan Lockhart

Member
Joined
Jan 14, 2021
Messages
27
It won't seem to let me upload the images saying they are to large for the server to process I'll try again shortly. I did have a go at making an onglette graver but messed it up I'll try send over the pictures of that to
 

Latest posts

Sponsors

Top