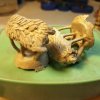
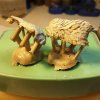
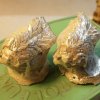
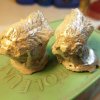
Falcon Feathers Ahoy!

Jim gordon

Member
Joined
Apr 8, 2022
Messages
63
Location
Oregon
Thank You! I'll try to get some better shots. I'ts Fine silver ,I use a qc-50 round ,to plane off the casting skin,(on it's side,plenty of 'tap' oil) and qc-36 and 37.flat to tackle fussy areas. Fine Silver is plenty soft, took me awhile to learn how to plane the skin off. The skin is always on castings where the molten alloy interfaces with the Gypsun investment.
I'm having fun with that 'Dragon Scale' look! Or Dragon-ish feathers.hah!
When I'm done graving ,I polish with 'Tin Oxide' and a soft bristle rotory brush.
Very lightly, as 'Fine' is so soft , it's easy to over polish!
I'll try to get some better shots up.
Sincerely,Jim
 

Jim gordon

Member
Joined
Apr 8, 2022
Messages
63
Location
Oregon
Wonderful idea! Great tip!
Sincerely, Jim
(Would not have thunk it) 20220503_181525.jpg
Yes,these are 'more better!' 20220505_112752.jpg 20220505_112856.jpg Prior to casting I first seat the Falcon Body pattern to the wing set, I like to use 'Madame Butterfly' silk tape, this Tape is 'Red'. The Red Silk tape can be obtained from 'Pearson Dental lab supply'
I will install the legs and tail componant, and continue seating after upper body Is closed reasonably. 20220512_134007.jpg You can see I have many Body patterns, their are three different body styles, I was keeping my options open.
(More is better, right?) 20220512_140508.jpg Next I will seat the lower body with legs and tail in place, great care is taken at this point, as I do not wish to destroy the feather pattern that is intimate to the leg 'Honches'(hips).
These 'Body Patterns' are leftovers from an earlier project ,so I will fill the lower void with a light cure paste, and re-fashion the lower feathers around the tail.
At the same time I will add paste under body to re-establish a faithful body relationship to wings, Then remove the 'Head' and adapt a 'HORUS' falcon head.( I have made many enameled heads of many colors).
The Red Die is best removed with household Ammonia and a soft Puma brush with running water.
 
Last edited:

Jim gordon

Member
Joined
Apr 8, 2022
Messages
63
Location
Oregon
Very cool Jim..
Can’t wait to see it through
Thank You! It's been well close to two years! I have 16 in progress, the Enameling was a learning curve, in it's self. Casting Silver in such large components was also, a big curve, I am a 40yr Dental Tech so I felt I had a reasonable chance.
I'm really just trying to see how crazy far I can take it. The whole thing is just one big experiment, what I don't know about Silver would sink the Titanic.
Yer very kind.
Jim
 
Last edited:

Jim gordon

Member
Joined
Apr 8, 2022
Messages
63
Location
Oregon
It is nearly impossible to remove all of the 'Red' die from the body pattern,
And it's not an issue ,some Red die is just a fact of life,we continue. 20220512_153455.jpg I scrub the general area of the wing/leg/tail with vasilene gelly,(just enough) so that the light UV, 'paste' will 'give it up' after curing.
I will cure at least 30 min,as some area are difficult for UV light to reach,then I will turn entire assembly over and cure further.
When I separate the pattern I will scrub with alcohol /Puma brush thoroughly as any uncured paste is 'NOT' wanted at this stage, it would simply compromise fidelity of fit,and possibly cause unintended results. 20220512_155604.jpg I'm using 'Primotec' paste 866-643-3129,for adaptation, and Primotec UV curing chamber. 20220512_155656.jpg 20220512_155727.jpg After curing be sure to clean greasy film off with alcohol, remove any undercuts or possible obstructions with a scalpel. If body snaps on to wing that's bad,you want an easy passive fit.
Place body back on wing,add more paste for corrections and cure, repeat if needed.Remember ,after casting you'll have a WYSIWYG. 20220512_164052.jpg Now I will texture cured plastic with cuts and creases,then I will use Red Primotec paste (stiff) and stroke on some paste in random pattern and cure, so that after casting I can use my 'cat like' graving skills to pass them off as feathers. The body should have a passive fit to wings and legs, a fit more like a 'cheap polyester suit' rather than a precise rocket ingine,part. 20220512_175738.jpg Now for head adaptation. After removing pattern head,I lube the neck with vasolene gelly,I heat a solid cast (extra) gold head using large tweezers over the bunsen burner and seat it gently to the plastic pattern, I repeat this a few times to assure that the head/neck profile Is imprinted to the plastic body. 20220512_231328.jpg The reason I do this is that both versions of the head are desendants from the same master die,hence they share identical neck feather profiles.as you will see next, having the same DNA,(Direct Nifty Adaptation) The 'HORUS' heads will be much easier to seat. 20220513_114518.jpg Useing a small strip of 'Madame Butterfly' I seat the finished head to body, not difficult,one must take the time to evaluate as you progress. 20220513_113305.jpg some earlier versions did have the 'Sun Disc' welded to the head, it's risky so I will cement the 'sun disc' on these later versions 20220513_120839.jpg I polished the interior of the head,then I lube with vasolene gelly and seat with Red Primotec paste at the fringe only as UV light cannot reach interior for curing.,then I will turn it over and fill with paste and cure.
 
Last edited:

Jim gordon

Member
Joined
Apr 8, 2022
Messages
63
Location
Oregon
At this stage I sticky wax the head in position, then add Primotec paste around the fringe, making sure to fulfill height on conture so that I may grave character from head to body direction. After cementation of head to body. It pays to be very cautious during head adaptation, if executed well, it's cute'r, than a 'sack full'a puppys' 20220513_131114.jpg Then I flip it over and fill with paste/cure. 20220513_133032.jpg After head adaptation is completed I Sprue with 3 ,,8-10mm plastic 1/8" dia. sprue, these will be the studs for clamping in my A300 Ringenie vise. Further spruing is 8ga rope wax, with some small14ga rope to feed 'down contour' in body(molten alloy will flow up,but not down much). I'll scrub with alcohol to remove any matter,then scrub with surfactant,blow dry. I'll be using Whip-Mix Brand investment,curing a min of one and 1/2 hours. 20220513_165945.jpg 20220513_172345.jpg Projected Wt; 150 grains, I'll add about 125%,so I will have about 350 grains for each casting. Peak burnout will be 1250* for 1 hour,then I'll let temp slide to 350* for at least 15min.I want to cast inside a 30min. Window, the longer it idles at such low temp,the higher the risk of cracking investment. This table shows Wt. To casting Temps that work well with my 'KERR' casting machine and 'Whip-Mix' investment. 20220513_175659.jpg I know next to nothing about 'Pour Casting' however if anyone does,please feel free to add,I am delighted to have you step in! Your comments are formally invited!
I will post pictures of castings as soon as possible.
The reason I don't like to weld Enameled parts is the risk of Enamel fracturing.
It can be done however I have damaged enough,to advise you not to attempt it.
The welder sends a charge through the metal that contributes to damage, as well as tremendous heat at point of weld disturbing 'CTE'.It's sad to damage a perfectly good Enameled componant.please don't attempt it.
I have been using 'OOMOO' impression materials and plastic, for recent projects.
They have been economicaly reasonable for me. I do use Dental Acrylics with them with good success. Dental acrylic does have a higher 'pot ash' content requiring higher/longer burnouts,however it's strength/durability is the trade off.
The larger the item the less acrylic should be used, these Falcon body's are mostly 'plastic' with some 'acrylic' to add rigid property's to them.plastics have poor memory and are not desirable for all applications,something to think about.
OOMOO plastics do burn out very clean!(very low pot ash).
Castings turned out great, I etched off the investment with 220 grit Aluminum Oxide, hence the Matt finish. I will next disc off the patterns, leaving three studs for clamping/graving, then leave only the center stud (shortened) for final assembly weld to Wingsets at time of completion. 20220518_193518.jpg Prepared on left, graved only/pre-polish
 

Attachments

  • 20220515_135823.jpg
    20220515_135823.jpg
    142.8 KB · Views: 2
  • 20220515_135739.jpg
    20220515_135739.jpg
    141.4 KB · Views: 2
  • 20220515_135206.jpg
    20220515_135206.jpg
    176.7 KB · Views: 2
  • 20220515_135127.jpg
    20220515_135127.jpg
    151.7 KB · Views: 2
Last edited:
Top