Photorealistic/Advanced bulino questions

Mike576

Elite Cafe Member
Joined
Nov 20, 2020
Messages
257
Location
Ledyard Connecticut
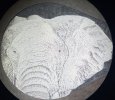
One question I have for advanced level of bulino is how does one achieve that truly photo realistic look. For example if you look for masters like firmo&francesca fracassi, Geoffrey lignon, etc it’s as if a black and white photo is set into steel.

Just thinking through the problem in my head its obviously due to an extreme level of skill and dedication but technique wise other than the density of dot spacing and depth of the dot spacing how else can the image be affected?

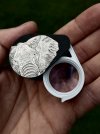
So far I have only used the Phil coggan bulino point and have gotten comfortable with it. Is it worth experimenting with another geometry to affect the image in some way or is the massive level of difference between my own work and master level down to the increasing the “resolution” of the dot spacing? I currently use a 6x Zeiss loupe and was thinking of stepping that up to a 10x to make that resolution jump “easier”. My only worry is the Zeiss 10x is super small area wise to view when compared to the very large 6x.

I have seen the Chris Decamillis bulino videos and took a bulino class online a while back with Wes Griffen. So I have seen to a very basic degree how graver geometry can affect the way light reflects in the more “line” base style of bulino. Is that concept similar to dots? Or are they too small to really matter? Also to leave the burr on the piece or cut the burr? (Thats a huge question I have!) I try to cut it away most of the time but inevitably some remain. I enjoy the picked dot way of doing things but never have seen a bulino engraved piece in person, photos never do it justice because they are too far away. so it’s hard to tell the scale of things and what techniques are used.
Does anyone know of a place maybe a museum or something where pieces can be seen in person ideally in the New England area? Tired casting plates but they only tell so much and at this scale I have trouble finding plates that show the really high level work.

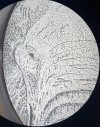
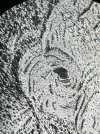
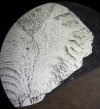
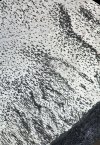
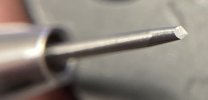
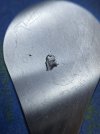
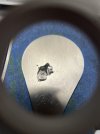
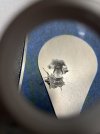
Thanks again, photos just for examples of my work super close up and of the tool I use. The shaft of the tool is 1/16

Only way to get better is the hard way I guess! back to the bench for me.

thanks again
-Mike
 

Attachments

  • IMG_7013.jpeg
    IMG_7013.jpeg
    272.4 KB · Views: 52
  • IMG_7015.jpeg
    IMG_7015.jpeg
    272.6 KB · Views: 45
  • IMG_7019.jpeg
    IMG_7019.jpeg
    302.8 KB · Views: 43
  • IMG_7017.jpeg
    IMG_7017.jpeg
    232.2 KB · Views: 42
  • IMG_7018.jpeg
    IMG_7018.jpeg
    301.7 KB · Views: 43
  • IMG_6926.jpeg
    IMG_6926.jpeg
    31.6 KB · Views: 43
  • IMG_6927.jpeg
    IMG_6927.jpeg
    51.8 KB · Views: 52
  • IMG_6997.jpeg
    IMG_6997.jpeg
    126.9 KB · Views: 55

Mike576

Elite Cafe Member
Joined
Nov 20, 2020
Messages
257
Location
Ledyard Connecticut
Just realized I said I have one question at the start of my post then proceeded to ask about a dozen. Guess that’s what happens when you go down the engraving rabbit hole!
 

Sageoconnell

Member
Joined
Jul 8, 2022
Messages
36
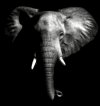
Coming from strictly an art prospective studying the art form of Chiaroscuro might help a lot when trying to achieve realistic design goals. When I was learning how to tattoo portraits years ago learning and understanding how lights and darks work together gave my artwork a lot more dimension. To me the elephant you did looks great but if it had darker shades it would make the lighter parts pop out more.
 

Mike576

Elite Cafe Member
Joined
Nov 20, 2020
Messages
257
Location
Ledyard Connecticut
Coming from strictly an art prospective studying the art form of Chiaroscuro might help a lot when trying to achieve realistic design goals. When I was learning how to tattoo portraits years ago learning and understanding how lights and darks work together gave my artwork a lot more dimension. To me the elephant you did looks great but if it had darker shades it would make the lighter parts pop out more.
Thanks for the tip, I’ll look into that concept. Art is new to me, never been a very artistic person. I have a very analytical brain so all these concepts are new to me. Learning a lot as I go! Always scared to over darken an area and wreck a piece.
 

Sageoconnell

Member
Joined
Jul 8, 2022
Messages
36
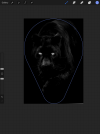
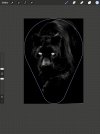
Look at the difference in these two pics. They are pretty much the same angle but the one has more shading making the highlights stand out more. IMG_6571.jpeg
 

Attachments

  • IMG_6570.jpeg
    IMG_6570.jpeg
    88.9 KB · Views: 20

Sageoconnell

Member
Joined
Jul 8, 2022
Messages
36
Nice. I would have went into the curves panel and brought out the highlights on the body a little more. I did it on my phone real quick but procreate has way more options. This way the body will read a little easier. IMG_6617.jpeg
 

Mike576

Elite Cafe Member
Joined
Nov 20, 2020
Messages
257
Location
Ledyard Connecticut
Nice. I would have went into the curves panel and brought out the highlights on the body a little more. I did it on my phone real quick but procreate has way more options. This way the body will read a little easier.
Good idea still an option as I haven’t gotten too far along
 

Attachments

  • IMG_7069.jpeg
    IMG_7069.jpeg
    99.7 KB · Views: 31

papart1

:::Pledge Member:::
::::Pledge Member::::
Joined
May 23, 2015
Messages
1,406
Location
Michigan
One question I have for advanced level of bulino is how does one achieve that truly photo realistic look. For example if you look for masters like firmo&francesca fracassi, Geoffrey lignon, etc it’s as if a black and white photo is set into steel.

Just thinking through the problem in my head its obviously due to an extreme level of skill and dedication but technique wise other than the density of dot spacing and depth of the dot spacing how else can the image be affected?

So far I have only used the Phil coggan bulino point and have gotten comfortable with it. Is it worth experimenting with another geometry to affect the image in some way or is the massive level of difference between my own work and master level down to the increasing the “resolution” of the dot spacing? I currently use a 6x Zeiss loupe and was thinking of stepping that up to a 10x to make that resolution jump “easier”. My only worry is the Zeiss 10x is super small area wise to view when compared to the very large 6x.

I have seen the Chris Decamillis bulino videos and took a bulino class online a while back with Wes Griffen. So I have seen to a very basic degree how graver geometry can affect the way light reflects in the more “line” base style of bulino. Is that concept similar to dots? Or are they too small to really matter? Also to leave the burr on the piece or cut the burr? (Thats a huge question I have!) I try to cut it away most of the time but inevitably some remain. I enjoy the picked dot way of doing things but never have seen a bulino engraved piece in person, photos never do it justice because they are too far away. so it’s hard to tell the scale of things and what techniques are used.
Does anyone know of a place maybe a museum or something where pieces can be seen in person ideally in the New England area? Tired casting plates but they only tell so much and at this scale I have trouble finding plates that show the really high level work.

Thanks again, photos just for examples of my work super close up and of the tool I use. The shaft of the tool is 1/16

Only way to get better is the hard way I guess! back to the bench for me.

thanks again
-Mike
and no ink right?
 

Mike576

Elite Cafe Member
Joined
Nov 20, 2020
Messages
257
Location
Ledyard Connecticut
and no ink right?
That’s another thing I wonder. Some engravers use ink. Some do not, hard to find out who does/doesnt. I personally do since it makes for a deeper black but the areas engraved look dark just from the cuts. Once the ink is added it’s like you adjusted the exposure in a photo.

I use speedball block printing ink
 

Mike576

Elite Cafe Member
Joined
Nov 20, 2020
Messages
257
Location
Ledyard Connecticut
This is going to be outstanding,
The eyes are hypnotic already.

John B.
Thank you! I’m trying really hard with this one. The whiskers are a bit of a disappointment so far in my eyes but still decent. I’ll do better next time
 

Attachments

  • IMG_7103.jpeg
    IMG_7103.jpeg
    97.7 KB · Views: 44

papart1

:::Pledge Member:::
::::Pledge Member::::
Joined
May 23, 2015
Messages
1,406
Location
Michigan
That’s another thing I wonder. Some engravers use ink. Some do not, hard to find out who does/doesnt. I personally do since it makes for a deeper black but the areas engraved look dark just from the cuts. Once the ink is added it’s like you adjusted the exposure in a photo.

I use speedball block printing ink
do you seal afterwards please?
 

Latest posts

Sponsors

Top