Weldon, great information. I started this addition in order to not hijack your post.
Thank you for your fine tutorial.
I have added a couple of my old classroom handouts.
Please excuse them, they are from a pre-PC era but they might help some folks.
I'm sure you have probably done it this way too, Weldon.
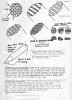
While the blank is in the soft state I cut the end in two or more directions with a fine liner.
This way it's easy to maintain an even depth in the texture.
They can also be made from tapping the end into an old discarded file or other rough surfaces depending on the type of texture wanted.
For game scene use some interesting textures can be created by tapping into brick or concrete.
Like you, I cut mine into pie or wedge shapes to get into the tight corners or just leave it round for bigger areas in the middle of the field.
I make most of my texture punches out of 1/8 inch or 1/16 soft state drill rod.
Harden and temper as Weldon said.
Then hold the punch in a little handle with a set screw or use as is in the case if the 1/8 inch.
I like the drill rod because it is easier to see the point with the thinner shaft.
The drill rod is very cheap and you can select water or oil hardening.
Being thrifty I also find good uses for worn dotting punches too.
Jimzim 75.....In Weldon’s post on making dotting punches from beat up Ngraver dotting punches.
The Ngraver dotting punch won't fit into the Foredom #30 rotary handpiece unless yours has a bigger chuck than most.
It will work with most jewelry dotting punches, however.
And as you suggest it makes good quick work of putting an accurate taper on the ends when held against a bench grinder.
Thank you for your fine tutorial.
I have added a couple of my old classroom handouts.
Please excuse them, they are from a pre-PC era but they might help some folks.
I'm sure you have probably done it this way too, Weldon.
While the blank is in the soft state I cut the end in two or more directions with a fine liner.
This way it's easy to maintain an even depth in the texture.
They can also be made from tapping the end into an old discarded file or other rough surfaces depending on the type of texture wanted.
For game scene use some interesting textures can be created by tapping into brick or concrete.
Like you, I cut mine into pie or wedge shapes to get into the tight corners or just leave it round for bigger areas in the middle of the field.
I make most of my texture punches out of 1/8 inch or 1/16 soft state drill rod.
Harden and temper as Weldon said.
Then hold the punch in a little handle with a set screw or use as is in the case if the 1/8 inch.
I like the drill rod because it is easier to see the point with the thinner shaft.
The drill rod is very cheap and you can select water or oil hardening.
Being thrifty I also find good uses for worn dotting punches too.
Jimzim 75.....In Weldon’s post on making dotting punches from beat up Ngraver dotting punches.
The Ngraver dotting punch won't fit into the Foredom #30 rotary handpiece unless yours has a bigger chuck than most.
It will work with most jewelry dotting punches, however.
And as you suggest it makes good quick work of putting an accurate taper on the ends when held against a bench grinder.
Attachments
-
 scan0007.jpg67.1 KB · Views: 209