Clarinet Cap

Tira

~ Elite 1000 Member ~
Joined
Nov 9, 2006
Messages
1,551
Location
Doylestown, PA
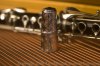
This is a clarinet cap I finished and delivered to NYC last week. It is a brass cap that was engraved and then chromed similar to the motorcycle parts I usually do. The design was interlocking rings which had to be sized as the design moved from the bottom to the top due to the conical nature of the cap. The symbol in the center front is the musician's personal logo. :)
 

Attachments

  • ClarinetCapiGraver.jpg
    ClarinetCapiGraver.jpg
    171.4 KB · Views: 319
  • ClarinetCapiGraver2.jpg
    ClarinetCapiGraver2.jpg
    42.5 KB · Views: 266

BrianPowley

~ Elite 1000 Member ~
Joined
Dec 7, 2006
Messages
1,805
Location
East Springfield, Ohio, United States
Tira, Nice job and a real challenge.
Engraving on a curved surface is very hard to execute. Add to that, it is also tapered and it is also very "THIN" material. It doesn't take much to engrave all the way through and ruin it. (Been there,done that)

You managed to keep the pattern consistent with all those challenges.
Bravo!
 

Andrew Biggs

Moderator
Joined
Nov 10, 2006
Messages
5,034
Location
Christchurch, New Zealand
Beautiful job Tira.

Symetrical and interlocked designs like that are really hard to get looking right and to add to it you've done it on a very complex surface. You really nailed it.

Cheers
Andrew
 

Jim Sackett

Elite Cafe Member
Joined
Mar 17, 2007
Messages
828
Location
Hallock, Minnesota, United States
Nice job Tira

Wow that is an interesting pattern. It had to take a lot of figuring to get the circles on that taper the right size. Very nice! I've thought about trying something similar on an unfinished candy dish lid I have.

Jim Sackett

lid 002.jpg
 

Sam

Chief Administrator & Benevolent Dictator
Staff member
Joined
Nov 6, 2006
Messages
10,491
Location
Covington, Louisiana
curved surfaces and thin, too...nice job Tira. I'll bet it was tough to lay out. / ~Sam
 

Tira

~ Elite 1000 Member ~
Joined
Nov 9, 2006
Messages
1,551
Location
Doylestown, PA
Ranchman, Thermo-lock was my friend on this project. I stuffed the cap full of hot thermo-lock to keep it from deforming and then I made a fixture with more thermo-lock that held the outside of the cap in the vise. It worked well. The only problem I had was that it took almost an hour to dig the thermo-lock out of the inside of the cap when I was done.

Thanks Sam - I did the layout in Adobe Illustrator. The rings were a mathematical progression. It took a long time to layout especially since it was only my second project in AI. I'm much more used to Corel Draw. :)
 

deedubbya

Member
Joined
Feb 18, 2008
Messages
11
Location
Victoria B.C.
What can I say.....it's all been said . Nice job, it can be a bit of a rick making sure the weave is right, Looks great
Congrats!
 

Ranchman

Elite Cafe Member
Joined
Jan 25, 2007
Messages
138
Location
Colorado
Tira,
I'm glad you said you used thermo lock. I have a similar thin walled project and was wondering if thermo would work. I wasn't sure if when it cooled it wouldn't shrink and pull away from the sides. Looks like digging it out will be time consuming but better than crushing or denting the sides.

Thanks,
Jeff
 

KCSteve

~ Elite 1000 Member ~
Joined
Jun 19, 2007
Messages
2,882
Location
Kansas City, MO
In another thread someone mentioned that you can use a light bulb to soften ThermoLoc. When I do something like this I think I'll use a lightbulb or my little heat pen to soften the surface and stick in a handle of some sort. After it cools I'll see if it'll pull out. If not I'll warm it back up (from the top) and see if I can get it to pull out. If I have to pull it out I should use a ThermoLoc handle - that's the one thing that stuff actually sticks to - everything else it just seals up against. Probably have to slide a toothpick along one side to break the vacuum.
 

fegarex

~ Elite 1000 Member ~
Joined
Nov 8, 2006
Messages
2,061
Location
Ludington, MI
Tira,
I was going to reply to this earlier but things happen...
You did a GREAT job on this. I hope people understand just how difficult the design and shape is on that cap. Making the design on a flat is one thing but adding the taper to it..... WOW...
Nice.
 

finn

Elite Cafe Member
Joined
Nov 14, 2007
Messages
100
Location
Ogden Ut
If you have problems with the Thermo Lock and diging it out of thin items .
A much better option is Cerrosafe

Here is a link to a distributor http://www.buffaloarms.com/browse.cfm/4,1143.html
or this link http://www.midwayusa.com/eproductpage.exe/showproduct?saleitemid=462291

With this “Lead” you can melt it in hot water on your stove pore it into your item and it will harden then you engrave your item with out fear of “Denting” and when finished just re heat it in hot water and poor it out. Easy and you can re use it also just like the thermo lock.

tip try it on a junk item first so you can see how it works and if it will warp or streach your item in the hot water.

And you did do a nice job on the engraving !
Keep up the good work.


more instructions on how to use Cerro safe(Click me)
 
Last edited:

jdumars

Member
Joined
Feb 12, 2008
Messages
24
Location
Nashville, Tennessee
Tira, stating the obvious here, but WOW! Awesome! I had a factory-engraved mouthpiece cap from the 20s a few years ago and it was not nearly as nice as yours. Great work as always!
 

Phil Coggan

~ Elite 1000 Member ~
Joined
Apr 2, 2008
Messages
1,147
Location
South Wales
Hi Tira,
Beautiful job, excellent! really well done.....i'm glad I did'nt have to do it!
Just a thought and please forgive me if this sounds crazy, as I know nothing about Thirmo Lock.
If you slide a roll of paper into the cap so that say a quarter of an inch of metal stays exposed, the Thermo will still stop the cap from collapsing with just enough grip on that quarter inch to hold it in, and it would be easier to remove........or are you already doing this, and should I have kept my mouth shut! :eek:

Phil
 

Tira

~ Elite 1000 Member ~
Joined
Nov 9, 2006
Messages
1,551
Location
Doylestown, PA
Phil, Thanks for the comments. :) About the thermo-lock, do you mean to pack the cap with paper up to the last 1/4 inch and then to use the thermo-lock for just the last part? That would have made it much easier to dislodge at the end. I've never done a part as thin and collapsable as the cap so I thought I would have to pack the cap full to prevent vibration and possible compression. Even with the cap full there was a lot of vibration. The brass in the cap was just under .75mm thick. Thanks for the idea - I'll have to try the next one like that!

Jdumars - Thanks! I'm sure you have seen a lot of musical instrument accessories. I've never seen a factory done cap. What was the pattern on that?
 

Phil Coggan

~ Elite 1000 Member ~
Joined
Apr 2, 2008
Messages
1,147
Location
South Wales
Phil, Thanks for the comments. :) About the thermo-lock, do you mean to pack the cap with paper up to the last 1/4 inch and then to use the thermo-lock for just the last part?
No Tira, I mean put the paper in to stop the Thirmo from sticking to the whole cap, ie. slide a thin tube of paper in around the inside except for the last 1/4 inch. The Thermo would still support the thin walls but it would'nt be stuck to them.
What I would do is shape some wood to fit snuggly inside the cap and then epoxy it in, I use a hair dryer when i'm finished to soften the epoxy.

Phil
 
Last edited:

Tira

~ Elite 1000 Member ~
Joined
Nov 9, 2006
Messages
1,551
Location
Doylestown, PA
Aaaahhhhh! Did you just hear the lightbulb go on? :) That's a much better idea than what I did - I'll give it a try on the next one. What type of epoxy do you use that will release with heat? Thanks for the help.
 

Phil Coggan

~ Elite 1000 Member ~
Joined
Apr 2, 2008
Messages
1,147
Location
South Wales
I use Araldite Rapid, I don't know if you've got it over there, I use it on trigger guards pistol caps etc.
I'ts really strong but goes soft with heat.

Phil
 
Last edited:

Latest posts

Sponsors

Top